7
Saving scanned data
Click
and choose [Save]. The dialog appears.
1
If you want to export the data, please refer to the Help screens for Dr. PICZA.
Choose the desired location for saving the file, enter a file name, and click [SAVE].
2
Cutting scan data with the modeling machine to make a 3D object
Click
and choose [Open].
Open the file containing the scan data to be cut.
1
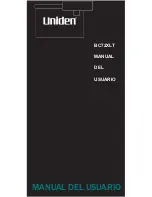
Click
.
MODELA PLAYER starts, and the 3D
data in the file you opened in step 1
appears on screen.
2
Load the material and install the blade on
the modeling machine. For more
information, refer to the manual for your
modeling machine.
3
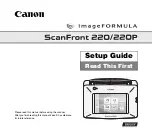
Make the settings for the cutting
conditions. Clicking [
] ad-
vances the setting screens in
sequence from A to D. Make the
settings in order from A to D.
(Clicking A, B, C, or D in the
figure displays the corresponding
setting screen, this should not be
used except when it's necessary to
make settings independently.)
4
Click here to advance to the next settings.
MODELA PLAYER screen
A
B
C
D


