background image


– 2 –


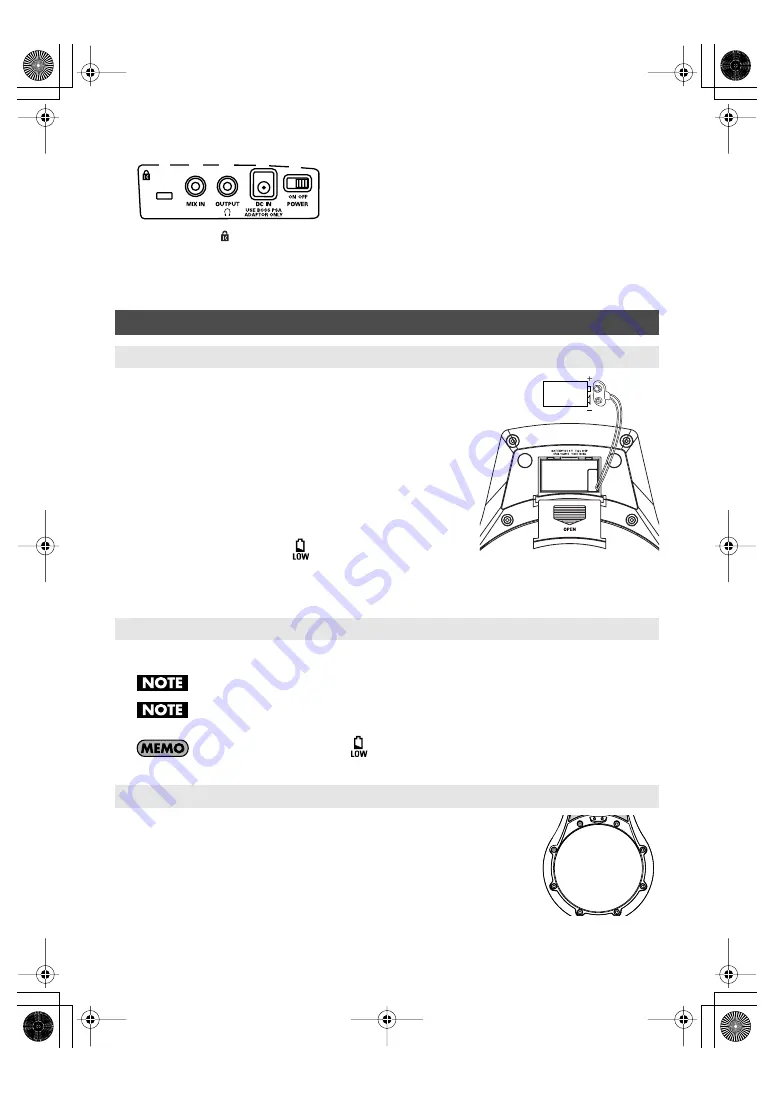
Side Panel


fig.Side


1.


Security Slot (

)


http://www.kensington.com/


2.


MIX IN Jack


For connecting an external audio source 
(CD, MD, etc.) for playing along.


3.


OUTPUT Jack


For headphones, amp, or audio system.


* The RMP-3 outputs sounds in monaural.


4.


AC Adaptor Jack


Connect the AC adaptor (optional) here.


5.


POWER Switch


Turns the power on/off.


fig.BattCase.e_50


1.


Press down and slide off the lid of the battery compartment 
(located on the bottom of the unit).


2.


Connect the snap cord to the battery, and place it inside the 
battery compartment.


* Verify the battery’s polarity (+ versus -).


3.


Securely close the battery cover.


* Do not let the snap cord get caught in the battery compartment lid.


When to Change the Battery


The Battery LOW indicator (

) at the lower left of the 

display begins to flash when the battery power drops. 
Insufficient battery power lowers the volume level of the mini speaker and causes unstable 
operation. Replace the battery as soon as possible.

A BOSS PSA series AC adaptor (sold separately) can be used to power the RMP-3.


Turn off the power before connecting the AC adaptor.

Use only the BOSS PSA-series AC adaptor. Other adaptors may cause malfunction or damage 
to the RMP-3 and must never be used.

The Battery LOW indicator (

) flashes when the battery power drops while the AC 

adaptor is used.


fig.Bolt


BEFORE playing the RMP-3, you must tune the head to your preferred 
playing tension. The head is NOT tuned before shipping.
Always tighten the tuning bolts in the order shown in the figure.


* Failure to adjust the tension may result in damage to the head.

* Head tension may change with extended use. Make adjustments as needed.

5

4

2

1

3


Preparations


Loading the Battery

Connecting the AC Adaptor

Adjusting the Head Tension

Battery 
Snap

9V
Battery

1

7

8

6

3

4

5

2

RMP-3_e 2 ページ 2005年1月14日 金曜日 午前11時13分

Summary of Contents for Rhythm Coach RMP-3

Page 1: ...the head tension Thank you and congratulations on your choice of the Roland RMP 3 Before using this unit carefully read the sections entitled USING THE UNIT SAFELY and IMPORTANT NOTES on another leafl...

Page 2: ...ttery power drops Insufficient battery power lowers the volume level of the mini speaker and causes unstable operation Replace the battery as soon as possible A BOSS PSA series AC adaptor sold separat...

Page 3: ...PHONES OUTPUT Jack 1 Stereo miniature phone type MIX IN Jack 1 Miniature phone type AC Adaptor Jack Power Supply DC 9 V Dry Battery 6F22 1604 9 V type carbon Dry Battery 6LR61 1604A 9 V type alkaline...

Page 4: ...amp or audio system and adjust the volume to the desired level When using with an audio system the PHONES VOLUME level should not be greater than the middle position 12 o clock When Turning Off the P...

Page 5: ...icates fig TimeCheck e 1 Press COACH a few times until is displayed at TIME CHECK 2 Press or to select exercise variation 3 Press START STOP to begin the exercise 4 When finished press START STOP agai...

Page 6: ...on 3 Press START STOP to begin the exercise 4 When finished press START STOP again After starting the click you can set the desired maximum tempo by pressing when it reaches the desired tempo To clear...

Page 7: ...exercise 4 When finished press START STOP again To change the tempo during the exercise press or This function checks the striking force differences between the right and left hands or one hand fig S...

Page 8: ...ty initial setting 6 Setting this to a higher value makes the sensitivity higher 3 When finished press START STOP The setting is stored and then the RMP 3 is in the Metronome mode This restores the RM...

Reviews: