66
4. A wide variety of Operations
4-4 Making Corrections for Printing and Cutting
If the locations of printing and cutting become misaligned, you use the [PRINT-CUT ADJ.] menu item to perform
position alignment.
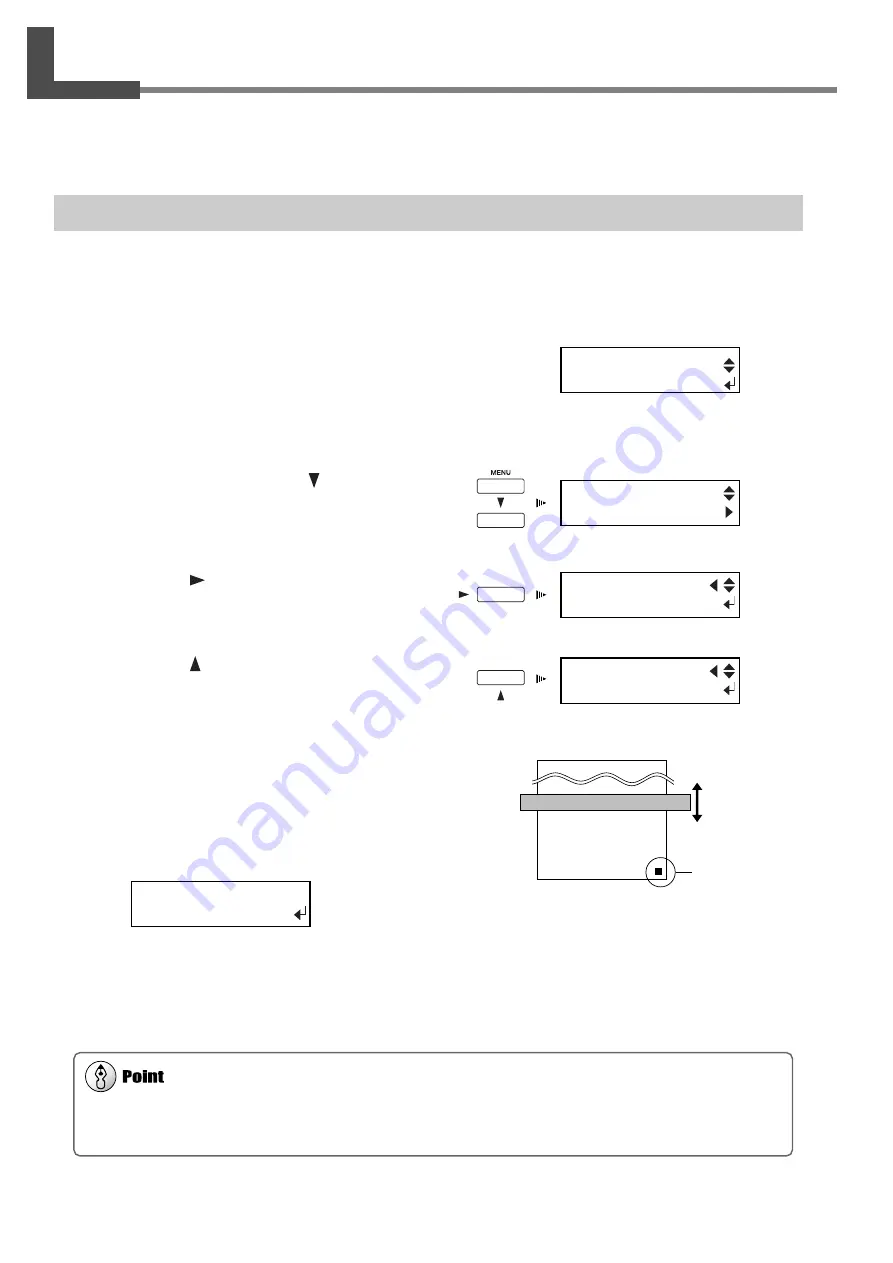
Adjusting Automatically
1
Load a media.
Make sure the [SET UP] light is illuminated.
2
Go to "1-3 Assembling and Installing" and refer
to "Step 8: Match the Machine to the Environ-
ment Where Installed" to execute [ENV.
MATCH].
3
After finishing, press the [ ] key to select
[PRINT-CUT ADJ.].
4
Press the [
] key.
The screen shown in the figure appears.
5
Press the [ ] key to select [AUTO].
6
Press the [ENTER] key to print a square mark
and read it automatically.
Position alignment starts. Printing and reading of the
square marks is performed automatically. When the op-
eration has finished the screen shown in the figure ap-
pears.
7
Press the [ENTER] key.
The display returns to the screen in step 4.
Depending on the type of media, it may not be possible to perform correction automatically. If this happens, read in the offset
value from a test pattern and align the positions for printing and cutting. For information on how to read an offset value from a
test pattern, see the next section, "Adjusting Manually."
Rear
Front
Square mark
MENU
PRINT - CUT ADJ.
PRINT - CUT ADJ.
TEST PRINT
PRINT - CUT ADJ.
AUTO
PRINT - CUT ADJ.
COMPLETED !!
MENU
ENV. MATCH
Summary of Contents for SP-300
Page 48: ...46 2 Basic Operation MEMO ...
Page 58: ...56 3 Performing Output MEMO ...
Page 93: ...91 6 About the Menus This chapter provides detailed item about the operation menus ...
Page 109: ...107 8 Appendix ...
Page 115: ...R3 031201 ...


