11
TD-6V
TEST MODE
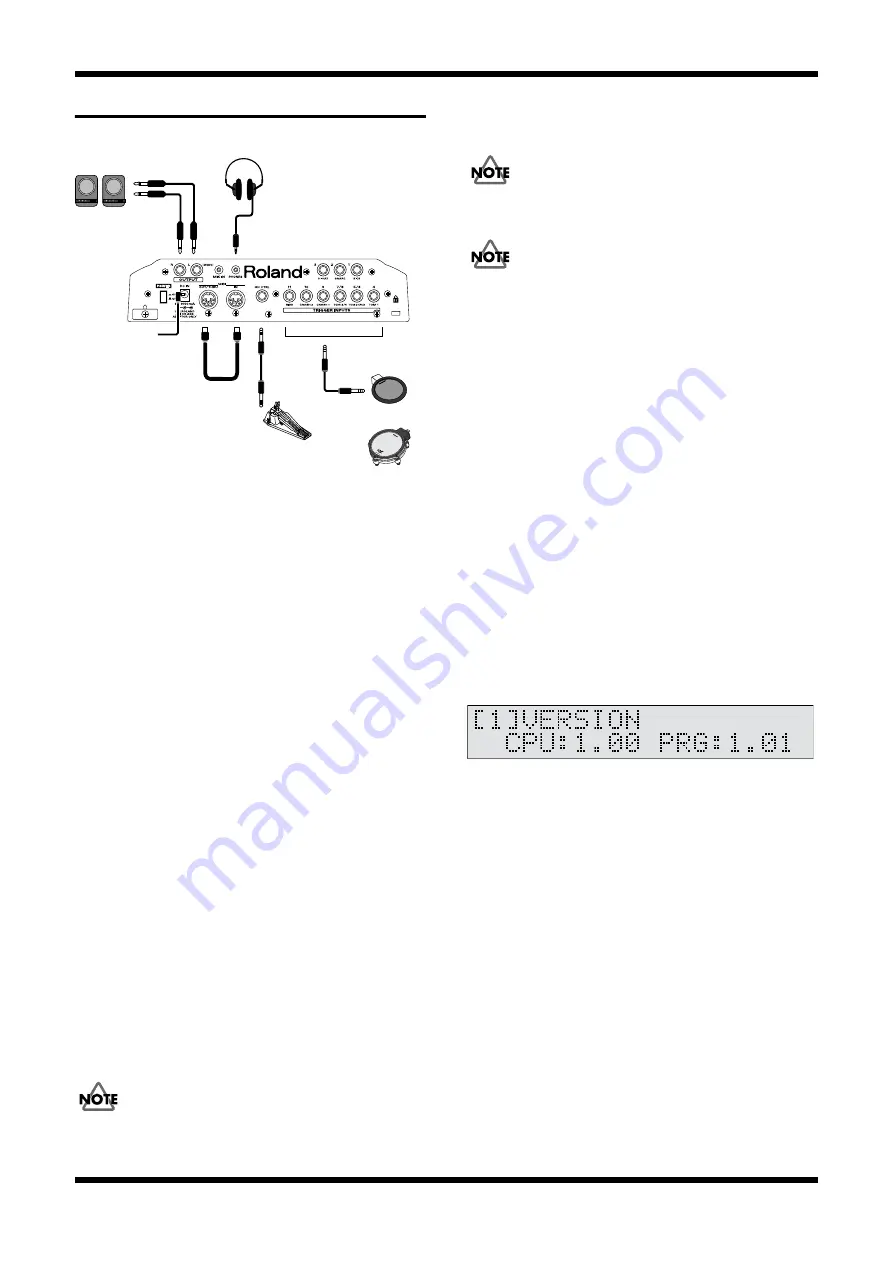
fig.setsuzoku
Test items
1.Version Test
2.Device Test
3.MIDI Test
4.Switch/LED Test
5.LCD Test
6.Hi-Hat Pedal Test
7.Trigger Test 1(Head Piezo & Rim Switch)
8.Trigger Test 2(Rim Piezo)
9.Mix In Test
10.Sound Test
11.Effect Test
12.Factory Reset
Required items
• MIDI Cable
• Hi-Hat Control Pedal (FD-8, FD-7 and FD-6)
• PD-8 or PD-7 (Pad with a rim switch)
• PD-120 or PD-80RW
• Oscillator or audio device (synthesizer etc.)
• Headphones
• Powered Monitor Speakers x 2
Entering test mode
1.
Connect the AC adaptor.
Connect the hi-hat control pedal.
2.
While holding down [REC] and [PLAY] button, turn on the power.
Continue holding them until the display indicates “WELCOME TO TD-
6V...”
3.
Press [EXIT] button.
4.
Press [ENTER] button.
When performing the HI-HAT Pedal Test, connect the hi-hat control pedal
before turning the power on.
Also do not press the pedal until the display indicates “WELCOME TO TD-
6V...”
If turn on the power without connecting the hi-hat pedal or press the pedal
before the display indicates “WELCOME TO TD-6V...,” the HI-HAT Pedal Test
will produce a result of NG.
If you press a different switch, or if you press the switches in the wrong order,
you will not enter test mode.
Perform the procedure from the beginning.
When you enter test mode, the contents of user memory will be erased.
Before you enter test mode, use bulk dump to make a backup of the user
memory.
Before exiting test mode, be sure to perform Factory Reset.
If you exit test mode without performing the Factory Reset, an error of
“BACKUP NG!” may appear the next the [power] is turned on in normal
mode.
Basic procedure for test mode
If a test result is ‘OK’ and you wish to proceed to the next item, press [>]
button.
For several of the tests, you will automatically advance to the next test after a
result of ‘OK’.
If a test result is ‘NG’, or if you wish to halt during a test and proceed to the
next test, hold down [SHIFT] and press [>] button.
To return to the previous test, press [<] button.
Proceeding through Test mode
1.Version Test
1.
Few seconds will be required before the display appears.
The checksum is being calculated.
2.
Verify the software version.
fig.test01
The display will show the following items.
• CPU (CPU Internal ROM) Version
• PRG (Flash Memory) Version
3.
Press [>] button to proceed to the next test.
2.Device Test
Check items
1.CPU Internal ROM: verify checksum
2.Program ROM: verify checksum
3.SRAM: write/read
4.XP Chip: write/read
5.Effect DRAM: read
6.Wave ROM: read
7.Backup Battery: battery voltage (2.8V -- 3.5V)
8.Trigger Noise: trigger noise
MIDI Cable
AC Adaptor
Speakers
PD-80RW or PD-120
PD-8 or PD-7
FD-8 or FD-7, FD-6
R
L
Stereo headphones
Summary of Contents for TD-6V
Page 3: ...3 TD 6V...
Page 4: ...4 Feb 2004 LOCATION OF CONTROLS fig panel 1 2 3 4 12 5 6 7 8 9 11 10...
Page 6: ...6 Feb 2004 EXPLODED VIEW fig bunkai...
Page 17: ...18 Feb 2004 CIRCUIT BOARD MAIN fig main comp View from components side...
Page 18: ...19 TD 6V fig main foil View from foil side...
Page 24: ...30 Feb 2004 CIRCUIT BOARD PANEL fig panel comp View from components side...


