34
Audio Operations
Adjusting the Volume Balance of Input Audio
You can adjust the input sensitivity, sound position, and volume balance of audio input to the VR-3EX.
NOTE
Lowering the [MAIN] fader all the way results in no audio output from the output connectors assigned to the MAIN bus (p. 39).
Adjusting the Input Sensitivity
This adjusts the input sensitivity of source devices (such as
microphones and audio mixers) connected to AUDIO INPUT
connectors 1 through 4 on the side panel.
* Operate the knob and fader for the channel corresponding to
the input connector.
1.
Turn the [GAIN] knob all the way counterclockwise to turn
down the input sensitivity.
2.
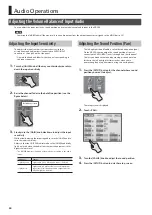
Raise the channel fader to the bold line position (see the
figure below).
Bold line position
3.
Slowly turn the [GAIN] knob clockwise to adjust the input
sensitivity.
While actually playing the incoming audio, turn the [GAIN] knob to
raise the input sensitivity.
Adjust so that the SIG/PEAK indicator above the [GAIN] knob briefly
lights up in red when the audio from the source equipment is at its
highest volume level.
•
The SIG/PEAK indicator lights up as shown below according to the audio
input.
Indicator
Status
Lighted green
Lights up in green when audio input is detected.
Lighted red
Lights up in red when volume exceeds maximum
input level. If this happens, audio output from the
VR-3EX might be distorted.
Adjusting the Sound Position (Pan)
The left-right position of audio is called the sound position (pan).
On the VR-3EX, you can adjust the sound position of sources
connected to AUDIO INPUT jacks 1 through 4 on the side panel.
This lets you broaden the sound by moving its sound position
farther to the left and right at times such as when you’re
transmitting feed of a performance using two microphones.
1.
Press the [SETUP] button for the channel whose sound
position you want to adjust.
The setup screen is displayed.
2.
Touch <PAN>.
3.
Turn the [VALUE] knob to adjust the sound position.
4.
Press the [SETUP] button to quit the setup screen.


