background image

Actioncam

7s Plus

BEDIENUNGSANLEITUNG 

IN DEUTSCH


USER GUIDE


IN ENGLISH

Touch 

Display

www.

rollei

.de

Summary of Contents for 710458

Page 1: ...Actioncam 7s Plus BEDIENUNGSANLEITUNG IN DEUTSCH USER GUIDE IN ENGLISH Touch Display www rollei de ...

Page 2: ...u 6 Erste Schritte 6 Modi der Kamera 7 Selfie Modus Wechsel zum Front Display 7 Touch Funktion 8 Tastenfunktion 9 Webcam Funktion 15 Anschluss eines externen Monitors 15 Fernsteuerung 15 Speicherort Speicherkarten 16 WiFi Einstellung Bedienung per App 16 Firmware Updates 17 Entsorgung 17 Sicherheitshinweise 18 Konformität 20 User Guide in English 21 ...

Page 3: ...Sie ihnen diese Anleitung zur Verfügung Wenn Sie das Gerät an Dritte weitergeben gehört diese Anleitung zum Gerät und muss mitgeliefert werden Zeichenerklärung Die folgenden Symbole werden in dieser Bedienungsanleitung auf der Kamera oder auf der Verpackung verwendet Mit diesem Symbol gekennzeichnete Produkte erfüllen alle maßgeblichen Gemeinschaftsvor schriften des Euro päischen Wirtschaftsraums ...

Page 4: ...deo mp4 H 264 Anschlüsse micro USB 2 0 micro HDMI Stativgewinde Fernbedienung 2 4 GHz Fernbedienung inklusive WiFi IEEE 802 11 b g n 2 4 GHz Aufnahmedauer Bis zu 75 Minuten bei voll aufgeladenem Akku 4K Stromversorgung Wechselbarer Lithium Ionen Akku 3 7 V 850 mAh 3 145 Wh Betriebstemperatur 20 C bis 40 C zur Verwendung in tropischem Klima geeignet Abmessungen Gewicht 60 x 42 x 32 mm ca 61 g 45 g ...

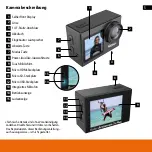
Page 5: ...ldschirm Micro HDMI Steckplatz Micro SD Steckplatz Micro USB Steckplatz Integriertes Mikrofon Betriebsanzeige Ladeanzeige 1 2 3 4 5 6 7 8 9 10 11 14 12 15 13 12 13 10 11 8 9 7 6 5 1 2 3 4 14 15 Technische Details sind ohne Vorankündigung änderbar Druckfehler und Irrtümer vorbehalten Das Reproduzieren dieser Bedienungsanleitung auch auszugsweise ist nicht gestattet ...

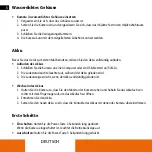
Page 6: ...nen Computer oder ein USB Netzteil an 5V 2A 2 Die Ladestatusleuchte leuchtet auf während der Akku geladen wird 3 Die Ladeanzeige erlischt wenn der Akku vollständig geladen ist Wechseln des Akkus 1 Halten Sie die Kamera so dass Sie den Monitor der Kamera sehen und hebeln Sie das Akkufach von rechts mit dem Fingernagel auf um das Akkufach zu öffnen 2 Entnehmen Sie den Akku 3 Setzen Sie den neuen Akk...

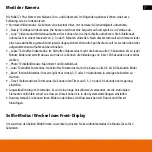
Page 7: ...amera alle 0 5 Sekunden bis zu jeder Minute Bilder und erstellt daraus ein Video Sie können die Videolänge von 6 bis 120 Sekunden oder endlos wählen Photo Einzelbildmodus Man nimmt ein Einzelbild auf Auto Zeitraffer Fotomodus Im Zeitraffer Fotomodus macht die Kamera alle 0 5 bis 60 Sekunden Bilder Burst Serienbildmodus Dies ermöglicht es Ihnen 3 5 oder 10 Aufnahmen in wenigen Sekunden zu machen Ti...

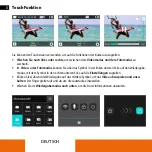
Page 8: ... oder Fotomodus können Sie über das Symbol in der linken unteren Ecke auf den Wiedergabe modus mit dem Symbol in der rechten unteren Ecke auf die Einstellungen zugreifen Klicken Sie während der Wiedergabe auf das mittlere Symbol um das Video abzuspielen und anzu halten Der Finger gleitet auf und ab um die Lautstärke einzustellen Wischen Sie im Wiedergabemodus nach unten um die Datei Informationen ...

Page 9: ...Um die Display Beschriftung aus oder wieder einzublenden berühren Sie das Display kurz mittig Tastenfunktion Übersicht Menü Schalten Sie die Kamera ein und drücken Sie kurz die Modus Taste um auf das folgende Kameramenü zu zugreifen und die Abwärts Taste um die verschiedenen Modi zu durchlaufen Um einen Modus auszuwählen drücken Sie die Auswahltaste 1 Modus Menü Video oder Foto 2 Wiedergabe von Vi...

Page 10: ... Sie die Auswahltaste drücken Zum Verlassen drücken Sie die Modus Taste Um die Foto und Videomodi direkt zu durchlaufen drücken Sie die Abwärts Taste 1 1 Videomodus Drücken Sie die Auslösertaste um die Aufnahme zu starten Das Kamerasymbol auf dem Bildschirm wird während der Aufnahme rot Drücken Sie die Auslösertaste erneut um die Aufnahme zu beenden 1 2 Fotomodus Drücken Sie die Auslösertaste um e...

Page 11: ...otos zu wechseln und drücken Sie dann die Auslöser Auswahltaste um die Videos wiederzugeben und anzuhalten Drücken Sie die Modus Taste um zurückzukehren 3 Systemeinstellungen Im Modus Systemeinstellung können Sie die Einstellungen für das System vornehmen und verschiedene Parameter für die Kamera auswählen Mit der Modus Taste wechseln Sie die Registerkarte mit der Abwärts Taste durchlaufen Sie die...

Page 12: ...winkel Objektiv entstehen nicht in jedem Videomodus einstellbar Weißabgleich Stellen Sie verschiedene Weißabgleiche für optimale Aufnahmen ein Belichtungskorrektur Diese können Sie zwischen 3 Bild wird dunkler und 3 Bild wird heller einstellen Videolänge der Timelapse Aufnahme Hier stellen Sie Ihre Aufnahme Dauer im Zeitraffermodus ein nur im Lapse Modus verfügbar Messmodus Hier können Sie einstel...

Page 13: ...verschiedene Weißabgleiche für optimale Aufnahmen ein Belichtungskorrektur Diese können Sie zwischen 3 Bild wird dunkler und 3 Bild wird heller einstellen Messmodus Hier können Sie einstellen auf welchen Bildbereich sich die Kamera fokussiert z B an verschiedenen Stellen in der Mitte an einem Punkt oder in einer Matrix Konturenschärfe Die Schärfe können Sie zwischen niedrig mittel und hoch einstel...

Page 14: ...irmschoner Hier stellen Sie ein dass sich das Display automatisch nach einer bestimmten Zeit ausschaltet Automatische Abschaltung Hier stellen Sie ein dass sich die Kamera automatisch nach einer bestimmten Zeit ausschaltet Ton Hier können Sie den Verschluss den Start und den Tastenton ein und ausschalten sowie dessen Lautstärke variieren Sprache Verändern Sie hier die Sprache des Kameramenüs Datum...

Page 15: ...rd Außerdem hängt die Kompatibilität der Kamera als Webcam von dem verwendeten Programm ab Anschluss eines externen Monitors Sie können über den micro HDMI Anschluss einen externen Monitor anschließen Als Auflösung können Sie alle Auflösungen der Kamera verwenden solange der Monitor diese unterstützt Hinweis Die Kamera unterstützt kein Live Online Streaming Fernsteuerung Mit der mitgelieferten Fer...

Page 16: ...hrem Smartphone verbinden Schalten Sie die Kamera an und drücken Sie für 3 Sekunden auf die Abwärts Taste oder wischen Sie auf dem Touchscreen nach unten um über die Verknüpfung das WiFi anzuschalten oder öffnen Sie die Systemeinstellungen um dort das WLAN zu aktivieren Das WiFi der Kamera wird aktiviert die WiFi Anzeige leuchtet und die WiFi In formationen Netzwerkname und Netzwerkpasswort 123456...

Page 17: ...ichen Möglichkeiten zum Sammeln von Papier Pappe und leichten Verpackungen Anwendbar in der Europäischen Union und anderen europäischen Staaten mit Systemen zur getrennten Sammlung von Wertstoffen Geräte die mit diesem Symbol gekennzeichnet sind dürfen nicht über den Hausmüll entsorgt werden Sie sind gesetzlich dazu verpflichtet Altgeräte getrennt vom Hausmüll zu entsorgen Informationen zu Sammels...

Page 18: ...werden Das Verpackungsmaterial ist kein Spielzeug Lassen Sie Kinder nicht mit der Verpackungsfolie spielen Sie können sich beim Spielen darin verfangen und ersticken Beaufsichtigen Sie Kinder um sicherzustellen dass sie nicht mit Kleinteilen Schrauben Dübel Speicher karte Batterien Akkus spielen Wenn Sie vermuten dass ein Kleinteil verschluckt wurde suchen Sie sofort einen Arzt auf Lagern Sie Klei...

Page 19: ...as Produkt längere Zeit nicht verwenden um Schäden durch einen auslaufenden Akku zu verhindern Verwenden Sie das Produkt nur in einem Temperaturbereich zwischen 20 C und 40 C Das Gerät eignet sich zur Verwendung in tropischem Klima Modifizieren Sie das Gerät nicht Öffnen Sie niemals das Gehäuse sondern überlassen Sie die Reparatur Fachkräften Wenden Sie sich dazu an eine Fachwerkstatt Bei eigenstä...

Page 20: ...oncam 7s Plus der Richtlinie 2014 53 EU entspricht 2011 65 EG RoHs Richtlinie 2014 53 EU RED Richtlinie Der vollständige Text der EU Konformitätserklärung ist unter der folgenden Internetadresse verfügbar www rollei de egk ac7splus Rollei GmbH Co KG In de Tarpen 42 D 22848 Norderstedt Deutschland ...

Page 21: ... Battery 25 Getting Started 25 Modes of the camera 26 Selfie mode change to front display 26 Touch function 27 Button function 28 Webcam function 34 Connecting an external monitor 34 Remote control 34 Storage location memory cards 35 WiFi setting operation via App 35 Firmware updates 36 Disposal 36 Safety instructions 37 Conformity 39 ...

Page 22: ...perating instructions together with the device for future use If other people use this device make this manual available to them If you pass on the device to a third party this manual belongs to the device and must be supplied with it Explanation of symbols The following symbols are used in this manual on the camera or on the packaging Products marked with this symbol comply with all relevant comm...

Page 23: ...o mp4 H 264 Connections micro USB 2 0 micro HDMI tripod thread Remote control 2 4 GHz remote control included WiFi IEEE 802 11 b g n 2 4 GHz Recording time Up to 75 minutes with fully charged battery 4K Power supply Exchangeable lithium ion battery 3 7 V 850 mAh 3 145 Wh Operating temperature 20 C to 40 C suitable for use in tropical climate Dimensions Weight 60 x 42 x 32 mm approx 61 g 45 g with ...

Page 24: ... Battery compartment Built in loudspeaker Down button Mode button Power shutter select button Touch screen Micro HDMI Slot Micro SD slot Micro USB Slot Integrated microphone Power indicator Charge indicator 1 2 3 4 5 6 7 8 9 10 11 14 12 15 13 12 13 10 11 8 9 7 6 5 1 2 3 4 14 15 ...

Page 25: ...A 2 The charging status light turns on while the battery is charging 3 The charging status light turns off when the battery is fully charged Changing the Battery 1 Hold the camera so that you can see the monitor of the camera and lever the battery compartment from the right with your fingernail to open the battery compartment 2 Remove the battery 3 lnsert the new battery so the contacts line up wi...

Page 26: ...e the camera takes pictures every 0 5 seconds to every minute and creates a video from them You can select the video length from 6 to 120 seconds or endless Photo single frame mode You take a single picture Auto time lapse photo mode In time lapse photo mode the camera takes pictures every 0 5 to 60 seconds Burst continuous photo mode This allows you to take 3 5 or 10 pictures in a few seconds Tim...

Page 27: ... mode In Video or Photo mode the icon in the lower left corner allows you to access Playback mode and the icon in the lower right corner allows you to access the settings During playback click the centre icon to play and pause the video Slide your finger up and down to adjust the volume In playback mode wipe down to view the file information ...

Page 28: ...utton To hide or show the display label briefly touch the centre of the display Button function Overview Menu Turn the camera on and briefly press the mode button to access the following camera menu and the down button to scroll through the different modes To select a mode press the Select button 1 Mode Menu Video or Photo 2 Playback video and photo 3 System Settings 4 Return to previous screen To...

Page 29: ...on by pressing the selection button To exit press the the mode button To scroll through the photo and video modes directly press the down button 1 1 Video mode Press the Shutter button to start recording The camera icon on the screen turns red during recording Press the Shutter button again to stop recording 1 2 Photo mode Press the shutter button to capture an image 1 2 1 1 ...

Page 30: ...n button to switch videos or photos and then press the shutter select button to play and pause the videos Press the mode button to return 3 System Settings In the System Setting mode you can enter the settings for the system and choose different parameters for the camera Use the mode button to change the tab the down button to scroll through the function and the select button to select a function ...

Page 31: ... the image caused by the wide angle lens not adjustable in every video mode White balance Adjust different white balances for optimal results Exposure compensation You can set this between 3 image becomes darker and 3 image becomes lighter Video length of timelapse recording Here you can set the duration of your recording in timelapse mode only available in lapse mode Measurement mode Here you can...

Page 32: ...in timer mode White Balance Set different white balance settings for optimal shooting Exposure compensation You can set this between 3 image becomes darker and 3 image becomes lighter Metering mode Here you can set the image area on which the camera focuses e g at different points in the centre at a point or in a matrix Contour sharpness You can set the sharpness between low medium and high Shutte...

Page 33: ...ing light is on or off during operation Screen saver Here you can set the display to switch off automatically after a certain time Automatic switch off Here you can set the camera to switch off automatically after a certain time Sound Here you can turn the shutter sound start sound and button sound on and off and vary the volume Language Change the language of the camera menu here Date Time Set th...

Page 34: ...ction Also the compatibility of the camera as a webcam depends on the program you are using Connecting an external monitor You can connect an external monitor via the micro HDMI connector You can use any resolution of the camera as long as the monitor supports it Note The camera does not support live online streaming Remote control You can operate the Actioncam remotely with the supplied remote co...

Page 35: ... your smartphone via the built in WiFi function Turn the camera on and press the down button for 3 seconds or wipe down on the touch screen to turn on WiFi via the shortcut or open the system settings to activate WiFi there The WiFi of the camera is activated the WiFi indicator lights up and the WiFi information network name and network password 1234567890 appears on the camera monitor Then connec...

Page 36: ...als Applicable in the European Union and other European countries with systems for the separate collection of recyclable materials Devices that are marked with this symbol must not be disposed of with household waste You are legally obliged to dispose of old devices separately from to dispose of household waste Information on collection points that accept old appliances free of charge can be obtai...

Page 37: ...is not a toy Do not let children play with the packaging material They can get caught in it and suffocate while playing Supervise children to ensure that they do not play with small parts screws plugs memory card batteries rechargeable batteries If you suspect that a small part has been swallowed consult a doctor immediately Store small parts so that they are inaccessible to children and animals C...

Page 38: ... the product for a long period of time to prevent damage from a leaking battery Only use the product in a temperature range between 20 C and 40 C The product is suitable for use in a tropical climate Do not modify the product Never open the casing leave the repair to qualified personnel Contact a specialist workshop for this purpose Liability and warranty claims are excluded in the event of repair...

Page 39: ...am 7s Plus complies with the directive 2014 53 EU 2011 65 EC RoHs Directive 2014 53 EU RED Directive The complete text of the EU Declaration of Conformity can be downloaded at the following Internet address www rollei com egk ac7splus Rollei GmbH Co KG In de Tarpen 42 D 22848 Norderstedt Germany ...

Page 40: ...en 42 22848 Norderstedt Service Hotline 49 40 270750270 www rollei com Rollei Remote Control for Actioncam 7s Plus Rollei GmbH Co KG In de Tarpen 42 D 22848 Norderstedt Battery 1x 3 V CR 2032 Made in China rollei_de rollei foto de ...

Reviews: