background image

RIDING YOUR E-BIKE

Read the following information before attempting to ride your Roller-Pro Rider E-Bike.

A helmet as well as other protective gear must be worn at all times

The Roller-Pro Rider E-Bike supports up to 120 kg. Do not carry passengers.

Only operate the Roller-Pro Rider E-Bike where permitted. Local laws may restrict where you 

may ride.

The Roller-Pro Rider E-Bike contains a motor and may be classified as a motor vehicle under 

local laws in your area. It is your responsibility to abide by any local laws restricting how or 

where you may ride. 

The display shows how much charge is left in the battery. Make sure the battery is at full power 

before heading out on a long-distance ride.

How to ride?

Note:

Before starting to ride, make sure you are well equipped and protected. The   Roller-Pro Rider 

E-Bike is placed on a flat level surface, is charged and all parts are well assembled. Follow the 

below steps. For your safety, please read this entire section before attempting to ride.

Note: Make sure to decelerate on time and always stop a few meters before your actual stop point 

for safety.

Make sure to decelerate on time and always stop a few meters before your actual stop point for safety.

Press the bell button to attract the attention of the person or vehicle in front of you and to indicate 

them of your presence and to avoid any accidents

Press the light button on the control panel in order to turn on the light and easily ride around during 

the darker hours of the day.

Practice until you are comfortable with using all of the E-Bikes functions. Check the following tips 

below.

Step 1. 

 Carefully step on with one foot and place yourself on the saddle. Find a good relaxed       

              comfortable position. Grab both handles.

Step 2.

  Start your Roller-Pro Rider E-Bike by pressing the power button. Keep one foot on the 

              ground and press the throttle very slowly to begin accelerating. Use the handles to steer.

Step 3.

  Continue accelerating by pushing the throttle.

Step 4.

  To stop, release the throttle and use the handbrake, to gradually come to a stop then step 

              off the E-Bike one foot at a time. Be extra cautious when riding for the first time until you 

              are familiar with the Rider. 

Step 5.

  To turn the E-Bike off, remain at a complete stop for a few seconds. Then press and hold 

              the power button for 3~5 seconds until the display turns off. 

PRACTICING GUIDELINES

Avoid wearing anything that can drape over or get caught into/under the wheels. Wear 

closed-toe, flat shoes to maintain flexibility and stability.

Practice until you can easily get on, move forward, turn, stop, and dismount with ease.

The E-Bike is designed to handle inclines up to 15º. The inclination will depend on the battery 

status, weight, the terrain type on which you are riding. Riding over steep inclines is not 

recommended.

The Roller-Pro Rider E-Bike is designed for relatively smooth, flat terrain.

Until you are comfortable using the E-Bike, avoid operating in places with slopes, pedestrians, or 

obstacles.

8

Summary of Contents for Rider E-Bike

Page 1: ...USER MANUAL E BIKE RP RIDER RIDER...

Page 2: ...e your safety and the safety of others please read and follow the guidelines in this user manual carefully and thoroughly before and during riding If you have any questions regarding the Roller Pro Ri...

Page 3: ...ot use the product if your weight less than 20Kg or exceed 120 Kg Do not attempt to open or modify your Rider E Bike as doing so will void the manufacturer s warranty and could lead to serious injurie...

Page 4: ...ure that the device is being used as explained in the user manual Risk of shock Do not allow water and or liquids to come in contact with any part of the product Use dry non abrasive cloth to remove d...

Page 5: ...bility to dispose of their waste equipment properly in accordance with local regulations and laws For additional information about where you should drop off your batteries and electrical or electronic...

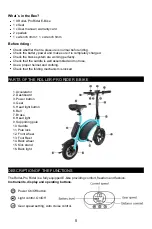
Page 6: ...se a proper helmet and clothing Check that the folding mechanism is locked PARTS OF THE ROLLER PRO RIDER E BIKE DESCRIPTION OF THE FUNCTIONS 1 Accelerator 2 Dashboard 3 Power button 4 Gear 5 Head ligh...

Page 7: ...r Press the speed button to switch between speed 1 2 and 3 Each gear has a different speed The 1st speed level allows a maximum speed of 15 km h The 2nd speed level allows a maximum speed of 20 km h T...

Page 8: ...efore charging make sure your E bike Rider is turned off If charging for the first time make sure the first charge is at least 3 hours Do not under any circumstances use the E Bike while it is connect...

Page 9: ...e control panel in order to turn on the light and easily ride around during the darker hours of the day Practice until you are comfortable with using all of the E Bikes functions Check the following t...

Page 10: ...charging port During cleaning keep the charging port dry Do not immerse the e bike in water which will cause permanent damage Use dry non abrasive cloth to gently remove debris or dust Never use alcoh...

Page 11: ...15 EN6100 3 2 2014 EN6100 3 3 2013 LVD Standard Directive 2014 35 EU MD Standard Directive 2006 42 EC EN60335 1 2012 A11 2014 A13 2017 EN60204 1 2006 A1 2009 AC2010 ROHS Standard Directive 2011 65 EU...

Page 12: ...MANUAL DE USUARIO RP RIDER E BIKE RIDER 11...

Page 13: ...guridad de los dem s lea y siga las directrices de este manual del usuario detenidamente y en profundidad antes y durante la conducci n Si tiene preguntas acerca de la bicicleta el ctrica Roller Pro R...

Page 14: ...utilizar rodilleras coderas guantes No utilice el producto si su peso es inferior a 20 kg o superior a 120 kg No intente abrir o modificar su bicicleta el ctrica Rider ya que esto anular la garant a...

Page 15: ...spositivo se est utilizando como se explica en el manual del usuario Riesgo de descarga el ctrica No permita que el agua y o los l quidos entren en contacto con ninguna parte del producto Use un pa o...

Page 16: ...acuerdo con las regulaciones y leyes locales Para obtener m s informaci n sobre d nde debe eliminar sus bater as y desechos el ctricos o electr nicos p ngase en contacto con su oficina local o region...

Page 17: ...egado est bloqueado PIEZAS DE LA BICICLETA EL CTRICA ROLLER PRO RIDER DESCRIPCI N DE LAS FUNCIONES 1 Acelerador 2 Pantalla LCD 3 Bot n de encendido 4 Marcha 5 Bot n de la luz 6 Timbre 7 Freno 8 Luz 9...

Page 18: ...n de velocidad para alternar entre la velocidad 1 2 y 3 Cada marcha tiene una velocidad diferente El 1r nivel de velocidad permite una velocidad m xima de 15 km h El 2 nivel de velocidad permite una v...

Page 19: ...r a Antes de cargar compruebe que la bicicleta el ctrica Rider est apagada Si la carga por primera vez aseg rese de que la carga dure al menos 3 horas No utilice la bicicleta el ctrica mientras est co...

Page 20: ...de la luz en el panel de control para encenderla y montar f cilmente durante las horas de oscuridad Practique hasta que se encuentre c modo usando todas las funciones de la bicicleta el ctrica Consult...

Page 21: ...de carga Mantenga el puerto de carga seco durante la limpieza No sumerja la bicicleta el ctrica en agua ya que causar a da os permanentes Utilice un pa o seco y no abrasivo para eliminar de forma suav...

Page 22: ...EN6100 3 2 2014 EN6100 3 3 2013 Normativa LVD Directiva 2014 35 UE Normativa MD Directiva 2006 42 CE EN60335 1 2012 A11 2014 A13 2017 EN60204 1 2006 A1 2009 AC2010 Normativa ROHS Directiva 2011 65 UE...

Page 23: ...partes compradas a empresas ajenas a Roller Pro y que se hayan a adido a posteriori en nuestros productos T rminos y Condiciones Generales El Real Decreto Legislativo 1 2007 de 16 de noviembre por el...

Page 24: ...ginalmente fue dise ado y producido o en su caso destinado a la venta Dicho producto o cualquiera de sus identificativos n mero de serie etc hayan sido total o parcialmente abiertos montados desmontad...

Reviews: