background image

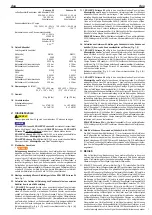
1.7.  Weight 

Scirocco 50 

Scirocco 80 


21 kg (46 lbs) 

51 kg (112 lbs)

1.8.  Noise information


Work place-related


Emission value 

L

pA

 = 57 dB (A) 

L

pA

 = 63 dB (A) 


K = 3 dB (A) 

K = 3 dB (A)

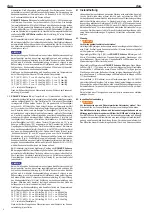
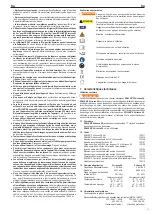
2. Start-up


CAUTION

CAUTION  


Transport weights above 35 kg must be carried by at least 2 persons.


NOTICE

NOTICE


Only transport/store the 

ROLLER’S Scirocco 50, ROLLER’S Scirocco 80 in 

an upright position. Do not lie it on its side! Leave the 

ROLLER’S Scirocco 

50, ROLLER’S Scirocco 80 to stand for at least one hour before putting into 

operation.

 Operate/store 

ROLLER’S Scirocco 50 with R-290 refrigerant only in adequately 

ventilated rooms with a 

minimum size of 9 m

2

.

 Operate/store 

ROLLER’S Scirocco 80 with R-290 refrigerant only in adequately 

ventilated rooms with a 

minimum size of 14 m

2

.

2.1.  Electrical connection


WARNING

WARNING


Caution: Mains voltage present! Before connecting the device or the conden-

sation tank with pump or the operating hours counter and electricity meter, check 

whether the voltage given on the rating plate corresponds to the mains voltage. 

Only connect devices of protection class I to a socket/extension lead with a 

functioning protective contact. On building sites, in a wet environment, indoors 

and outdoors or under similar installation conditions, permanently connected 

to a permanently installed pipe, only operate the device or the condensation 

tank with pump with a fault current protection switch (RCD) which interrupts 

the power supply as soon as the leakage current to earth exceeds 30 mA for 

200 ms.

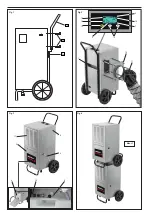
2.2.  Fitting the handle to the tubular steel frame of the ROLLER’S Scirocco 80


See Fig. 1.

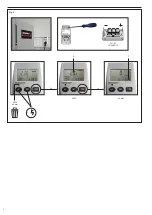
2.3.  Installation of the device with draining of the condensation into an external 

tank or into a drain pipe

2.3.1. Install 

ROLLER’S Scirocco 50  on a level base in the centre of the room  with 

minimum size of 9 m

2

 to be dehumidified. The minimum distance from the 

wall must be 200 mm. Close all doors and windows to the outside. Unscrew 

the union nut (Fig. 6 (19). Remove the plug (20). Push the condensation draining 

hose (4) through the hole of the union nut until the hose flange is touching. 

Screw on and tighten the union nut. Feed the condensation draining hose (4) 

into a suitable tank or lengthen the hose which feeds directly into a drain pipe. 


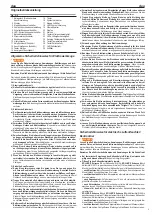
Operating hours counter (Fig. 9 (7)) and electricity meter (Fig. 9 (8)) (accessory 

Art No. 132132).

2.3.2. Install 

ROLLER’S Scirocco 80  on a level base in the centre of the room  with 

minimum size of 14 m

2

 to be dehumidified. The minimum distance from the 

wall must be 200 mm. Close all doors and windows to the outside. Remove the 

detachable power cable from the tray (1) and connect it. The backlight of the 

display (2) comes on briefly. Press down the flap on top of the condensation 

tank (3) to open it. Push the hose for draining the condensation (4) through the 

hole in the housing from the inside to the outside. Feed the condensation draining 

hose (4) into a suitable tank or lengthen the hose which feeds directly into a 

drain pipe. Set the condensation tank switch (5) in the direction of the symbol 

showing the crossed out tank. Close the flap of the condensation tank (3).


ROLLER’S Scirocco 80 is equipped with an operating hours counter (7) and, 

as of date of manufacture 2020 (rating plate) with an MID-conform electricity 

meter (8).

2.4.  Install the device with condensation draining into the condensation tank 

(9) or into the condensation tank with pump (Fig. 7, 8)

2.4.1. Install 

ROLLER’S Scirocco 50  on a level base in the centre of the room  with 

minimum size of 9 m

2

 to be dehumidified. The minimum distance from the 

wall must be 200 mm. Close all doors and windows to the outside. Check 

whether the union nut (Fig. 6 (19)) and plug (20) are installed. Install if neces-

sary. When using the condensation tank with pump Scirocco 50 (accessory 

Art. No. 132129), fasten the condensation draining hose to the nozzle (Fig. 7 

(21)) of the pump. Remove the condensation tank (9). Push in the condensation 

tank with pump Scirocco 50. Do not allow the condensation pump to run dry.


Operating hours counter (Fig. 9 (7)) and electricity meter (Fig. 9 (8)) (accessory 

Art No. 132132).

2.4.2.  Install 

ROLLER’S Scirocco 80  on a level base in the centre of the room  

with a 

minimum size of 14 m

2

 to be dehumidified. The minimum distance from 

the wall must be 200 mm. Close all doors and windows to the outside. Remove 

the detachable power cable from the tray (1) and connect it. The backlight of 

the display (2) comes on briefly. Press down the flap on top of the condensation 

tank (3) to open it. When using the condensation tank with pump Scirocco 80 

(accessory Art. No. 132121), push the condensation draining hose through the 

hole in the housing from the outside to the inside and fasten it to the nozzle 

(Fig. 8 (21)) of the condensation tank. Place the condensation tank (9) (acces-

sory Art. No. 132100) or condensation tank with pump Scirocco 80 (accessory 

Art. No. 132121) in the tray (Fig. 5) so that the vane of the float is inside the 

bar of the light barrier (10). Push the hose to the condensation tank (4) into the 

opening of the 11.5 l condensation tank. Set the condensation tank switch (5) 

in the direction of the symbol showing the not crossed out tank. Close the flap 

of the condensation tank (3). When using the condensation tank with pump 

Scirocco 80, set the condensation tank flap (3) against the magnets so that the 

connecting pipe of the pump can be fed out. Do not allow the condensation 

pump to run dry.


ROLLER’S Scirocco 80 is equipped with an operating hours counter (7) and, 

as of date of manufacture 2020 (rating plate) with an MID-conform electricity 

meter (8).

2.5.  Use the Scirocco 80 exhaust air set (accessory, Art. No. 132104)


With the exhaust air hose (11) for distributing the exhaust air in the room, the 

exhaust air can be used to dehumidify cavities, e.g. suspended ceilings, and 

for blow drying wet surfaces. Fasten the connecting flange (12) to the ROLLER’S 

Scirocco 80 with the four screws provided (Fig. 2). Push the exhaust air hose 

(11) onto the collar of the connecting flange and fix it with a lashing strap. 

Fastening eyes are provided for hanging up/fastening the exhaust air hose.

3. Operation


Air dehumidification/building drying can take several weeks until the moisture 

has been drawn out of concrete, masonry, plaster and screed etc. The room 

temperature may rise slightly. Use a hygrometer for additional monitoring of 

the humidity. 

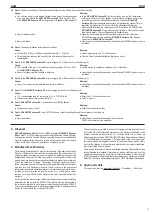
3.1.  Switch on the ROLLER’S Scirocco 50 with the On/Off button (Fig. 6 (13)). The 

fan starts. You can select between two speed steps with the fan speed button 

(22). The selected fan speed is displayed by the LEDs (23). The temperature/

timer display (24) shows the currently measured temperature. The temperature 

unit “degrees Celsius” or “degrees Fahrenheit” can be selected with the temper-

ature unit button (25). The humidity display (14) shows the currently measured 

relative humidity. The device is pre-set to 60 % relative humidity. Set the desired 

humidity between 30 and 90 % with the two buttons (15). Briefly pressing the 

button changes the value by 5 % and the humidity display (14) flashes. The 

humidity value in the display (14) changes automatically after setting and shows 

the currently measured relative humidity again. The device regulates the humidity 

of the room to be dehumidified and switches off on reaching the set humidity. 

The device switches back on when the room humidity increases. The set 

humidity of 30% corresponds to continuous operation, the device usually 

dehumidifies permanently. When draining the condensation into the conden-

sation tank (9), the device switches off when the condensation tank is full. Then 

the condensation tank LED (6) flashes and an acoustic signal sounds once. 

Empty the condensation tank and put it back in. Dehumidification is continued. 

There is no need to switch off the device to empty the condensation tank. When 

using the condensation tank with pump Scirocco 50 (accessory Art. No. 132129), 

the condensation tank is emptied by the pump.


ROLLER’S Scirocco 50 can be set to an operating time of 1 to 24 hours. Press 

the timer button (26) for this. The temperature/operating time display (24) 

flashes. Set the desired operating time with the buttons (15) whilst the display 

is flashing. The value is changed by one hour by briefly pressing the buttons. 

The timer LED (27) lights when the timer is switched on. 

ROLLER’S Scirocco 

50 switches off when the set operating time runs out. The timer is deactivated 

at the “00” setting.


The memory function of the 

ROLLER’S Scirocco 50 ensures that the set 

humidity value is retained in the event of a power failure. The device then 

automatically continues dehumidification with the previously set value. The 

compressor switches on with a delay of approx. 3 minutes for protection but 

the fan starts immediately.


NOTICE

NOTICE


When draining the condensation into an external tank, it must be ensured that 

this is emptied regularly and that the hose to the condensation drain (4) is laid 

into the tank with a downward gradient. If the condensation is drained directly 

into a drain pipe with a hose, this must also be laid with a downward gradient. 

Do not bend the hoses to the condensation drain. If you do, the condensation 

will run into the condensation tank.


The amount of condensation that forms is influenced by the temperature and 

humidity of the room air. Recommended values in continuous operation: 


30 °C (86 °F): 80 % r. h. = approx. 50 litres/day, 60 % r. h. = approx. 24 litres/day


20 °C (68 °F): 80 % r. h. = approx. 24 litres/day, 60 % r. h. = approx. 14 litres/day


15 °C (59 °F): 80 % r. h. = approx. 16 litres/day, 60 % r. h. = approx. 10 litres/day


10 °C (50 °F): 80 % r. h. = approx. 10 litres/day, 60 % r. h. = approx.   7 litres/day


(r. h. = relative humidity)


Water residue can drip from the condensation drain hose (4) after dehumidi-

fication.

eng eng

13

Summary of Contents for 132010 A220

Page 1: ...a e 4 71332 Waiblingen Deutschland Telefon 49 7151 1727 0 Telefax 49 7151 1727 87 www albert roller de deu Betriebsanleitung 5 eng Instruction Manual 11 fra Notice d utilisation 16 ita Istruzioni d us...

Page 2: ...Fig 3 Fig 1 Fig 2 Fig 4 1 2 13 14 16 6 7 18 15 11 12 1x 4x 2x 8 4 17 3 Max 1 5 10 9...

Page 3: ...2m Fig 7 Fig 5 Fig 6 28 4 9 20 19 2m Fig 8 WARNUNG WARNUNG 21 15 13 18 6 23 27 24 14 2 22 26 25 WARNUNG WARNUNG 3 21...

Page 4: ...Fig 9 kWh hh mm 3x 1x 12 6 9 3 3x 1 5 V LR44 AG13 kWh hh mm 8 7 4...

Page 5: ...Gebrauch mit dem Elektrowerkzeug vertraut sind Achtloses Handeln kann binnen Sekundenbruchteilen zu schweren Verletzungen f hren 4 Verwendung und Behandlung des Elektrowerkzeugs a berlasten Sie das E...

Page 6: ...l uche Von elektrischen Ger ten k nnen Gefahren ausgehen die zu Sach und oder Personensch den f hren k nnen wenn sie unbeaufsichtigt sind Kinder und Personen die aufgrund ihrer physischen sensorischen...

Page 7: ...rocco 50 mittig in den zu entfeuchtenden Raum mit einer Mindestgr e von 9 m2 auf einen ebenen Untergrund stellen Der Mindestab stand zur Wand muss 200 mm betragen T ren und Fenster nach drau en schlie...

Page 8: ...euchtigkeit erhalten Das Ger t setzt danach automatisch die Entfeuchtung Trocknung mit dem zuvor eingestellten Wert fort Zum Schutz des Verdichters schaltet dieser um ca 3 Minuten verz gert ein Dabei...

Page 9: ...Entfeuchtung Trocknung nach dem Abtauen automatisch das Symbol Vereisung 18 erlischt Sollte die Vereisung in kurzem Abstand wiederholt eintreten ROLLER S Scirocco 80 ausschalten Warten bis das Eis vol...

Page 10: ...etzte Produkte und Teile gehen in das Eigentum von ROLLER ber Die Kosten f r die Hin und R ckfracht tr gt der Verwender EineAufstellung der ROLLER Vertrags Kundendienstwerkst tten ist im Internet unte...

Page 11: ...damaged have the power tool repaired before use Many accidents are caused by poorly maintained power tools f Keep cutting tools sharp and clean Properly maintained cutting tools with sharp cutting ed...

Page 12: ...sible if not heeded CAUTION CAUTION Danger with a low degree of risk which could result in minor injury reversible if not heeded NOTICE NOTICE Material damage no safety note No danger of injury Warnin...

Page 13: ...ondensation tank 9 acces sory Art No 132100 or condensation tank with pump Scirocco 80 accessory Art No 132121 in the tray Fig 5 so that the vane of the float is inside the bar of the light barrier 10...

Page 14: ...n 4 is laid into the tank with a downward gradient If the condensation is drained directly into a drain pipe with a hose this must also be laid with a downward gradient Also check whether the hose to...

Page 15: ...compressor is not iced up Cause Remedy Device defective Have the device checked repaired by an authorised ROLLER customer service workshop 6 Disposal ROLLER S Scirocco 50 and R 410Aor R 290 refrigeran...

Page 16: ...Utiliser l outil lectrique adapt votre application L outil lectrique adapt r alise mieux le travail et de mani re plus s re au r gime pour lequel il a t construit b Ne pas utiliser l outil lectrique s...

Page 17: ...ss s sans surveillance Les enfants et les personnes qui en raison de leurs facult s physiques sensorielles ou mentales ou de leur manque d exp rience ou de connais sances sont incapables d utiliser l...

Page 18: ...irection du symbole de r servoir barr Fermer le volet du r servoir pour condensats 3 ROLLER S Scirocco 80 est quip d un compteur d heures de fonctionnement 7 et partir de la date de fabrication 2020 p...

Page 19: ...l appareil pour vider le r servoir En cas d utilisation d un r servoir pour condensats avec pompe Scirocco 80 accessoire code 132121 le r servoir est vid par la pompe En cas de panne de courant la fo...

Page 20: ...quip d un syst me de d givrage automatique gaz chaud Ce syst me est r gul par l appareil Apr s le d givrage l appareil poursuit automatiquement la d shumidification le s chage et le symbole givrage 18...

Page 21: ...ti lisateur ou de tierces personnes ou d autres causes n incombant pas la responsabilit de ROLLER Les prestations sous garantie ne peuvent tre effectu es que par des SAV agr s ROLLER Les appels en gar...

Page 22: ...e l elettroutensile Utilizzare l elettroutensile adatto per il tipo di lavoro specifico Con l elettroutensile adeguato si lavora meglio e in modo pi sicuro nel campo nominale di potenza b Non utilizza...

Page 23: ...hio estrarre la spina di rete e staccare tutti i tubi flessibili Gli apparecchi elettrici possono causare pericoli e lesioni alle persone e o danni materiali se non sono sottoposti a sorve glianza I b...

Page 24: ...condensa 3 per aprirlo Far passare il tubo flessibile di scarico della condensa 4 attraverso il foro dell alloggiamento dall interno verso l esterno Condurre il tubo flessibile di scarico della conden...

Page 25: ...mento ininterrotto l apparecchio non effettua la regolazione dell umidit dell aria e deumidifica continuamente Se si utilizza il recipiente di raccolta della condensa 9 acces sorio cod art 132100 l ap...

Page 26: ...chio inizia a deumidificare asciugare automaticamente dopo lo sbrinamento il simbolo di formazione di ghiaccio 18 scompare Se la formazione di ghiaccio si ripete dopo un breve tempo spegnere il ROLLER...

Page 27: ...interventi propri o di terzi o da altri motivi di cui la ROLLER non risponde Gli interventi in garanzia devono essere effettuati solo da centri assistenza autorizzati ROLLER La garanzia riconosciuta...

Page 28: ...negeer nooit de veilig heidsregels voor elektrisch gereedschap ook niet wanneer u na veelvuldig gebruik zeer goed met het elektrische gereedschap vertrouwd bent Achteloos handelen kan in een fractie v...

Page 29: ...als dit beschadigd is Er bestaat gevaar voor ongevallen Controleer regelmatig of het condensaat correct wordt afgevoerd Schakel het apparaat bij langere werkonderbrekingen uit trek de netstekker uit...

Page 30: ...De klep van de condenstank 3 sluiten ROLLER S Scirocco 80 is met een bedrijfsurenteller 7 en vanaf productie datum 2020 typeplaatje met een MID conforme stroomverbruikmeter 8 uitgerust 2 4 Plaatsing v...

Page 31: ...oeft het apparaat niet te worden uitgeschakeld Bij het gebruik van de condenstank met pomp Scirocco 80 toebehoren artikelnr 132121 wordt de condenstank geleegd door de pomp Dankzij de geheugenfunctie...

Page 32: ...paraat start de ontvochtiging droging na het ontdooien automatisch het symbool bevriezing 18 gaat weer uit Indien de bevriezing binnen een korte tijd herhaaldelijk optreedt de ROLLER S Scirocco 80 uit...

Page 33: ...werkzaamheden mogen uitsluitend door een geautoriseerde ROLLER klantenservice worden uitgevoerd Reclamaties worden uitsluitend erkend indien het product zonder voorafgaande ingrepen in niet gedemontee...

Page 34: ...r eller l gger undan elverktyget Denna f rsiktighets tg rd f rhindrar att elverktyget startas oavsiktligt d F rvara elverktyg som inte anv nds utom r ckh ll f r barn L t inte personer som inte k nner...

Page 35: ...ER kundtj nstverkstad byta ut dem Anv nd endast godk nda f rl ngningskablar med motsvarande m rkning med tillr ckligt ledningstv rsnitt Anv nd f rl ngningskablar upp till en l ngd p 10 m med ett ledni...

Page 36: ...tick in slangen f r kondensvatten avledning utifr n och in genom h let i huset och f st den vid anslutningsstutsen Fig 8 21 p kondensvatten beh llare St ll kondensvatten beh llare 9 tillbeh r art nr 1...

Page 37: ...e akt p att denna t ms regelbundet och att slangen f r avledningen av kondensvatten 4 leds ner i beh llaren med fallh jd Vid direkt avledning av kondensvatten med en slang i en avloppsledning m ste de...

Page 38: ...inte har uppn tts Orsak tg rd Vid kall omgivningstemperatur och eller vid konstant drift kan det bildas is p aggregatet P ROLLER S Scirocco 50 lyser lysdioden isbildning Fig 6 18 P ROLLER S Scirocco 8...

Page 39: ...genopladelige batteri inden du foretager indstillinger p apparatet skifter indsatsv rk t jsdele eller l gger el v rkt jet fra dig Denne forholdsregel forhindrer at el v rkt jet starter ved en fejltage...

Page 40: ...eret personale eller af et autoriseret ROLLER kundeservicev rksted Brug kun godkendte og tilsvarende m rkede forl ngerledninger der har et tilstr kkeligt ledningstv rsnit Brug forl ngerledninger med e...

Page 41: ...ensvand beholderen med pumpe Scirocco 80 tilbeh r art nr 132121 i rummet fig 5 s sv mmerens fane befinder sig inden for fotocellens 10 b jle Stik slangen til kondensafledningen 4 ind i 11 5l kondensva...

Page 42: ...msvigt bevarer memory funktionen i ROLLER S Scirocco 80 luftaf fugterens indstillede v rdi Derefter forts tter apparatet automatisk affugtningen t rringen med den forudindstillede v rdi For at beskytt...

Page 43: ...temmelse med loven 7 Producentens garanti Garantiperioden er p 12 m neder fra overdragelsen af det nye produkt til f rste bruger Tidspunktet for overdragelsen skal dokumenteres ved at indsende de orig...

Page 44: ...ssa l anna sellaisten henkil iden k ytt s hk ty kalua jotka eiv t ole siihen perehtyneet tai eiv t ole lukeneet n it ohjeita S hk ty kalut ovat vaarallisia kokemattomien henkil iden k yt ss e Hoida s...

Page 45: ...ROLLER sopimuskorjaamon uusia ne K yt vain hyv ksyttyj ja asianmukaisesti merkittyj jatkojohtoja joiden poikkipinta ala on riitt v K yt korkeintaan 10 m pitki jatkojohtoja joiden poikkipinta ala on 1...

Page 46: ...kuva 5 jotta uimurin lippu olisi valopuomin 10 pidikkeen sis puolella Pist lauhdeveden poistoletku 4 11 5 litran lauhdevesis ili n aukkoon Aseta lauh devesis ili n kytkin 5 ei yliviivattua s ili t kuv...

Page 47: ...is ksi ett lauhdeveden poistoletku 4 on asetettu lauhdevesis ili n 9 aukkoon Lauhdeveden poistoletkuja ei saa taivuttaa mutkalle Jos t t ohjetta ei nouda teta lauhdevesi virtaa kokooma astian reunan y...

Page 48: ...H iri Laite kytkeytyy pois p lt vaikka laitteeseen asetettua ilmankosteutta ei ole viel saavutettu Syy Korjaustoimenpide Jos ymp rist n l mp tila on kylm ja tai laitetta k ytet n jatkuvasti saattaa l...

Page 49: ...ga je potrebno popraviti c Pred nastavitvijo naprave menjavo delov vstavnega orodja ali odlo itvijo elektri nega orodja morate povle i vti iz vti nice in ali odstraniti akumula torsko baterijo Ta pre...

Page 50: ...avo elektri ne naprave in podalj ke glede na po kodbe Poskrbite za to da se bodo po kodovani deli popravili s strani kvalificiranih strokovnjakov ali v poobla eni servisni delavnici ROLLER Uporabljajt...

Page 51: ...itisnite zgoraj na zaklop posode za kondenzat 3 da se odpre Pri uporabi posode za kondenzat s rpalko Scirocco 80 t artikla opreme 132121 potisnite cev za odvod kondenzata skozi odprtino ohi ja od zuna...

Page 52: ...opi ca 2 minuti kasneje Pri tem utripa simbol kompresor 16 na displeju 2 vendar pa ventilator nemudoma za ene OBVESTILO OBVESTILO Pri odvajanju kondenzata v eksterno posodo morate obvezno paziti na to...

Page 53: ...znite posodo za kondenzat 5 9 Motnja ROLLER S Scirocco 50 Utripa lu ka LED za zamrznitev 18 oz sveti neprekinjeno eprav kompresor ni zamrznjen Vzrok Pomo Naprava je okvarjena Poskrbite za pregled popr...

Page 54: ...54...

Page 55: ...55...

Page 56: ...kheid dat het onder Technische gegevens beschreven product in overeenstemming is met onderstaande normen volgens de bepa lingen van de richtlijnen 2014 35 EU 2014 30 EU 2011 65 EU 2015 863 EU swe EG f...

Reviews: