background image

13

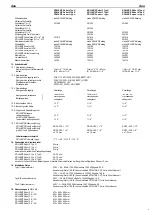
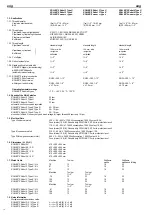
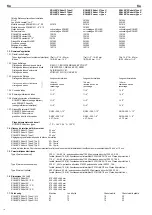
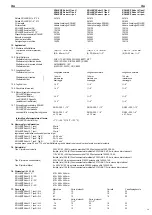
1.9.  Vibrations (all types)


Weighted rms value of acceleration 

< 2.5 m/s² 

K = 1.5 m/s²


The indicated weighted effective value of acceleration has been measured against standard test procedures and can be used by way of comparison with another 

device. The indicated weighted effective value of acceleration can also be used as a preliminary evaluation of the exposure.

CAUTION

CAUTION   


The indicated weighted effective value of acceleration can differ during operation from the indicated value, dependent on the manner in which the device is used. 

Dependent upon the actual conditions of use (periodic duty) it may be necessary to establish safety precautions for the protection of the operator.

2. Start-up

CAUTION

CAUTION   


Transport weights above 35 kg must be carried by at least 2 persons, carry the 

tool set separately. When transporting and installing the machine, please note 

that the machine has a high centre of gravity with and without the base frame, 

i.e. it is top heavy.

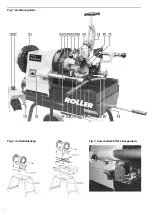
2.1. Installing ROLLER’S Robot 2U, 2K, 2D, ROLLER’S Robot 3U, 3K, 3D, 

ROLLER’S Robot 4U, 4K, 4D


Remove both U-rails from the machine. Fix the machine to the oil tray. Push 

the tool carrier into the guide arms. Push the pressing lever (8) from the rear 

through the loop on the tool carrier and the clamping ring (10) onto the rear 

guide arm so that the wing nut is facing the rear and the ring groove stays free. 

Feed the hose with suction fi lter through the hole in the oil tray from the inside 

and connect it to the coolant-lubricant pump. Push the other end of the hose 

onto the nipple on the back of the tool carrier. Push the handle (9) onto the 

pressing lever. Fix the machine to a workbench or subframe (accessory) with 

the 3 screws provided. The machine can be lifted respectively at the front by 

the guide arms and at the rear by a pipe clamped into a clamping and guide 

chuck for transport. For transporting on the subframe, pipe sections Ø ¾" with 

a length of approx. 60 cm are pushed into the eyes on the subframe and fi xed 

with the wing nuts. If the machine is not to be transported, the two wheels can 

be removed from the subframe.


Fill in 5 litres of thread cutting material. Insert chip tray.

NOTICE

NOTICE


Never operate the machine without thread cutting material.


Insert the guide bolt of the die head (12) into the hole of the tool carrier and 

push on the die head with axial pressure on the guide pin and swivelling move-

ments as far as it will go.

2.2. Installing ROLLER’S Robot 2U-L, 2K-L, 2D-L, ROLLER’S Robot 3U-L, 3K-L, 

3D-L, ROLLER’S Robot 4U-L, 4K-L, 4D-L (Fig. 2)


Fix the machine to a workbench or subframe (accessory) with the 4 screws 

provided. The machine can be lifted respectively at the front by the guide arms 

and at the rear by a pipe clamped into a clamping and guide chuck for transport. 

Push the tool carrier into the guide arms. Push the pressing lever (8) from the 

rear through the loop on the tool carrier and the clamping ring (10) onto the 

rear guide arm so that the wing nut is facing the rear and the ring groove stays 

free. Push the handle (9) onto the pressing lever. Hang the oil tray in the two 

screws on the gear housing and push to the right into the slits. Hang the oil 

tray in the ring groove on the rear guide arm. Push on the clamping ring (10) 

until it is touching the suspension of the oil tray and clamp it tight. Hang the 

hose with suction fi lter into the oil tray and push the other end of the hose onto 

the nipple on the back of the tool carrier. 


Fill in 2 litres of thread cutting material. Insert the chip tray from the rear.

NOTICE

NOTICE


Never operate the machine without thread cutting material.


Insert the guide bolt of the die head (12) into the hole of the tool carrier and 

push on the die head with axial pressure on the guide pin and swivelling move-

ments as far as it will go.

2.3.  Electrical connection

WARNING

WARNING


Caution: Mains voltage present! Before connecting the thread cutting machine, 

Caution: Mains voltage present!

Caution: Mains voltage present!

check whether the voltage given on the rating plate corresponds to the mains 

voltage. 

Only connect the thread cutting machine of protection class I to 

a socket/extension lead with a functioning protective contact. There is a 

danger of electric shock. On building sites, in a wet environment, indoors and 

outdoors or under similar installation conditions, only operate the thread cutting 

machine on the mains with a fault current protection switch (FI switch) which 

interrupts the power supply as soon as the leakage current to earth exceeds 

30 mA for 200 ms.  


The thread cutting machine is switched on and off with the foot switch (4). The 

switch (3) serves to pre-select the direction of rotation or speed. The machine 

can only be switched on when the emergency off button (5) is unlocked and 

the thermal protection switch (6) on the foot switch is pressed. If the machine 

is connected directly to mains (without a plug device), a 16 A circuit breaker 

must be installed.

2.4.  Thread-cutting Materials


For safety data sheets, see www.albert-roller.de → Downloads → Safety Data 

Sheets.

Only use ROLLER thread cutting materials. They ensure perfect cutting results, 

long life of the dies and considerably relieve stress on the tools.

NOTICE

NOTICE


ROLLER’S Smaragdol

High-alloy mineral oil-based thread-cutting material. 

For all materials: steel, 

stainless steel, non-ferrous metals, plastics. Can be washed out with water, 

tested by experts. Mineral oil-based thread cutting materials are not approved 

for drinking water pipes in different countries, e.g. Germany, Austria and Swit-

zerland. Mineral oil-free ROLLER’S Rubinol 2000 must be used in this case. 

Observe the national regulations.
ROLLER’S Rubinol 2000


Mineral oil-free, synthetic thread-cutting material for 

drinking water pipes. 

Completely soluble in water. According to regulations. In Germany DVGW test 

no. DW-0201AS2031, Austria ÖVGW test no. W 1.303, Switzerland SVGW test 

no. 9009-2496. Viscosity at –10°C: ≤ 250 mPa s (cP). Pumpable up to –28°C. 

Easy to use. Dyed red for checking washout. Observe the national regulations.


Both thread cutting materials are available in aerosol cans, canisters, barrels 

as well as spray bottles (ROLLER’S Rubinol 2000).

NOTICE

NOTICE


All thread cutting materials may only be used in undiluted form!

2.5.  Material Support

CAUTION

CAUTION   

Pipes and bars longer than 2 m must be supported additionally by at least one 

height-adjustable ROLLER’S Assistant 3B, ROLLER’S Assistant XL 12" mate-

rial rest. This has steel balls for easy movement of the pipes and bars in all 

directions without the material support tipping over.

2.6.  Subframe, mobile and folding (accessory)

CAUTION

CAUTION   

The folded subframe, mobile and folding, quickly moves up automatically without 

mounted thread cutting machine after releasing. Therefore hold down the subframe 

by the handle when releasing and hold with both handles when moving up.


To move up with the thread cutting machine mounted, hold the subframe with 

one hand on the handle, put one foot on the cross member and release both 

locking pins by turning the lever. Then hold the subframe with both hands and 

move to working height until the two locking pins snap in. Proceed in the reverse 

order to fold up. Drain the thread-cutting material from the oil tray or remove 

the oil tray before unfolding or folding up.

3. Operation

  Use eye protection 

  Use ear protection

3.1. Tools


The die head (12) is a universal die head. That means for all types of threads 

for above mentioned sizes, divided in 2 tool sets, only one die head is required. 

For cutting tapered pipe  threads, the length stop (13) needs to be in the same 

direction with the closing and opening lever (14). To cut cylindrical long threads 

and bolt threads, the length stop (13) has to be folded away.
Changing the ROLLER’S dies

The ROLLER’S dies can be inserted or changed with the die head mounted 

on the machine or detached (i.e. on a bench). Slacken clamping lever (15) but 

do not remove it. Push the adjusting disc (16) at the handle away from the 

clamping lever to the far end position. In this position the ROLLER’S dies are 

put in or taken out. Ensure that the indicated size of thread shown on the back 

of the ROLLER’S dies corresponds to the size of thread to be cut. Furthermore, 

ensure that the numbers shown on the back of the ROLLER’S dies correspond 

with those indicated on the die holder (17).


Insert the ROLLER’S dies into the die head as far as the ball inside the slot of 

the die holder snaps in. Once all ROLLER’S dies are set, adjust the size of 

thread by shifting the adjusting disc. Bolt thread must always be set to „Bolt“. 

Clamp the adjusting disc with the clamping lever, close the die head by pressing 

the closing and opening lever (14) down slightly to the right. The die head opens 

either automatically (with tapered pipe threads), or at any time manually by 

slight pressure to the left on the closing and opening lever.


If the holding power of the clamping lever (15) is insuffi cient (e.g. through blunt 

ROLLER’S dies) when the 2½ – 3" and the 2½ – 4" die head is in use, due to 

the increased cutting force applied, with the result that the die head opens 

under cutting pressure, the capscrew on the side  opposite the clamping lever 

(15) must also be tightened.

eng eng

Summary of Contents for 340004

Page 1: ...roller de deu Betriebsanleitung deu Betriebsanleitung deu Betriebsanleitung 3 eng Instruction Manual eng Instruction Manual eng Instruction Manual 10 fra Notice d utilisation 16 ita Istruzioni d uso 2...

Page 2: ...22 1 23 14 13 16 15 18 12 17 4 3 24 9 7 11 8 20 21 25 19 10 Fig 1 Bedienungsteile Fig 3 Umschaltventil f r Linksgewinde Fig 3 Umschaltventil f r Linksgewinde Fig 2 Aufstellanleitung Fig 2 Aufstellanl...

Page 3: ...werkzeug in unerwarteten Situationen besser kontrollieren f Tragen Sie geeignete Kleidung Tragen Sie keine weite Kleidung oder Schmuck Halten Sie Haare und Kleidung fern von sich bewegenden Teilen Loc...

Page 4: ...n Lassen Sie die Maschine niemals unbeaufsichtigt laufen Schalten Sie die Maschine bei l ngeren Arbeitspausen aus ziehen Sie den Netzstecker Von elektrischen Ger ten k nnen Gefahren ausgehen die zu Sa...

Page 5: ...de zylindrisch 150 mm mit 150 mm mit 150 mm mit Rohrgewinde zylindrisch 150 mm mit 150 mm mit 150 mm mit Nachspannen Nachspannen Nachspannen Bolzengewinde 150 mm mit 150 mm mit 150 mm mit Nachspannen...

Page 6: ...ne der Schutzklasse I nur an Steckdose Verl ngerungsleitung mit funktionsf higem Schutz kontakt an Es besteht das Risiko eines elektrischen Schlages Auf Baustellen in feuchter Umgebung in Innen und Au...

Page 7: ...t eingesetzter Schraube von vorn in die Spannbackentr ger hineinschieben 3 3 Arbeitsablauf Vor Arbeitsbeginn Blockaden aus Sp nen und Bruchst cken des Werkst ckes entfernen HINWEIS HINWEIS Beim Ann he...

Page 8: ...hneidkopf schlie en siehe 3 1 Werkzeuge Wechseln der ROLLER S Schneidbacken 5 5 St rung Schneidkopf ffnet nicht Ursache Abhilfe Bei ge ffnetem Schneidkopf wurde Gewinde auf n chstgr eren Rohrdurchmess...

Page 9: ...Verwender EineAufstellung der ROLLER Vertrags Kundendienstwerkst tten ist im Internet unter www albert roller de abrufbar F r dort nicht aufgef hrte L nder ist das Produkt einzureichen im SERVICE CEN...

Page 10: ...e power source and or remove the battery pack if detachable from the power tool before making any adjustments changing accessories or storing power tools Such preventive safety measures reduce the ris...

Page 11: ...ol 120110 Waste code for thread cutting materials containing mineral oils ROLLER S Smaragdol and synthetic thread cutting materials ROLLER S Rubinol in spray cans 150104 Observe the national regulatio...

Page 12: ...LER S Robot 2 Type U 53 rpm ROLLER S ROLLER S Robot 3 Type U 23 rpm ROLLER S Robot 4 Type U 23 rpm automatic continuous speed regulation ROLLER S Robot 2 Type K Type D 52 26 rpm ROLLER S Robot 3 Type...

Page 13: ...n as the leakage current to earth exceeds 30 mA for 200 ms The thread cutting machine is switched on and off with the foot switch 4 The switch 3 serves to pre select the direction of rotation or speed...

Page 14: ...tightener is splayed by turning the spindle with a tool This may only be done with the pipe section tted Makes sure that no shorter nipples than the standard allows are cut with the ROLLER S Spann x a...

Page 15: ...the date of purchase and the designation of the product All functional defects occurring within the warranty period which are clearly the consequence of defects in production or materials will be rem...

Page 16: ...cheveux longs peuvent tre pris dans des parties en mouvement g Si des dispositifs sont fournis pour le raccordement d quipements pour l extraction et la r cup ration des poussi res s assurer qu ils so...

Page 17: ...r formation professionnelle et qu elle a lieu sous surveillance d une personne quali e Les enfants et les personnes qui en raison de leurs facult s physiques sensorielles ou mentales ou de leur manque...

Page 18: ...t e en cas de resserrage resserrage resserrage 1 3 4 Coupe de tubes 2 4 4 1 3 5 bavurage int rieur de tubes 2 4 4 1 3 6 Mamelons simples et doubles avec ROLLER S Nipparo serrage int rieur 2 2 2 avec R...

Page 19: ...que la rainure annulaire reste d gag e Glisser la poign e 9 sur le levier de pression Suspendre le bac huile aux deux vis x es au carter puis pousser le bac huile vers la droite a n que les vis s enga...

Page 20: ...el travers le mandrin arri re de centrage 2 ouvert ainsi qu travers le mandrin chocs serrage rapide 1 ouvert a n qu il d borde d environ 10 cm le mandrin Fermer le mandrin chocs serrage rapide jusqu c...

Page 21: ...machine est d fectueuse Faire examiner r parer la machine par une station S A V agr e ROLLER 5 3 D faut L arriv e d huile de coupe est insuf sante au niveau de la t te de letage Cause Rem de La pompe...

Page 22: ...ent tre effectu es que par des SAV agr s ROLLER Les appels en garantie ne sont reconnus que si le produit non d mont et sans interventions pr alables est remis une station S A V agr e ROLLER Les produ...

Page 23: ...siano collegati e utilizzati correttamente L utilizzo di un sistema di aspirazione della polvere pu ridurre i pericoli causati dalla polvere h L utente non pensi di poter trascurare di osservare le re...

Page 24: ...a macchina non devono utilizzare questa macchina senza sorveglianza o supervisione di una persona responsabile In caso contrario sussiste il pericolo di errori di utilizzo e di lesioni Controllare reg...

Page 25: ...4 1 3 7 Dispositivo per scanalare ROLLER ROLLER S Robot modello L DN 25 300 1 12 DN 25 300 1 12 DN 25 300 1 12 ROLLER S Robot modello vasca dell olio e raccoglitrucioli grande DN 25 200 1 8 DN 25 200...

Page 26: ...ltro di aspirazione nella vasca dell olio e spingere l altra sua estremit sul raccordo situato sul retro del portautensili Versare 2 litri di olio da taglio Applicare la vasca raccoglitrucioli dal lat...

Page 27: ...etti pi piccoli All uopo commutare senza indugio l interruttore 3 con macchina in ersercizio dalla posizione 1 alla posizione 2 Spingere la liera contro il materiale rotante mediante la leva d imbocco...

Page 28: ...tuire i pettini ROLLER S Mandata di olio da taglio nulla o insuf ciente Vedere il punto 5 3 Olio da taglio di cattiva qualit Usare oli da taglio ROLLER Avanzamento del portautensili ostacolato Svitare...

Page 29: ...he gereed schap in onverwachte situaties beter controleren f Draag geschikte kleding Draag geen wijde kleding of sieraden Houd haar en kleding verwijderd van bewegende onderdelen Losse kleding sierade...

Page 30: ...n of personenschade kunnen leiden als kunnen gevaren uitgaan die tot zaak en of personenschade kunnen leiden als kunnen gevaren uitgaan die tot ze zonder toezicht worden achtergelaten Laat de machine...

Page 31: ...d 1 3 4 Afkorten buizen 2 4 4 1 3 5 Inwendig ontbramen buizen 2 4 4 1 3 6 Nippels en dubbele nippels met ROLLER S Nipparo inwendig spannend 2 2 2 met ROLLER S Spann x automatisch inwendig spannend 4 4...

Page 32: ...i onerende randaarding Er bestaat het risico van een elektrische schok Op bouwplaatsen in vochtige omgevingen in binnen en buitenruimten of bij soortgelijke opstellingen mag de draadsnijmachine uitslu...

Page 33: ...uitsteekt Snelspan slagsysteem sluiten totdat de spanbekken op het materiaal aanliggen Door middel van de spanring na korte openingsbeweging met n of twee slagen het materiaal vastspannen Door het slu...

Page 34: ...ten vervangen De machine is defect De machine door een geautoriseerde ROLLER klantenservice laten controleren repareren 5 3 Storing Geen of gebrekkige toevoer van draadsnijolie aan de snijkop Oorzaak...

Page 35: ...ties worden uitsluitend erkend indien het product zonder voorafgaande ingrepen in niet gedemonteerde toestand bij een geautoriseerde ROLLER klantenservice wordt ingeleverd Vervangen producten en onder...

Page 36: ...ignorera inte s kerhetsreglerna f r elverktyg ven om du efter l ngre anv ndning r v l f rtrogen med elverktyget Of rsiktigt handlande kan inom br kdelar av en sekund leda till allvarliga personskador...

Page 37: ...ska maskinen liksom f rl ng ningskablar regelbundet f r att uppt cka eventuella skador L t vid skador den bytas ut av kvali cerad fackpersonal eller av en auktoriserad ROLLER kundverkstad Anv nd endas...

Page 38: ...nde 4 4 4 1 3 7 ROLLER S sp rrillanordning ROLLER S Robot utf rande L DN 25 300 1 12 DN 25 300 1 12 DN 25 300 1 12 ROLLER S Robot utf rande med stor olje och sp nbalja DN 25 200 1 8 DN 25 200 1 8 DN 2...

Page 39: ...rningsmaskinen Beakta n tsp nningen att sp nningen som r angiven p m rkskylten motsvarar n tsp nningen Anslut g ngsk rningsmaskinen i skyddsklass I endast till eluttag f rl ng ningssladdar med funktio...

Page 40: ...n r rkaparen 18 och skjuter den till nskat l ge med tryckspaken Det roterande r ret kapas genom att spindeln vrids medurs Det innersk gg som uppst r vid kapningen avl gsnas med avgradningsdonet 19 T m...

Page 41: ...ng Anv nd speciella sp nnbackar Sp nnbackarna r n tta Byt sp nnbackarna 6 Kassering G ngsk rningsmaskinen f r inte kastas i de vanliga hush llssoporna n r den inte l ngre anv nds De m ste kasseras p e...

Page 42: ...et sekund 4 Brug og behandling af el v rkt jet a Overbelast ikke el v rkt jet Brug altid kun et el v rkt j som er beregnet til arbejdsopgaven Med det passende el v rkt j arbejder du bedre og sikrere i...

Page 43: ...ller jord Gevindsk remiddel der ikke er brugt op a everes til den ansvarlige bortskaffelsesvirksomhed Affaldsn gle til mineralolieholdige gevindsk remidler ROLLER S Smaragdol 120106 til syntetiske ROL...

Page 44: ...min 1 ROLLER S Robot 3 Type U 23 min 1 ROLLER S Robot 4 Type U 23 min 1 automatisk trinl s regulering af omdrejningstal ROLLER S Robot 2 Type K Typ D 52 26 min 1 ROLLER S Robot 3 Type K Typ D 20 10 m...

Page 45: ...d fodkontakten 4 Kontakte 3 bruges til at forindstille drejeretningen og hastigheden Maskinen kan kun t ndes hvis n dafbryderen 5 er l st op og termiske beskyttelsesafbryder 6 er trykket p fodkontakte...

Page 46: ...d maskinen k re indtil beholderen er tom Eller Udluftningsproppen 25 fjernes og karret t mmes 3 4 Fremstilling af nipler og dobbeltnipler Til nippelsk ring bruges ROLLER S Spann x automatisk indvendig...

Page 47: ...G Neue Rommelshauser Stra e 4 71332 Waiblingen Deutschland 8 Reservedelsliste Reservedelsliste se www albert roller de Downloads Reservedelstegninger 5 2 Fejl Maskine tr kker ikke rsag Udbedring ROLLE...

Page 48: ...laitetta K yt ty n kannalta tarkoituksenmukaista s hk ty kalua K ytt m ll sopivaa s hk ty kalua sen ilmoitetulla tehoalueella ty skentelet paremmin ja turvallisemmin b l k yt s hk ty kalua jonka kytki...

Page 49: ...asianmukaiseen j telaitok seen J tekoodi mineraali ljypitoisille leikkaus ljyille ROLLER S Smaragdol 120106 synteettisille ROLLER S Rubinol 120110 J tekoodi mineraali ljypitoi sille leikkaus ljyille R...

Page 50: ...in 1 ROLLER S Robot 3 Tyyppi U 23 min 1 ROLLER S Robot 4 Tyyppi U 23 min 1 automaattinen portaaton kierrosluvun s t ROLLER S Robot 2 Tyyppi K Typ D 52 26 min 1 ROLLER S Robot 3 Tyyppi K Typ D 20 10 mi...

Page 51: ...k ytet n py rimissuunnan tai nopeuden esivalintaan Kone voidaan kytke p lle vain kun h t pys ytyspainike 5 on vapautettu lukituksesta ja l mp suojakytkint 6 on painettu Mik li kone liitet n verkkoon...

Page 52: ...as on tyhj Tai poista kierretulppa 25 ja anna altaan valua tyhj ksi 3 4 Nippojen ja kaksoisnippojen valmistus Nippaleikkaukseen k ytet n ROLLER S Spann x nippakiinnittimi auto maattinen sis kiinnitys...

Page 53: ...gen Saksa 8 Varaosaluettelot Katso varaosaluettelot osoitteesta www albert roller de Downloads Parts lists 5 2 H iri Kone ei tee kierrett Syy Korjaustoimenpide ROLLER leikkuuleuat ovat tyls t Vaihda R...

Page 54: ...navodil za elektri na orodja tudi e imate zaradi pogoste uporabe ob utek da ste dodobra seznanjeni z elektri nim orodjem Nepazljivo ravnanje lahko hipoma vodi do te kih po kodb 4 Uporaba in ravnanje...

Page 55: ...ti pri lokalnem podjetju za odstranjevanje odpadkov Kvali kacijska oznaka odpadka za maziva za rezanje navojev z vsebnostjo mineralnega olja ROLLER S Smaragdol 120106 120106 120106 za sinteti na ROLLE...

Page 56: ...ladnjem za olje in ostru ke DN 25 200 1 8 DN 25 200 1 8 DN 25 200 1 8 s 7 2 mm s 7 2 mm s 7 2 mm Obmo je delovne temperature ROLLER S Robot vse vrste 7 C 50 C 19 F 122 F 1 4 tevila vrtljajev delovnega...

Page 57: ...a rezanje navojev z za itnim razredom I le na vti nico podalj evali vodnik z delujo im za itnim vodnikom Obstaja tveganje elektri nega udara Na gradbi ih v vla nem okolju v notra njih in zunanjih pros...

Page 58: ...jem vretena v desno se cev odre e Notranji rob ki nastane po odrezu odstranite s pomo jo posnemalca notranjih robov 19 Izpust mazalnega sredstva za rezanje navojev cev na nosilcu orodja 7 potegnete do...

Page 59: ...ite izklju no dopustne cevi 5 7 Motnja Cev zdrsne skozi vpenjalno glavo Vzrok Pomo Vpenjalne eljusti so mo no umazane O istite vpenjalne eljusti Cevi imajo debel pla iz umetne mase Uporabite specialne...

Page 60: ...eitsverklaring Wij verklaren op eigen verantwoordelijkheid dat het onder Technische gegevens beschreven product in overeenstemming is met onderstaande normen volgens de bepa lingen van de richtlijnen...

Reviews: