11
eng eng
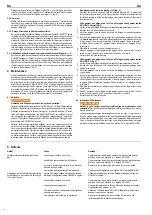
5. Faults
Fault
Cause
Remedy
Electric die stock does not work.
Worn carbon brushes.
Have the carbon brushes changed by qualifi ed personnel or an
authorised ROLLER customer service workshop.
Mains lead defective.
Have the mains lead replaced by qualifi ed personnel or an
authorised ROLLER customer service workshop.
Rotation direction lever (8) not pushed as far as it goes. Push rotation direction lever (8) as far as it goes.
Drive unit defective.
Have it checked/repaired by an authorised ROLLER customer
service workshop.
Electric die stock does not pull through,
overload protection (10) triggers off.
No original ROLLER quick-change die heads in use.
Only use original ROLLER quick-change die heads.
Worn carbon brushes.
Have the carbon brushes changed by qualifi ed personnel or an
authorised ROLLER customer service workshop.
Blunt dies.
Chang dies or quick-change die head. See 4.1. for changing dies.
Unsuitable or insuffi cient thread-cutting material.
Use ROLLER thread-cutting material; lubricate several times
during thread cutting.
Overload protection triggers off.
Press the overload protection (10) after the electric die stock has
cooled down for a short time.
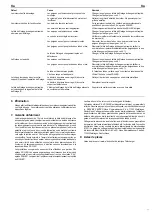
Increased motor heating.
Overloading due to blunt dies.
Change dies or quick-change die head. See 4.1. for changing dies.
Insuffi cient air for motor cooling.
Clean air slits on the motor, do not cover the air slits.
Heavy sparking on motor.
Worn carbon brushes.
Have the carbon brushes changed by qualifi ed personnel or an
authorised ROLLER customer service workshop.
Unsuitable carbon brushes.
Only use original ROLLER carbon brushes.
Quick-change die head does not start
cutting.
Blunt or broken dies.
Change dies or quick-change die head. See 4.1. for changing dies.
Wrong direction of rotation set.
Check position of rotation direction lever (8) and change if
necessary.
Dies installed incorrectly.
Remove die(s), re-insert in right direction, see changing dies 4.1.
Dies not inserted in the right order.
Remove quick-change die head, check numbering, re-insert dies
if necessary, see changing dies 4.1.
Defective quick-change die head.
Change quick-change die head.
Thread torn out.
Blunt dies.
Change dies or quick-change die head. See 4.1. for changing dies.
Dies not inserted in the right order.
Remove quick-change die head, check numbering, re-insert dies
if necessary, see changing dies 4.1.
Poor quality pipe material.
Look for the seal of quality when buying pipe material.
Unsuitable thread-cutting material.
Use ROLLER thread-cutting material.
Pipe turns i
Pipe turns in counter holder (3) during
thread cutting.
Teeth of the prism die (4) of the counter holder
soiled.
Clean the prism die with a wire brush.
Teeth of the prism die (4) of the counter holder
defective.
Change the counter holder.
Quick-change die head jams in the die
head holder (2).
Material build-up on the lock part of the die head.
Remove the material build-up with a fi le.
especially when they have not been used for a long time .
Clean the heavily soiled die head holder (2), the locking lever (12) and the ROLL-
ER’S quick-change die heads with dies for example with turpentine and remove
clogged chips. Change blunted ROLLER’S dies or ROLLER’S quick-change
die heads.
Only clean plastic parts (e.g. housings) with a mild soap and damp cloth. Do
not use household cleaners These often contain chemicals which can damage
the plastic parts. Never use petrol, turpentine, thinner or similar products to
clean plastic parts.
Make sure that liquids never get inside the electric die stock. Never immerse
the electric die stock in liquid.
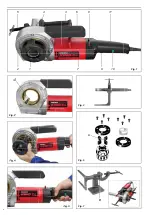
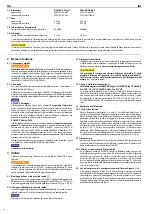
Changing the locking lever (12) (Fig. 2)
Unscrew the two screws next to the locking lever (12). Remove the locking
lever, spring and parallel pin. Remove any burr from the groove. Assemble in
reverse order. Check the function and smooth action!
Changing the dies on the ROLLER’S Central quick-change die head (Fig. 5)
1. Clamp the quick-change die head vertically in the vice.
2. Remove countersunk screws and cover.
3. Knock out the dies carefully to the centre of the die head body.
4. Knock the die heads with the start-cutting edge (A)
towards the bottom into
the corresponding slots to the extent that they do not protrude beyond the outer
diameter of the body. The dies and bodies are numbered. Die 1 in slot 1, die
2 in slot 2, die 3 in slot 3 and die 4 in slot 4.
5. Fit the cover and tighten the screws lightly.
6. Carefully knock the dies outwards with a soft pin (copper, brass or hard wood)
until they are in contact with the edge of the cover.
7. Tighten the countersunk screws fi rmly.
Changing dies in the ROLLER’S quick-change die head S (Fig. 5)
1. Clamp the quick-change die head vertically in the vice.
2. Remove countersunk screws and cover with guide bushing (do not remove the
guide bushing).
3. Knock out the dies carefully to the centre of the die head body.
4. Knock the die heads with the start-cutting edge (A) towards the top into the
corresponding slots to the extent that they do not protrude beyond the outer
diameter of the body. The dies and bodies are numbered. Die 1 in slot 3, die
2 in slot 2, die 3 in slot 1 and die 4 in slot 4.
5. Fit the cover with guide bushing and tighten the countersunk screws lightly.
6. Carefully knock the dies outwards with a soft pin (copper, brass or hard wood)
until they are in contact with the edge of the cover.
7. Tighten the countersunk screws.
4.2. Inspection / maintenance
WARNING
WARNING
Pull out the mains plug before carrying out maintenance or repair work!
This work may only be performed by qualifi ed personnel.
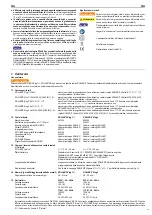
The gears of the ROLLER’S King 1¼ and ROLLER’S King 2 electric die stocks
are maintenance-free. They run in a life-long grease fi lling and therefore need
no lubrication. The motors have carbon brushes. These are subject to wear
and must therefore by checked and changed by qualifi ed specialists or an
authorised ROLLER customer service workshop from time to time.


