eng eng
Rapid charger Li-Ion
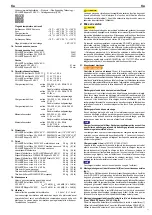
Input 100 – 240 V~; 50 – 60 Hz; 90 W
Output 21.6 V –
---
all-insulated, interference-suppressed
Rapid charger Li-Ion
Input 100 – 240 V~; 50 – 60 Hz; 290 W
Output 21.6 V –
---
all-insulated, interference-suppressed
Voltage supply
Input 220 – 240 V~; 50 – 60 Hz
220 – 240
220 – 240
Output 21.6 V –
---; ≤ 15 A
–
–
all-insulated, interference-suppressed
Voltage supply
Input 220 – 240 V~; 50 – 60 Hz
Output 21.6 V –
---; 40 A
–
–
all-insulated, interference-suppressed
1.6. Dimensions
ROLLER’S Axial-Press 25 22 V ACC 280×260×75 mm (11.0"×10.2"×3.0")
ROLLER’S Axial-Press 25 L 22 V ACC 305×260×75 mm (12.0"×10.2"×3.0")
ROLLER’S Exparo 22 V ACC
200×250×75 mm (7.9"×9.8"×3.0")
1.7. Weights
ROLLER’S Axial-Press 25 22 V ACC
drive unit without battery
2.6 kg (5.6 lb)
ROLLER’S Axial-Press 25 L 22 V ACC
drive unit without battery
2.8 kg (6.1 lb)
ROLLER’S Exparo 22 V ACC
22 V
22 V
drive unit without battery without expander
2.0 kg (4,4 lb)
drive unit without battery
drive unit without battery
Expander Cu (ROLLER’S Exparo 22 V ACC)
0.3 kg (0,7 lb)
Expander P (ROLLER’S Exparo 22 V ACC)
0.3 kg (0,7 lb)
Expander P-CEF (ROLLER’S Exparo 22 V ACC)
0.3 kg (0,7 lb)
ROLLER’S battery Li-Ion 21.6 V, 1.5 Ah
0.4 kg (0.9 lb)
ROLLER’S battery Li-Ion 21.6 V, 2.5 Ah
0.4 kg (0.9 lb)
ROLLER’S battery Li-Ion 21.6 V, 5.0 Ah
0.8 kg (1.8 lb)
ROLLER’S
ROLLER’S
ROLLER’S battery Li-Ion 21.6 V, 9.0 Ah
1.1 kg (2.4 lb)
ROLLER’S
ROLLER’S
Pressing heads (pair, average)
0.3 kg (0.7 lb)
ROLLER’S expander (average)
0.2 kg (0.4 lb)
ROLLER’S P-CEF expanding head (average)
0.2 kg (0.4 lb)
1.8. Noise information
Emission at workplace
ROLLER’S Axial-Press 25 22 V ACC /
L 22 V ACC
L
pA
= 73 d
pA
pA
B(A) L
WA
= 84 dB(A) K = 3 dB(A)
ROLLE
ROLLER’S Exparo 22 V ACC
R’S Ex
R’S Ex
L
paro 22 V ACC
paro 22 V ACC
pA
= 73 d
pA
pA
B(A) L
WA
= 84 dB(A) K = 3 dB(A)
1.9. Vibrations
Weighted effective value of acceleration
< 2,5 m/s² K = 1,5 m/s²
The specifi ed vibration emission value was measured according to a standard
test method and can be used for comparison with another power tool. The
specifi ed vibration emission value can also be used for an initial estimation of
the cut-out.
CAUTION
CAUTION
The vibration emission value may differ from the specifi ed value during actual
use of the power tool depending on the manner in which the power tool is used.
Dependent upon the actual conditions of use (periodic duty) it may be necessary
to establish safety precautions for the protection of the operator.
2. Preparations for Use
CAUTION
CAUTION
After the drive unit has been in storage for a long period of time, the overpres-
sure valve must be actuated fi rst by pressing the reset button (
sure valve must be actuated fi rst by pressing the reset button (4) before putting
back into operation. If it is stuck or stiff, it may not be pressed. The drive unit
must be handed over to an authorized ROLLER customer service workshop
for inspection.
The respective latest ROLLER sales literature applies for the use of ROLLER
pressing heads and ROLLER expanding heads for the different pipe connection
systems, see also www.albert-roller.de → Downloads → Product Catalogues,
Brochures. If the system manufacturer alters components of pipe connection
systems or markets new ones, their current application status must be enquired
about at ROLLER (Fax +
about at ROLLER
about at ROLLER
49 7151 1727-87 or e-mail info@albert-roller.de).
49 7151 1727-87
49 7151 1727-87
Subject to change and error.
2.1. Electrical connection
WARNING
WARNING
Note the mains voltage! Before connecting the drive unit, the rapid charger
or the power supply unit, check whether the voltage given on the rating plate
corresponds to the mains voltage. On building sites, in a wet environment,
indoors and outdoors or under similar installation conditions, only operate the
power tool on the mains with a fault current protection switch (FI switch) which
interrupts the power supply as soon as the leakage current to earth exceeds
30 mA for 200 ms.
Rechargeable batteries
Total discharging by undervoltage
The Li-Ion batteries may not drop below a minimum voltage because otherwise
the battery could be damaged by total discharge. The cells of the ROLLER
Li-Ion battery are delivered pre-charged to approx. 40 %. Therefore the Li-Ion
batteries must be charged before use and recharged regularly. Failure to observe
this regulation of the cell manufacturer can lead to damage to the Li-Ion battery
by total discharging.
Total discharging due to storage
If a relatively low charged Li-Ion battery is stored, self discharging can lead to
total discharge damage of the battery after longer storage. Li-Ion batteries must
therefore be charged before storing and recharged every six months at the
latest and charged again before use.
NOTICE
Charge the battery before use. Recharge Li-Ion batteries regularly to avoid
their total discharge. The rechargeable battery will be damaged by total
discharge.
Only use approved ROLLER rapid chargers for charging the
ROLLER
ROLLER
ROLLER battery,
ROLLER
ROLLER
see Guidelines for use, fi g. 3. New Li-Ion batteries and Li-Ion batteries which
New Li-Ion batteries and Li-Ion batteries w
New Li-Ion batteries and Li-Ion batteries w
have not been used for a long time only reach full capacity after several charges.
Rapid charger Li-Ion (Art. No. 571575, 571585, 571587)
The left control lamp lights up and remains green when the mains plug is
plugged in. If a battery is inserted in the rapid charger, the green control lamp
fl ashes to indicate that the battery is charging. The green light stops fl ashing
and remains on to signal that the battery is fully charged. If the red control lamp
fl ashes, the battery is defective. If the red control lamp comes on and remains
on, this indicates that the temperature of the rapid charger and / or the battery
is outside the permissible
is outside the permi
is outside the permi
operating range of the rapid charger of 0°C to +40°C.
NOTICE
The rapid chargers are not suitable for outdoor use.
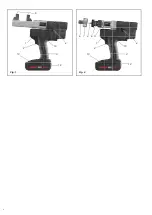
2.2. Installing (changing) the pressing heads (
Installing (
Installing (changing) the pressing heads (5) in axial presses (Figs.
55
1)
11
Remove the battery. Only use system-specifi c pressing heads. ROLLER’S
press ing heads have a letter to identify the compression sleeve system and a
number to identify the size. Read and observe the installation and assembly
instructions of the manufacturer/supplier of the used compression sleeve system.
Never use non-matching pressing heads (compression sleeve system, size)
for pressing work. The press joint could be unserviceable, and both the machine
and the press ing heads might be damaged.
Push the selected pressing heads (
Push the selected pressing heads (5) right in, if necessary turning them until
55
they engage (ball catch). Keep the pressing heads and locating hole inside the
pressing device clean.
2.3. Assembly (changing) of the expander (6), the expanding head (7) on
ROLLER’S Exparo 22 V ACC (Fig. 2)
22
Choose an expander (6) to match the expanding head (7). Use the expander
Cu for the ROLLER’S Cu expanding heads. Use the expander P for the
ROLLER’S P expanding heads. Use the P-CEF expander for the ROLLER’S
expanding heads. Only use system-specifi c expanding heads. ROLLER’S P
and ROLLER’S P-CEFexpanding heads are labelled with letters to identify the
compression sleeve system and a number to identify the size, ROLLER’S Cu
expanding heads only with a number to identify the size. Read and observe
the installation and assembly instructions of the manufacturer/supplier of the
used system. Never expand with an unsuitable expander, unsuitable expanding
heads (system, size). The joint could be useless and the machine and expanding
heads could be damaged. Grease the cone of the expanding mandrel (9) lightly.
Changing the P and Cu expander
Screw the selected expanding head onto the expanding device (6) to the stop.
The expanding device must now be set so that the thrust of the drive machine
The expanding device must now be set so t
The expanding device must now be set so t
is taken up by the drive machine and not the expanding head at the end of the
expanding. Unscrew the expanding device (6) complete with screwed on
expanding head from the drive machine for this. Let the feed piston run forward
as far as possible without the machine switching into reverse. In this position
as far as possible without
as far as possible without
the expander with screwed-on expanding head must be screwed onto the drive
unit until the expanding jaws (8) of the expanding head (7) are fully open. The
expanding head must be secured with the locking nut (11) in this position.
NOTICE
Make sure that the compression sleeve is far enough away from the expanding
head (7) in the expanding process because otherwise the expanding jaws (8)
can bend or break.
Changing the P-CEF expander
Remove the battery. Screw on the locking nut (11) and the selected expander
(6) up to the stop. Screw the selected expanding head (7) onto the expander
up to the stop.
3. Operation
CAUTION
CAUTION
After the drive unit has been in storage for a long period of time, the overpressure
valve must be actuated fi rst by pressing the reset button (13) before putting back
into operation. If it is stuck or stiff, it may not be pressed. The drive unit must be
handed over to an authorized ROLLER customer service workshop for inspectio
ROLLER
ROLLER
n.
12
Summary of Contents for Axial-Press 25 22 V ACC
Page 2: ...Fig 2 Fig 1 13 13 2 2 4 4 12 12 10 10 3 3 1 1 6 11 9 7 8 5 2...
Page 53: ...53...
Page 54: ...54...
Page 55: ...55...

