background image

Air adjustment


Injectors were conceived to avoid any air adjustments and that whatever the gas you 
use.


c) Use of device


:


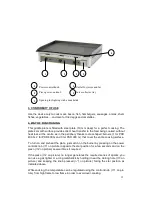
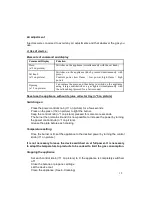
Elements of command and display


Never use the appliance without its juice collector tray (n°5 on picture)


Switching

-

on


Press the power control knob (n°1 on picture) for a few seconds.


Press on the piezo (n°2 on picture) to light the burner.


Keep the control knob (n°1 on picture) pressed for some more seconds.


The burner then remains lit and it is now possible to increase the power by turning 

the power control knob (n°1 on picture).


Grease the plate before each cooking.


Temperature setting


Once the burner is lit; set the appliance to the desired power by turning the control 
knob (n°1 on picture).


It is not necessary to leave the device switched on at full power. It is necessary 
to adapt the temperature to products to be cooked to limit the gas consumption.   


Stopping the appliance


Set each control knob (n°1 on picture) to 0: the appliance is completely switched

-

off.


Close the butane or propane cartridge


Let the device cool.


Clean the appliance. (See 6. Cleaning)


Command/Display


Function


Piezo


(n°2 on picture)


Switches on the appliance (simultaneously with the set knob)


Set knob


(n°1 on picture)


Switches  on  the  appliance  (knob  pressed  simultaneously  with 
piezo)


Controls  power  (low  flame  =  low  power,  high  flame  =  high 
power)


Opening


(n° 3 on picture)


Can replace the piezo and thus helps to switch on the appliance 
using  a  large  matchstick  or  a  gas  lighter  (simultaneously  with 
the set knob kept pressed for a few seconds)


19


Summary of Contents for PSR 400 G

Page 1: ...SATION PLAQUES A SNACKER GAZ INSTRUCTIONS FOR USE AND INSTALLATION GAS GRIDDLE PLATES PSR 400 G PSR 600 G PSR 900 G Fabrication fran aise Fabrication fran aise Fabrication fran aise Fabrication fran a...

Page 2: ......

Page 3: ......

Page 4: ...les de s curit doivent toujours tre observ es telles que Ne laisser jamais l appareil fonctionner sans surveil lance Tenir compte du mode d emploi conserver syst mati quement avec l appareil Installer...

Page 5: ...ombustibles Durant l utilisation prendre soin de ne pas obstruer les ou es de ventilation de l appareil Ne pas plier ou pincer le tuyau ou flexible Confier les r parations uniquement une personne qua...

Page 6: ...PSR 600 G et 3 br leurs pour la PSR 900 G qui cou vrent toute la surface de cuisson Pour allumer et pr chauffer la plaque il suffit d allumer le br leur en appuyant sur la manette du robinet n 1 sur l...

Page 7: ...a photo 5 FONCTIONNEMENT MANIPULATION a Installation Montage D baller soigneusement l appareil de son carton Placer la plaque snacker sur une surface plane et r sistante la chaleur Ne jamais placer l...

Page 8: ...uis pour l alimentation en air de combustion est de PSR 400 G 6 4 m3 h PSR 600 G 12 8 m3 h PSR 900 G 19 2 m3 h Conditions g n rales d installation L installation et l entretien de l appareil doivent t...

Page 9: ...m tre d injecteur France Luxembourg II2E 3 II2E 3B P G20 G25 G30 G31 G20 G25 G30 G31 20 25 28 30 37 20 25 50 135 90 135 85 Allemagne II2E3B P G20 G25 G30 G31 20 20 50 135 150 85 Autriche II2H3B P G20...

Page 10: ...la puissance souhait e en tournant le bouton de commande n 1 sur la photo Il n est pas n cessaire de laisser l appareil allum plein r gime Il faut adapter la temp rature aux produits cuire pour limite...

Page 11: ...s de cuisson Enfin essuyer la plaque avant tout rangement ou toute nouvelle utilisation Ne pas d poser de gla ons ou autre sur la plaque encore chaude d gla age qui entra nerait un choc thermique viol...

Page 12: ...couvert par la garantie D gla age re froidissement brutal l aide de gla ons et d eau froide lorsque la plaque est encore chaude en fin de cuisson Ne peuvent b n ficier de la garantie les r parations n...

Page 13: ...ave the machine working without any watch ing Take into account the instructions to be systematically kept with the appliance Install the appliance always in instructions respect A 10 cm distance mini...

Page 14: ...k after not to obstruct hearings of aeration of the appliance Do not bend the pipe or hose Entrust compensations only to a skilled person Use only spare parts of origin At the end of cooking before cl...

Page 15: ...just switch on the burner by pressing on the power control knob n 1 on picture opposite the star position for a few seconds and on the piezo n 2 on picture several times if required If the piezo n 2...

Page 16: ...e Never place the device near a wall or near a partition makes of combustible materials even if it is very well isolated A distance of minimum 10 cm with the partition or the wall is necessary Remove...

Page 17: ...stallation The installation and maintenance of the appliance must be carried out in compliance with the statutory texts and good practices in force mainly General specifications For all appliances Art...

Page 18: ...ter of injector France Luxembourg II2E 3 II2E 3B P G20 G25 G30 G31 G20 G25 G30 G31 20 25 28 30 37 20 25 50 135 90 135 85 Germany II2E3B P G20 G25 G30 G31 20 20 50 135 150 85 Austria II2H3B P G20 G30 G...

Page 19: ...ower by turning the control knob n 1 on picture It is not necessary to leave the device switched on at full power It is necessary to adapt the temperature to products to be cooked to limit the gas con...

Page 20: ...re putting it away or using it again Do not put ice cubes or other on the plate that is still hot deglazing which may lead to a violent thermal shock permanent damage and coloration of the plate The p...

Page 21: ...overed by the warranty Deglazing sudden cooling with ice cubes and cold water when the plate is still hot after cooking Cannot benefit from the guarantee the repairs required as a result of false oper...

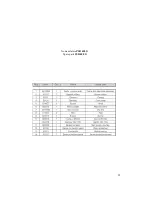
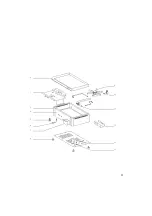
Page 22: ...22 Nomenclature PSR 400 G Spare parts PSR 400 G...

Page 23: ...23...

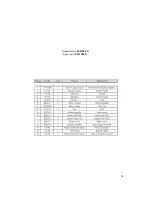
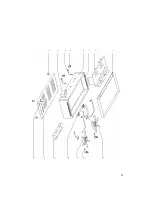
Page 24: ...24 Nomenclature PSR 600 G Spare parts PSR 600 G...

Page 25: ...25...

Page 26: ...Nomenclature PSR 900 G Spare parts PSR 900 G 26...

Page 27: ...27...

Page 28: ...G03232...

Reviews: