3
Rollerdor RD1X2 Control Box, Edition 2022/1
2. PROGRAMMING REMOTE
CONTROL HANDSETS
DIRECTION OF ROTATION
1
Press and hold the top right button ( ) on the handset and the barrel should start turning in the
downwards direction. Should the barrel be turning in the up direction, press the bottom right stop
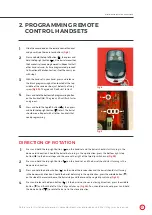
button ( ) so the barrel stops and then move the right of the two dip switches up
(fig.5B)
.
2
Press and hold the top right button ( ) on the handset, and the barrel should start turning in the
downwards direction.
3
Press and hold the bottom button ( ) on the side of the receiver box and the barrel should start turning
in the downwards direction. Should the barrel be turning in the up direction, press the middle button ( )
on the side of the receiver box so the barrel stops and then move the single dip switch up
(fig.5C)
.
4
Press and release the down button ( ), if the barrel continues in closing direction, press the middle
button ( ) and flick the left of the 2 dip switches up
(fig.5A)
, You should now have to press and hold
the down button ( ) to rotate the barrel in the close direction.
1
Slide the cover down on the remote control handset
and you will see there are four buttons
(fig.4)
.
2
Press and hold the top left button ( ), then press and
hold the top right button ( ), if the barrel moves then
the handset is already programmed in. Repeat with all
other handsets and, if all are programmed, proceed
to ‘Direction of Rotation Section’, if not then carry on
with step 3.
3
With the handset in your hand, press and release
the black programming button located at the top
middle of the receiver box just below the fixing
screw
(fig.5D)
. The green LED will start to flash.
4
Press and hold the bottom left programming button
on the handset ( ). The green LED will flash faster
and go out.
5
Press and hold the top left button ( ), then press
and hold the top right button ( ) to test. The barrel
should move. Repeat with all other handsets that
need programming.
fig.4
D
Pictures are for illustration purposes only, connector blocks are not provided and further fittings may be required.
fig.5
C
A
B
D


