background image

15

RolliBot RolliCool A20 Portable A/C with Heater User Manual

1. Press the power button on the control panel or remote.
2. Press sleep button on the control panel or the sleep mode button on the remote. The display’s 

“Sleep” light should turn on. Press again to turn this mode off.

  In sleep mode, the fan speed is automatically set to low and cannot be adjusted. 

Section 6. Maintenance

Proper maintenance will help improve your RolliCool’s performance. Periodically, the RolliCool 

will need its filters cleaned. For optimal performance, the filters should be cleaned at least twice 

a month. 

•   If any type of non-routine maintenance is needed, such as any maintenance not described in Section 6 of this    
  manual, please contact customer service or a certified HVAC professional as the unit contains refrigerant.
•  Wipe the exterior clean with non-abrasive cloth. If needed, cloth can be dampened with water.
•  Do not use harsh cleaning chemicals as these may damage the unit.

6.1 – How to Clean the Filters

•   Please make sure your A/C unit is completely powered off   

  before performing any type of maintenance.

•   Do not scrape the air filters as they may sustain damage. 
•   A hand vacuum may be used to clean filters.
•  Replace filters after cleaning. Do not use the RolliCool  


  without the filters.
•  If water has been used to clean any filter, ensure it is  


  completely dried before reinstalling. Do NOT dry any filter   

  in direct sunlight.

•   DO NOT wash the black carbon filter. Only the other two    
  filters may be washed.

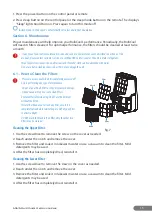
Cleaning the Upper Filter

1. Use the screwdriver to remove the screw on the cover as needed.
2. Reach under the notch and remove the cover.
3. Remove the filter and soak it in lukewarm water or use a vacuum to clean the filter. Mild 

detergents may be used.

4. After the filter has completely dried, reinstall it.

Cleaning the Lower Filter

1. Use the screwdriver to remove the srew on the cover as needed.
2. Reach under the notch and remove the cover.
3. Remove the filter and soak it in lukewarm water or use a vacuum to clean the filter. Mild 

detergents may be used.

4. After the filter has completely dried, reinstall it. 

Notch

Notch

Filter

Filter

fig. 7

Summary of Contents for Rolli Cool A20

Page 1: ...ving our customers and providing the best products our product information including our user manuals may receive updates from time to time Please check our website for the latest user manuals and pro...

Page 2: ...www rollibot com Customer Service 1 844 585 6295...

Page 3: ...he weather s like The A20 is designed for indoor use and can be used in different sized spaces Casters make it easy to move the unit from room to room so you can stay comfortable anywhere There s even...

Page 4: ...8 2 4 Remote Overview 9 Section 3 Setting Up the Unit 9 Section 4 Wireless Setup 12 4 1 App Installation 12 4 2 App Pairing 12 4 3 Amazon Alexa Setup 13 Section 5 How to Use the RolliCool 13 5 1 Time...

Page 5: ...bjects into the product The product is not a toy Do not leave children unsupervised around the product The product is designed for indoor use only Keep the product upright at all times Do not use the...

Page 6: ...nna Increase the separation between the equipment and receiver Connect the equipment into an outlet on a circuit different from that to which the receiver is connected Consult the dealer or an experie...

Page 7: ...Pipe 2 x Air Filters pre installed 1 x Heat Exhaust Pipe 1 x Heat Exhaust Pie Connector Window Kit Parts 1 x User Manual RolliCoolA20PortableA CwithHeater RemoteControl DrainagePipe WindowKit 1 2 3 4...

Page 8: ...adjust timer duration 5 Display This section will light up to show temperature and other information 6 Down Button Press to lower temperature or adjust timer duration 7 Mode Button Press to cycle bet...

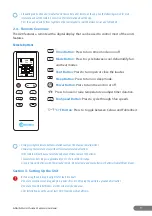
Page 9: ...the unit on or off Press to lower or raise temperature or adjust timer duration Fan Speed Button Press to cycle through 3 fan speeds C F Button Press to toggle between Celsius and Fahrenheit Avoidpre...

Page 10: ...B A B A These parts are used to secure the sections together and can be loosened or tightened when adjusting the sections according to window height Screw Fastener Step 1 Separate one screw fastener...

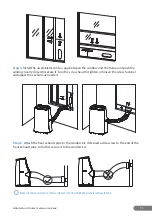
Page 11: ...early closed to secure it Turn the screw head to tighten or loosen the screw fastener and adjust the sections as needed Step 6 Attach the heat exhaust pipe to the window kit If desired add a screw to...

Page 12: ...h devices itisrecommendedtokeeptheconnecteddeviceswithinatleast32feetofeachother Theconnectionmaybeterminatedorfailtoworkproperlyiftheconnecteddevicesaretoofarapart Step 1 Turn on the RolliCool The WI...

Page 13: ...toattachthe drainagehose It srecommendedtoattachthehosetotheupperopeningwhenusingcoolordehumidifymodesandto attachittothetheloweropeningwhenusingheatmode SeeSection6 2forforinformation 5 1 Timer Mode...

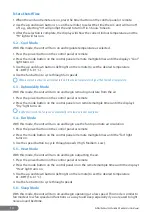
Page 14: ...emoving moisture from the air 1 Press the power button on the control panel or remote 2 Press the mode button on the control panel or on remote multiple times until the display s Dry light turns on In...

Page 15: ...How to Clean the Filters PleasemakesureyourA Cunitiscompletelypoweredoff beforeperforminganytypeofmaintenance Donotscrapetheairfiltersastheymaysustaindamage Ahandvacuummaybeusedtocleanfilters Replacef...

Page 16: ...unitmaybetiltedslightbackwardsto promotefasterdrainage Keepinmindtheunitmayholdmorewaterthanexpected Ifusingacontainer donotuseasmalloneoreithertakecareof drainageoutdoors Using the Upper Lower Draina...

Page 17: ...etemperaturefluctuations Section 8 Troubleshooting Problems Possible Causes Solution s The unit does not work There is no electricity Turn it on after connecting it to a socket with electricity The ov...

Page 18: ...includes a One Year Limited Hardware Warranty Warranty The Warranty covers product defects in materials and workmanship under normal use This Warranty is limited to residents of the United States and...

Page 19: ...disassemble the Product Disassembling the Product will void this Warranty Only WP or a party expressly authorized by WP should perform service on this Product DISCLAIMER OF WARRANTY THE REMEDIES DESCR...

Page 20: ...Copyright 2019 Rollibot LLC All Rights Reserved...

Reviews: