Step 4 - Fitting the Door Cont...
1.
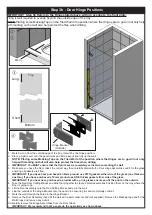
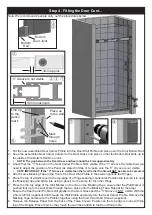
Put the now assembled Seal Carrier Profile into the Door Wall Profile and place over the Door Bottom Rail.
2.
Keep the assembled Seal Carrier parallel to the Door Glass and place so that the Bottom Rail butts up to
the inside of the Bottom Rail Door Joint.
• NOTE: The gap between the Door Glass and Seal should be 3mm approximately.
3.
Check that the “V” Groove on the Seal Carrier Profile is NOT visible. If the “V” Groove IS visible then you
need to adjust the position of the Panel (as stated in Step 4) to make sure the “V” Groove is not visible.
•
VERY IMPORTANT: If the “V” Groove is visible then the Seal Carrier Profile will
NOT be able to be secured.
4.
Attach some Masking Tape to the front of the Door Wall Profile in the areas opposite the Hinges.
5. Place the top of a Spirit Level to the top edge of a Hinge keeping it horizontal. Position the level so it is over
the Masking Tape and add a line using a pencil, do the same for the other Hinge.
6. Place the the top edge of the Wall Marker on the line on the Masking Tape, ensure that the Wall Marker is
pushed fully up to the wall. Mark through the two holes onto the Masking Tape. Repeat for the other.
7.
Ensure the Seal Carrier Profile is still parallel to the Door Glass and the “V” Groove is
NOT visible. With the
2.5mm drill bit (supplied) drill through the Wall Profile accurately into the Seal Carrier Profile. Remove the
Masking Tape and secure the Profiles together using the 9mm Cap Head Screws (supplied)
8.
Remove the Release Paper from the back of the False Covers, Position so the top edge is in line with the
top of the Hinges. Place them so they touch the wall then attach to the Door Wall profile.
②
①
Bottom
Rail
“V” Groove is not visible
②
3mm approx
②
Bottom
Door Joint
10mm maximum
Note: We recommend 2 people carry out the procedures below.
③
⑥
Line up
to the
pencil
mark
Mark
through
holes
Place up
to the wall
⑧
⑦
⑦


