background image

 Ref: KLBV/TLBV - Rev 2 May 2022

Hinged Bathscreen

Instruction Manual

KLBV / TLBV

IMPORTANT INFORMATION

Please make sure the purchaser/end user 

completes and returns the guarantee card 

which is enclosed with this product.  Failure 

to validate the Guarantee will mean only the 1 

Year Statutory Guarantee will apply.

CONSUMER GUARANTEE

PRE-INSTALLATION CHECKS

1.  Check you have the correct product. Please look at the labels on the side of the product packaging.

2. 

Check all the product components are in the box and the fixing kits.

3.  Unpack your product and handle it with care.

4.  Please check the product for defects or damage, once the installation has commenced we cannot accept responsibility for any defects or       

damage.

5.  Please take time to read these instructions prior to installing your product.

6.  Before you commence any drilling check there are no hidden electrical cables and/or water pipes.

7.  No attempt should be made to re-work the toughened safety glass.

8.  The installation of the product should be performed by two persons.

9.  It is strongly recommended that the walls the product is going to be installed on are vertical.

10. 

It is strongly recommended the product is fitted on a tiled surface or similar waterproof surface.

11.  It is strongly recommended the walls are tiled and grouted before the product is installed.

12.  If the walls and/or the tray are not level you will not achieve maximum adjustment of the product.

13.  Pictures used are for illustration purposes only, product designs may alter slightly as a result of continuing product development.

14.  We do not stipulate where the European Standard Kite Mark should be positioned on the glass when being factory assembled.

15.  Please note that some natural misting may occur when you remove this product from its packaging, due to the addition of the glass protection 

pre-coating. If this does occur this can easily be removed with a soft, dry cloth.

Component Check List: Supplied

Description

Quantity

Hinged Panel Assembly

1

Moving Panel Glass

1

Bottom Rail

1

Door Bottom Rail

1

Glass-to-Glass Hinges

2

Profile to Damn Joint

1

End Cap (LH & RH)

1 Each

Bottom Deflector Seal

1

Bracing Assembly (LH & RH)

1 Each

Vertical Flipper Seal

1

Wall Brackets

2

Hinge Backplate & Flipper Gasket

2

Wall Profile

1

Blanking End (LH & RH)

1 Each

Wall Profile Top Cap

1

              Fixing Kit Components

Description

Quantity

Door Setting Blocks

4

38mm Long Csk Head Screws

5

Wall Plugs

5

Hinge Spacer Gaskets

4

Branding Clip

1

Equipment Check List: Not Supplied

Description

Electric / Battery Drill
Pozi Screwdriver
Sealant Gun / Sealant
Spirit Level (Large)
6mm Masonry Drill Bit
Tape Measure
Pencil
Torque Wrench
Stanley Knife / Snips

Be aware toughened glass can shatter if not handled correctly. It should not 

be subjected to any sharp impact and it is essential to protect the glass by 

resting it on a soft protective surface during installation such as cardboard 

or carpeting. It is recommended to wear PPE at all times during installation.

Summary of Contents for KLBV

Page 1: ... not achieve maximum adjustment of the product 13 Pictures used are for illustration purposes only product designs may alter slightly as a result of continuing product development 14 We do not stipulate where the European Standard Kite Mark should be positioned on the glass when being factory assembled 15 Please note that some natural misting may occur when you remove this product from its packagi...

Page 2: ...t 3 The walls should be tiled and grouted up to the bath 4 When sealing have the bath full of water and use a good bathroom sealant Spray the seal and joints with the shower head and check for leaks after the bathroom sealant has cured Check the plumbing for leaks DO NOT plasterboard over the bath DO NOT grout the tiles when the enclosure has been fitted the grout may discolour the aluminium profi...

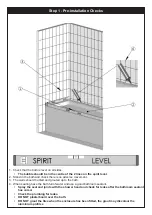
Page 3: ...l inline with the inner edge of the bath 3 Mark the wall up the wall profile using a pencil 4 Mark the wall through the holes in the wall profile 5 Disassemble the wall profile joint and bottom rail Apply a bead of silicon the width of the wall profile where it meets the top of the bath and the tiled wall 6 Drill the wall with a 6mm masonry drill not supplied Remove the masking tape and fit the wa...

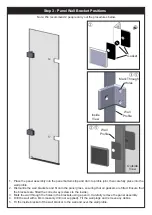
Page 4: ...glass ensuring that all gaskets are fitted Ensure that the brackets are fitted the correct way screws to the inside 3 Mark the wall through the holes in the brackets using a pencil Carefully remove the panel assembly 4 Drill the wall with a 6mm masonry drill not supplied Fit the wall plugs and remove any debris 5 Fit the inside bracket of the wall bracket to the wall and over the wall profile Note...

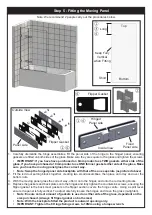
Page 5: ...ORTANT Ensure that the rail is fitted with the angle facing inwards towards the shower 3 With the panels in position attach the front of the wall brackets to the already fitted brackets and fully tighten all the screws Ensure that the gaskets are placed between the brackets and glass Note We recommend 2 people carry out the procedures below Dam to Profile Joint Bottom Rail Panel Rail Door Bottom R...

Page 6: ...ng panel glass the correct way offer it onto the hinges and onto the red setting blocks 4 Replace the gaskets and back plates onto the hinges and fully tighten the countersink screws ensuring the flipper gasket is the back most gasket so the flipper section covers the hinge centre Using a spirit level ensure the panel is fully vertical To adjust carefully loosen the hinges and move the glass re ti...

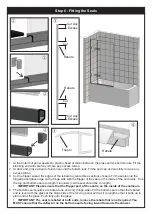
Page 7: ... of the enclosure Trim the top and bottom seals to length if required centre seal should be to length IMPORTANT Please ensure that the flipper part of the seal is on the inside of the enclosure 4 The bottom seal requires a rebate at one end only hinge side Fit the bottom seal so that the rebated end is level with the glass at the hinge side of the moving panel and cut it to length so that it butts...

Page 8: ...assemble 7 Ensure the gaskets are between the glass and bracing fully tighten all screws fit the cover cap 8 Place a bead of silicon around the top and up the sides of the dam to profile joints and door bottom joint 9 Seal the wall profile up from the bath top on the inside and outside 10 Seal the base of the enclosure horizontally on the outside only and around the end cap 11 Seal up from the top...

Page 9: ...per Gasket 2 4 Wall Brackets 2 15 Wall Channel 1 5 Profile to Damn Joint 1 16 Bottom Rail 1 6 End Cap LH 1 17 Door Bottom Rail 1 7 End Cap RH 1 18 Vertical Flipper Seal 1 8 Top Cap 1 19 Deflector Seal 1 9 Branding Clip 1 10 LH Bracing Assembly 1 11 RH Bracing Assembly 1 If you need to replace any damaged parts please see illustration below for parts list then call Customer Relations on 01325 32803...

Page 10: ...g the enclosure Should you experience any problems during installation please refer to the Trouble Shooting Guide or contact Customer Relations on 44 0 1325 328033 To enable customer relations to provide you with an excellent level of service it is important that you quote your product Code and Reference Number these can be found on the Guarantee card Product alignment on the bath 1 Is the screen ...

Reviews: