background image


17

START 


Testing 

1.  Clean  the  parts  of  the  refrigerator  with  lukewarm  water  containing  a  littleneutral 

detergent and with clear water, and wipe them dry. 
 

Notes: 

E

lectric parts of the refrigerator can only be wiped by dry cloth. 


2.Press the button to function 5mode. The compressorbegin to work. 
3.Open  the  door  30  minutes  later,  if  the  temperature  in  the  refrigerator  decreased 
obviously, it shows that the refrigerator system works well. When the refrigerator operates 
for a period of time, the temperature controller will automatically set the temperature within 
limits it opens. 
 

Adjusting the temperature 

 
The temperature of the refrigerator is controlled by the control panel mounted in the fridge 
compartment. 
1.  Under the normal operating condition (in spring and autumn), it is recommended to set 

at Mode 5-8. 

2.  In summer when the ambient temperature is high, it is recommended to set at Mode 

2-4,  so  as  to  guarantee  the  fridge  and  freezer  temperatures  by  extending  the 
refrigerator  running  time;  and  in  winter  when  the  ambient  temperature  is  low,  it  is 
recommended to set at Mode 2-4 to avoid frequent start/stop of the refrigerator. 

3.  Fast  Cool:  When  this  function  is  enabled,  the  fridge  temperature  and  the  freezer 

temperature can be reduced rapidly at the same time, so that foods can be kept in 
fresh condition with their nutrition not lost. The maximum running time of the fast-cool 
function is 26 hours, after which, the refrigerator will be restored to its previous mode 
that is set before the fast-cool function is enabled. 


NOTE

: If the indicator light ‘2’ or ‘5’ or ‘8’ gets flickering, it indicates that the refrigerator 

has broken down. Please contact the after-sales personnel for on-site service as soon as 
possible. 

Summary of Contents for CM-335

Page 1: ...al de usuario antes del uso por primera vez Incluye informaci n importante con respecto a la instalaci n operaci n y mantenimiento Un uso inadecuado del dispositivo puede provocar situaciones de pelig...

Page 2: ...entaci n asegurarse de que no est da ado ninguno de los tubos del circuito refrigerante Cada 8 gr de refrigerante el sitio donde se instala debe contar con un volumen m nimo de 1 m3 La cantidad de ref...

Page 3: ...dentro del aparato Al descongelar el aparato no utilizar nunca objetos met licos para acelerar el proceso El incumplimiento de dicha advertencia podr a causar da os irreparables al circuito refrigera...

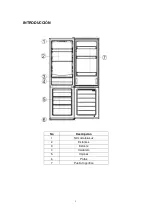
Page 4: ...3 INTRODUCCI N No Descripci n 1 Termostato Luz 2 Estantes 3 Estante 4 Verdulero 5 Cajones 6 Patas 7 Puerta frigor fico...

Page 5: ...dean sin parar es una indicaci n que nuestro aparato se ha estropeado Por favor en este caso contacte con en servicio t cnico USO Consejos uso correcto frigor fico Cuidado extra con alimentos no cocin...

Page 6: ...ci n si es posible Considere c mo desea cocinar el alimento antes de congelarlo No congele los alimentos en recipientes de metal Utilice bolsas de congelaci n especiales envases de pl stico papel de a...

Page 7: ...de que no haya obstrucciones Limpieza del exterior de la nevera congelador Use detergente no abrasivo est ndar diluida en agua tibia para limpiar el exterior Nevera Congelador No use limpiadores abras...

Page 8: ...el aparato no est en uso durante largos per odos de tiempo desconecte de la red el ctrica vac e todos los alimentos y limpie el aparato dejando la puerta entreabierta para evitar olores desagradables...

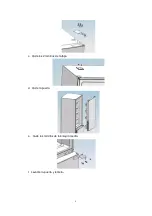
Page 9: ...8 c Quite los 2 tornillos de la tapa d Quite la puerta e Quite los tornillos de la bisagra media f Levante la puerta y ret rela...

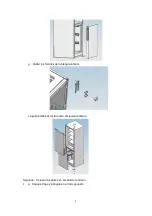
Page 10: ...9 g Quitar los tornillos de la bisagra inferior La puerta debe estar tal como el siguiente dibujo Segundo Colocar las partes en el sentido contrario 1 a Saque el tope y p ngalo en el lado opuesto...

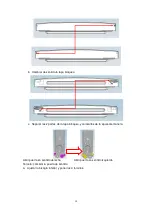
Page 11: ...eo c Separar las 2 partes de la tapa bloqueo y colocarlas de la siguiente manera Abrir puerta en sentido derecha Abrir puerta en sentido izquierdo Tercero cambiar la puerta de sentido a Ajustar la bis...

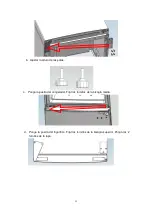
Page 12: ...tar la altura de las patas c Ponga la puerta del congelador Fijar los tornillos de la bisagra media d Ponga la puerta del frigor fico Fijar los tornillos de la bisagra superior Ponga los 2 tornillos d...

Page 13: ...sten sistemas de recogida espec ficos para residuos de aparatos el ctricos y electr nicos SAFETY WARNING It is hazardous for anyone other than authorized service personnel to carry out servicing or re...

Page 14: ...der to avoid a hazard This appliance can be used by children aged from 8 years and above and persons with reduced physical sensory or mental capabilities or lack of experience and knowledge if they ha...

Page 15: ...appliance are damaged prior to disposal Up to date information concerning options for disposing of your old appliance and packaging from the new one can be obtained from your local council office Lock...

Page 16: ...r annex ensure that the Fridge Freezer is placed above the damp course otherwise condensation will occur on the Fridge Freezer cabinet Never place the Fridge Freezer in a wall recessed or into fitted...

Page 17: ...rts of the Fridge Freezer can be cleaned with wax polish See page 10 for more details on cleaning Before plugging in YOUMUST Check that you have a socket which is compatible with the plug supplied wit...

Page 18: ...g and autumn it is recommended to set at Mode 5 8 2 In summer when the ambient temperature is high it is recommended to set at Mode 2 4 so as to guarantee the fridge and freezer temperatures by extend...

Page 19: ...meats should always be stored on a shelf above raw meats to avoid bacterial transfer Keep raw meats on a plate which is large enough to collect juices and cover it with cling film or foil Leave space...

Page 20: ...led foods egg Ready meals meat pies soft cheeses Pre cooked meats egg Ham Prepared salads including pre packed mixed green salads rice potato salad etc Desserts egg Cheese home prepared food and lefto...

Page 21: ...ozen foods together Try to keep frozen food together whilst shopping and on the journey home as this will help to keep the food cooler Store food straight away Don t buy frozen food unless you can fre...

Page 22: ...ot use used food containers unless cleaned thoroughly first Exclude as much air from the container as possible You could buy a special vacuum pump which sucks excessive air out of the packaging Leave...

Page 23: ...ater inside the Fridge Freezer cabinet As the solid frost loosens prize it away with the plastic scraper and remove 3 When defrosting is completed clean your Fridge Freezer as described Cleaning insid...

Page 24: ...control dial to the maximum setting and wait a few minutes If there is no humming noise it is not working Contact the local store where your purchase was made The Fridge Freezer is not working Check...

Page 25: ...revent unpleasant smells Changing the internal light 6 Before carrying out the bulb replacement always press and turn the thermostat control to dial to position 0 then disconnecting the mains supply 7...

Page 26: ...remove 4 bolts of hinge c Use the tool remove 2 bolts of opercle in cabinet d Upward the refrigerator door 50mm and remove it 1 a Use the tool remove 3 bolts of middle hinge b Upward the freezer door...

Page 27: ...26 c Use the hand and lift adjustable feet under the lower hinge remove 4 bolts in lower hinge The door have tear down so far...

Page 28: ...d Put the parts of door and lower hinge to relevant location in the opposite side 2 a Use the tool to take out shaft sleeve in top of refrigerator door and freezer door put them into the opposite side...

Page 29: ...and 2 parts of stopped and assemble into the location of below drawing This situation apply to open door in right side This situation apply to left side Thrid Assemble the door of refrigerator and fr...

Page 30: ...t to put the refrigerator in a level stable 1 Assemble freezer door and rotation 180 of middle hinge in side of cabinet fix 3 bolts of middle hinge 2 Assemble refrigerator door and upper hinge to side...

Page 31: ...30 The install of door have finished so far Schematic plot of right open Schematic plot of left open...

Page 32: ...ed technician You should only try to reverse the door yourself if you believe that you are qualified to do so All parts removed must be saved to do the reinstallation of the door You should rest the f...

Page 33: ...that this product should not be disposed with other household wastes throughout the EU To prevent possible harm to the environment or human health from uncontrolled waste disposal recycle it responsi...

Reviews: