means the proportion of the time that a machine can work continuously within 10 minutes when
it outputs the rated welding current.
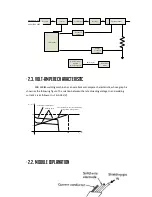
The relation between the duty cycle “X” and the output welding current “I” is shown as
the right figure.
If transformer is over-heat, the heat relay inside it will open and will output an instruction
to circuit board, cut AC relay and the output welding current, and brighten the over-heat pilot
lamp in the front panel. At this time, the machine should be relaxed for 15 minutes to cool the
fan. When operating the machine again, the welding output current or the duty cycle should be
reduced.
•
3.3. Equipment Connection
Operation Steps
:
1.
Connect the power source input cable of welding machine with the output port of air
switch in electric box on the spot.
2.
Connect the cable plug of wire feeder to the positive output of welding machine.
3.
Connect the control cable plug of wire feeder to the aero socket on the front board of
welding machine.
4.
Connect the negative pole of welding machine to the work piece (base metal).
5.
Connect the output pipe of gas cylinder to the input joint of gas valve on the wire feeder
and clamp it.
6.
Insert the torch joint into the output of wire feeder unit and keep the wire aim at the wire
feeder mouth.
-
Note: The plane of the joint should be aimed at screw, plugged tightly and rotated
90º, then screw the bolt tightly to ensure the gun contacting closely.
7.
Connect the shielded gas pipe of torch with the output of front panel on wire feeder.
8.
Connect the control cable pin of torch with the two-lead aero socket of front panel on
wire feeder.
9.
Notice that the wire diameter should be accordant with the wire wheel and torch tip and
press the wire properly with the handle.
•
3.4. Maintenance of MIG Gun mechanism
•
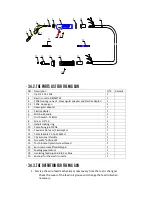
3.4.1. Dissection graphics for the MIG GUN
Summary of Contents for Ronch Weld 200MP
Page 1: ...SERIES 200MP 250MP MULTIPROCESS ...
Page 11: ...3 Installation ADJUSTMENT 3 1 Parameters Model Parameters MULTIMIG 200 PFC MV ...
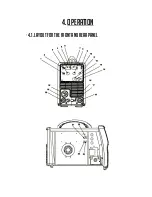
Page 16: ...4 OPERATION 4 1 Layout for the front and rear panel ...
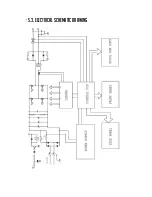
Page 24: ... 5 3 Electrical Schematic drawing ...
Page 25: ...25 200MP 250MP MULTIPROCESS ...


