background image


NEXUS CALL SYSTEM 

by Rondish


P23


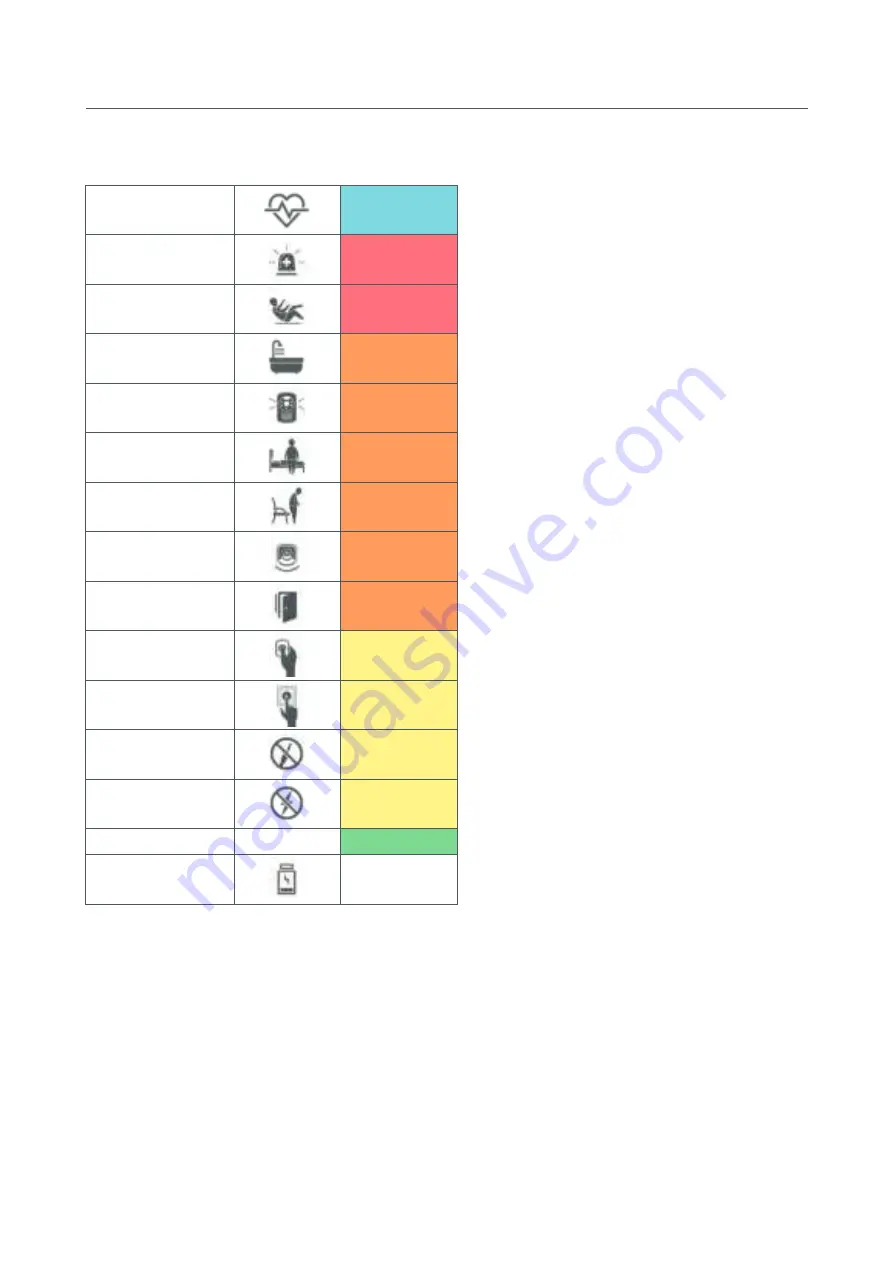
Display Types & Priority


Code Blue 


Priority 1 

Emergency 


Priority 1 

Man-down 


Priority 1 

Bath 


Priority 2 

Monitor* 


Priority 2 

Bed 


Priority 2 

Chair 


Priority 2 

Sensor 


Priority 2 

Door 


Priority 2 

Pendant 


Priority 3 

Call point 


Priority 3 

Cord removed 


Priority 3 

AC lost 


Priority 3 

Nurse Presence 


Priority 4 

Low battery 


Priority 4 


* A bed monitor displays when pairing the device to Nexus.  During an alarm Nexus will display 

either a bed, chair, sensor or floor type alarm (refer to Section 3.3.1 for details) 


3.2.2  Admin Reset 

There may be times when an event needs to be cleared from the central display panel.  This can 

be achieved by a long-press on the event and entering the Admin PIN that has been assigned 

for the system.  Note that this call may come up again if it has not been reset at the call point. 

Summary of Contents for Nexus Nurse Call

Page 1: ...Rondish Company Limited Nexus Nurse Call User Instructions for Repeater Configuration V2 1 19th March 2021 ...

Page 2: ...EXUS 10 2 1 The Nexus Display 11 2 1 1 Registering Nexus 11 2 1 2 Android Options 11 2 2 Configuring a Repeater Network 13 2 2 1 Network ID 13 2 2 2 Wireless Channel 14 2 2 3 Target Address 14 2 2 4 Repeater Address 14 2 3 Call Points 16 2 4 Indication Lights 17 2 4 1 Operation Modes 17 2 4 2 Programming 18 2 4 3 Call Forward 19 2 4 4 Pairing Call Points 19 2 5 Messaging Options 20 3 USER INTERFAC...

Page 3: ...ice Location 25 3 3 3 Delete Device 25 3 4 Event Log 26 3 5 Settings 26 3 5 1 Change Settings 27 3 5 2 Backup Restore 28 3 5 3 Export Log 28 3 5 4 Network Settings 28 4 MAINTENANCE 30 4 1 Battery Life 30 4 2 Nexus Updates 30 5 TROUBLESHOOTING 31 Appendix A Computer programming Call Points 32 FCC CE Statements 33 ...

Page 4: ...ected to a large computer monitor Up to three calls can be displayed on the screen with higher priority calls automatically moved to the top of the alarm display Alarm priority levels are Emergency Bath and standard Call If more than three calls happen to be active at the same time Nexus will display the three highest priority events and lower priority newer calls will display as the higher priori...

Page 5: ...NEXUS CALL SYSTEM by Rondish P5 1 2 System Layout with Repeaters ...

Page 6: ...crylic design Includes mounting screws TVB 11 Controller Box Allows Nexus software to run on an HD computer monitor Connect with paging receiver to allow remote corridor displays Bluetooth compatibility for mouse and keyboard ZP 01 M ZP 01 S Master Controller and Network Repeaters Expand the wireless coverage of your system using system repeaters up to 2km open space Allows use of bed monitoring d...

Page 7: ...Call and reset buttons Pull cord with dual triangles Includes mounting screws Replaceable CR2477 lithium batteries Low battery alert Rated IP65 WLSCP 02 Multi function call point Call Emergency Presence Guard and Reset buttons Input for handset and sensorpad floor mat Operates on 4 x AA alkaline batteries or DC12V Low battery alert Includes wall mount bracket and screws WLSMCL 01 Multi color Indic...

Page 8: ...p interval Reset on WCP 21C WCP 21BL Press button Cardiac Blue 0 25s high low beeping Blue rapid beeping Reset on WCP 21BL WLSCP 02 Call button Call Yellow 10s beep intervals Amber 10s beep interval Reset on WLSCP 02 WLSCP 02 Emergency button Emergency Red 0 5s high low beeping Red rapid beeping Reset on WLSCP 02 WLSCP 02 Presence button Presence Green no sound Green Reset on WLSCP 02 WCP 21 Press...

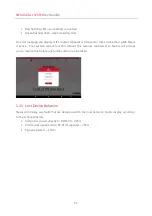
Page 9: ... active Your system cannot function without this receiver connected so Nexus will prompt you to resolve this before any further action can be taken 1 3 3 Lost Device Behavior Nexus will display any faults that are detected within the local network Faults display according to the schedule below Call points paired directly to DON 40 24hrs Call devices assigned to a ZP 01 S repeater 24hrs Signal repe...

Page 10: ... 01 S repeaters to use the same Network and Channel selected at Master unit When all Repeaters in the network are initialized by the Master power up or connection check the RSSI values shown in the Event Log Rondish recommends programming a signal hop if recorded RSSI values are below 100 4 Program Call points to communicate with the nearest repeater unit 5 Pair call points with Nexus and define h...

Page 11: ...license for your organization If you are loading Nexus onto a device not purchased from Rondish you will be prompted to enter a registration key the first time Nexus is launched The email and password used for the software registration will allow you to update Nexus as new features are implemented See Section 4 2 for details 2 1 2 Android Options The tablet is recommended for ease of programming a...

Page 12: ...t Android Box TVB 11 Connect the power adapter provided Connect with HD monitor using HDMI cable Bluetooth keyboard or mouse is recommended Insert Rondish dongle to launch Nexus If using a DON 40 receiver dongle skip to Section 3 3 to configure Call Points For facilities that require use of a Repeater Network the setup is covered in the next section ...

Page 13: ...t Data Rate 5 Set Repeater Address To enter programming on a ZP 01 S press and hold the T SW button on back until the Tx Rx LED on the front panel flashes and remains on To enter a digit use a screwdriver to select a number using the Address dial and enter the digit by pressing T SW Each time a digit is entered the ZP 01 S will beep in acknowledgment 2 2 1 Network ID The Network ID setting must be...

Page 14: ...nd press the T SW button 2 Adjust the rotary to 8 and press T SW again 3 The Tx Rx LED will then come back on and stay on steady briefly to indicate programming finished 4 The ZP 01 then automatically exits programming mode reboots itself and returns to normal operating mode If the signal strength of a Network Repeater is not strong enough directing towards the master the target address can instea...

Page 15: ...ary and DIP switches at Address in the picture in Section 2 2 above This setting can be selected without entering programming The chart below can be referred to when adjusting the rotary and DIP switches to set the required Address For example setting ZP 01 S Address to 18 1 setting of 2 on the rotary switch 2 setting of POS 1 ON and POS 2 OFF on DIP switch When this is changed the ZP 01 S should ...

Page 16: ... 21C call points are shipped in a sleep mode to preserve battery life until they are used To wake the call point hold Call until the LED stops flashing Step 2 Program Settings Use Rondish computer programmer to upload network settings onto call points This is only required if using a Repeater Network Refer to Appendix A Step 3 Add to Nexus Refer to Section 2 3 for how to pair and rename a call poi...

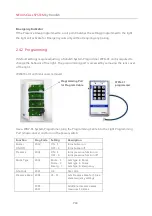
Page 17: ...to call points using a magnetic fob Room Indicator Press LED Segment Sound if buzzer active Blue Green Amber Red Call ON 1s ON 9s OFF Bath ON 1s ON 3s OFF Pull cord ON 1s ON 3s OFF Handset ON 1s ON 9s OFF Emergency OFF FLASHING 5s ON 5s OFF Presence ON OFF OFF N A Code Blue FLASHING OFF OFF 0 25s ON 0 25s OFF Reset OFF OFF OFF OFF OFF Sluice Indicator If the Presence Area programmed to a call poin...

Page 18: ...L 01 with lens cover removed Use a WGP 01 System Programmer plug the Programming Cable into the Light Programming Port shown above and turn on the power switch Function Prog Code Setting Description Buzzer ON OFF 000 ON 1 OFF 0 turns buzzer on turns buzzer off Presence 001 ON 1 OFF 0 turns presence function on turns presence function off Room Type 002 Room 1 Sluice 2 Emerg 3 Sets type to Room Sets...

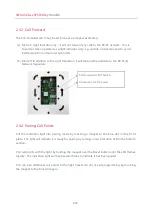
Page 19: ...o the ZP 01 S Network Repeaters 2 4 4 Pairing Call Points Put the indication light into pairing mode by touching a magnet to the blue dot on the front plate The light will indicate it is ready for pairing by turning on an indication LED in the bottom section Pair call points with the light by holding the magnet over the Reset button until the LED flashes rapidly The indication light will beep seve...

Page 20: ... by Rondish P20 2 5 Messaging Options Paging Pagers Remote display Mobile phone Requires online connection Turn Mobile Phone messaging ON Tap on Mobile Phone Provisioning Scan the QR code using your Android mobile phone ...

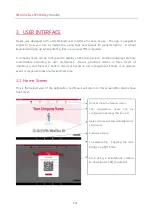
Page 21: ...avigated similar to how you use a smartphone using taps and swipes for general option A virtual keyboard will pop up when entering text or an access PIN is required A company name can be configured to display on the home screen and alarm displays are fully customizable according to user preferences Nexus prioritizes alarms in three levels of importance and there is a built in record of events to a...

Page 22: ...all alarms have been reset Nexus will automatically revert to the Home Screen after several seconds Color band this indicates the alarm priority with a time stamp shown on the left side Emergency RED band 0 5s beep interval Bathroom AMBER band 4s beep interval Standard Call YELLOW band 10s beep interval Location 1 this is typically a room or ward number though is fully customizable Location 2 this...

Page 23: ...resence Priority 4 Low battery Priority 4 A bed monitor displays when pairing the device to Nexus During an alarm Nexus will display either a bed chair sensor or floor type alarm refer to Section 3 3 1 for details 3 2 2 Admin Reset There may be times when an event needs to be cleared from the central display panel This can be achieved by a long press on the event and entering the Admin PIN that ha...

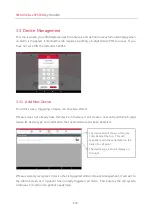
Page 24: ...nputting a 6 digit Admin PIN to access If you have not set a PIN the default is 123456 3 3 1 Add New Device From this screen triggering a device can have two effects If Nexus does not already have this device in memory it will create a new entry with the 6 digit device ID device type and notification that new hardware has been detected If Nexus already recognizes a device that is triggered while i...

Page 25: ... just added will bring up the screen below prompting you to enter a Primary and Secondary location The text you enter here will display when this device is in alarm state Click OK to confirm the location details and these will now display on the Device Management screen If you want to change how the alarm is displayed you can just tap on the entry again to make amendments 3 3 3 Delete Device If yo...

Page 26: ... data file that can be accessed by exporting and opening using Excel or the complete log can be accessed by tapping the screen seven times Your response time is logged as the duration between an alarm triggering and being reset Refer to Section 2 5 2 for instruction on how to export the data log 3 5 Settings The Settings tab is where you will set the default name to display on the Home screen chan...

Page 27: ...d Settings Network Settings used if system repeaters are connected Section 2 5 4 Network ID Channel Gateway ID Update makes changes take effect 3 5 1 Change Settings This will allow you to add a company name to display on the Home Screen or update the Admin PIN Press the Update button to make any changes take effect ...

Page 28: ...ow you to transfer the Event Log to a CSV file that is openable using MS Excel Insert a USB storage device and tap the Export Log button Nexus will prompt you to confirm the data export After inserting the USB drive into a PC the file will be stored in Android data Nexus com kelly pit file nexus events_date 3 5 4 Network Settings These settings will only be visible if a ZP 01 M is connected with N...

Page 29: ...ensure the systems do not affect the performance of each other Network ID Select 0 3 Channel ID Select 1 4 Gateway ID Recommend keeping the default of 48 for most applications The settings selected here must be matched by ZP 01 S network repeaters used at your facility These are covered in Section 2 2 ...

Page 30: ...rence only assuming each call lasts 1min before reset Component 1 Call Day 5 Calls Day 10 Calls Day WCP 21C 3 years 18 months 10 months WCP 21 3 years 18 months 10 months WLSCP 02 Battery life assumes volume set to silent alarm duration is 1min each and signal bump function turned ON 4 2 Nexus Updates There may be updates to the Nexus app since your purchase the version number is displayed at the ...

Page 31: ...ay need to install a signal repeater to improve wireless coverage Check for possible sources of interference Consider moving the Nexus tablet to a different location Dongle not receiving LEDs flash but nothing happens on the screen Disconnect and reconnect the dongle Re start the tablet Audible alarm not loud enough Increase volume setting this can be done on indication lights and or the Nexus tab...

Page 32: ...all Point Zone Address code can be chosen and set for 00 63 within the operating area of an individual Network Repeater This address tells the Central Monitor how to contact the Call Point and must not be repeated for each ZP 01 S Device Configuration The program string is 22 P LL G Where 22 Device Configuration Password P Product Type 3 Bath Alarm Button or 8 Call Point LL Presence Area 0 31 Used...

Page 33: ...which case the user will be required to correct the interference at his own expense The individual device complies with part 15 of the FCC Rules Operation is subject to the following two conditions 1 The device may not cause harmful interference and 2 the device must accept any interference received including interference that may cause undesired operation RF exposure statements 1 The Transmitter ...

Reviews: