background image

USER MANUAL

31

18"

/450mm

GASOLINE CHAIN SAW

Summary of Contents for 4647

Page 1: ...GASOLINE CHAIN SAW 4647 18 450mm GASOLINE CHAIN SAW ...

Page 2: ... weight 7kgs Frequency 8500rpm Bar length 18 Chain Speed 22m sec Brake Time 0 015s Weight without bar and chain 5 7kg PART LIST 18 450mm GASOLINE CHAIN SAW Bar Low Kickback Saw Chain Oil Pump Fuel Tank Cup Chain Brake Lever Front Hand Guard Starter Handle Throttle Control Lockout Muffle Front Handle Rear Handle Boot Loop Filter Cover Choke Lever Throttle Control Trigger Chain Screw Adjustment Nut ...

Page 3: ... or maintain the unit Follow all safety instructions Failure to do so can result in property damage or serious injury to yourself and or others Be thoroughly familiar with the controls and the proper use of the unit Know how to stop the unit and disengage the controls quickly Stay alert Do not operate the unit when tired ill or under the influence of alcohol drugs or medication Never allow childre...

Page 4: ...t for its intended purpose to cut wood Only use the unit as described in this manual Only use the manufacturer s recommended attachments with this unit Rotational Kickback can happen when the upper tip of the guide bar contacts an object while the chain is moving Fig 1 2 This can cause the chain to dig into the object and momentarily stop moving The guide bar is then kicked up and back toward the ...

Page 5: ...OL INE CHAIN SAW Fig 1 Fig 2 Fig 3 KICKBACK SAFETY PRECAUTIONS DO NOT over reach DO NOT cut above shoulder height DO NOT make cuts with the tip of the guide bar Fig 1 DO NOT let the tip of the guide bar contact any abject such as a log ...

Page 6: ...increases the chance of kickback and serious injury This increased risk is not significantly reduced by using a low kickback saw chain Using a bow guide on this unit is extremely dangerous Never start the saw when the guide bar is inside an existing cut Be extremely careful when re entering a cut Keep proper footing and balance at all times Always begin a cut with the engine running a full speed F...

Page 7: ... turn the unit on and off properly or if the lockout switch does not work Have defective switches replaced by an authorized service center DO NOT attempt operations beyond the operator s capacity or experience DO NOT cut near electrical cables or power lines DO NOT force the chain saw especially near the end of a cut It will do a better safer job when used at the intended rate DO NOT touch the eng...

Page 8: ...ain sheathed in the scabbard and positioned to the rear Always make sure the stop switch is in the proper position before starting or stopping the engine When cutting a limb that is under tension be alert for spring back which may cause the operator to be struck when the tension of the wood fibers is cause the operator to be struck when the tension of the wood fibers is released Use extreme cautio...

Page 9: ...eakage of parts fuel leaks and any other conditions that may affect its operation damaged parts should be properly repaired or replaced by an authorized service center unless otherwise indicated in this manual Use only original manufacturer replacement parts and accessories which are designed specifically to enhance the performance and maximize the safe operation of the product failure to do so ma...

Page 10: ...ng efficiency shorten the life of the saw chain cause rapid dulling of the saw chain and excessive wear to the guide bar from overheating An insufficient amount of lubricating oil is evidenced by smoke guide bar discoloration or pitch build up Fill the bar lube reservoir each time the fuel tank is filled Only use bar and chain oil that is formulated to perform over a wide range of temperatures wit...

Page 11: ...o Oil and Fuel Information for complete mixing instructions and detailed fuel requirements NOTE Always clean the fuel tank cap and surrounding area before fueling the unit Use a damp cloth This helps prevent debris from entering the fuel tank 1 Turn the unit on its side so that the fuel tank is facing up Fig 5 2 Slowly unscrew and remove the fuel tank cap by turning it anti clockwise ...

Page 12: ...o 1 3 throttle and then engage the chain brake by pushing the chain break lever forward with the left hand Fig 6 The Chain should stop moving abruptly If it does immediately release the throttle control trigger turn off the engine and return the chain brake to the disengaged position Refer to Starting and Stopping Instructions If the chain does not stop when the chain brake is engaged release the ...

Page 13: ... should be visible in the primer bulb If fuel cannot be seen in the bulb press and release the bulb until fuel is visible 3 Place the unit on a firm flat surface Crouch in the starting position and hold the unit firmly as shown Fig 9 Grip the front handle firmly with the left hand Place the right foot through the rear handle boot loop 4 With the right and pull the starter rope rapidly until the fi...

Page 14: ...ion Fig 10 NOTE It is normal for the chain to coast to a stop once the stop switch is in the STOP position NOTE For emergency stopping push the chain brake lever front hand guard forward to engage the chain brake and then move the stop switch up to the STOP position NOTE if moving the stop switch to the STOP position fails to stop the engine pull the choke lever out to the full extent to stop the ...

Page 15: ...ttle control trigger with the left hand while holding the front handle with the right hand Never allow any part of your body to be in the chain line while operating a saw Fig 14 Balance body weight securely with both feet on solid ground Keep the left arm locked in a straight arm position to withstand any kickback force Fig 15 Keep all body parts to the left of the chain line Fig 15 Make sure the ...

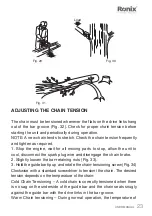
Page 16: ...d result in damage to the guide bar chain or motor Release the switch trigger as soon as the cut is completed Allow the chain to come to a complete stop Unnecessary wear may occur to the chain guide bar and unit if the saw is run without a cutting load Do not put pressure on the saw at the end of the cut Proper Hand Grip Position Thumb Below the Handle Proper Grip Fig 11 Fig 12 Fig 13 Chain Line C...

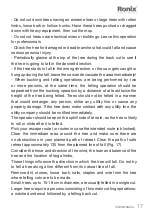
Page 17: ...4 6 m between workers Only operate the unit when visibility and light are adequate to see clearly REMOVING BUTTRESS ROOTS A buttress root is a large root extending from the trunk of the tree above the ground Remove large buttress roots prior to felling Fig 16 1 Make the horizontal cut into the buttress first followed by the vertical cut 2 Remove the resulting loose section from the work area 3 Rem...

Page 18: ...ner that would endanger any person strike any utility line or cause any property damage If the tree does make contact with any utility line the utility company should be notified immediately The operator should keep on the uphill side of terrain as the tree is likely to roll or slide after it is felled Pick your escape route or routes in case the intended route is blocked Clear the immediate area ...

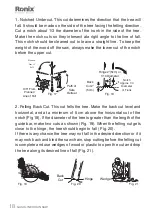
Page 19: ...pprox 1 3 Diameter of Trunk Hinge 2 5cm or 1 10 Diameter Fig 17 Fig 18 2 Felling Back Cut This cut fells the tree Make the back cut level and horizontal and at a minimum of 5 cm above the horizontal cut of the notch Fig 18 If the diameter of the tree is greater than the length of the guide bar make two cuts as shown Fig 19 When the felling cut gets close to the hinge the tree should begin to fall ...

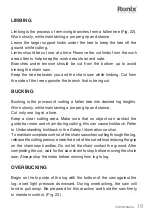
Page 20: ...while maintaining a proper grip and stance Cut only one log at a time Keep a clear cutting area Make sure that no object can contact the guide bar nose and chain during cutting this can cause kickback Refer to Understanding kickback in the Safety Information section To maintain complete control of the chain saw when cutting through the log release the cutting pressure near the end of the cut witho...

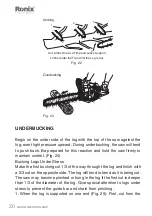
Page 21: ...repared for this reaction and hold the saw firmly to maintain control Fig 24 Bucking Logs Under Stress Make the first bucking cut 1 3 of the way throught the log and finish with a 2 3 cut on the opposite side The log will tend to bend as it is being cut The saw may become pinched or hung in the log if the first cut is deeper than 1 3 of the diameter of the log Give special attention to logs under ...

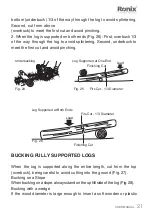
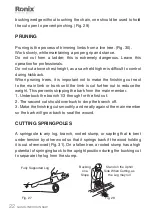
Page 22: ...m m GASOL INE CHAIN SAW Underbucking Log Supported at One End Finishing Cut Load Firs Cut 1 3 Diameter Fig 24 Fig 25 Firs Cut 1 3 Diameter Log Supported at Both Ends Finishing Cut Load Fig 26 BUCKING FULLY SUPPORTED LOGS When the log is supported along the entire length cut from the top overbuck being careful to avoid cutting into the ground Fig 27 Bucking on a Slope When bucking on a slope always...

Page 23: ...further out to reduce the weight This prevents stripping the bark from the main member 1 Underbuck the branch 1 3 through for the first cut 2 The second cut should overbuck to drop the branch off 3 Make the finishing cut smoothly and neatly against the main member so the bark will grow back to seal the wound CUTTING SPRINGPOLES A springpole is any log branch rooted stump or sapling that is bent un...

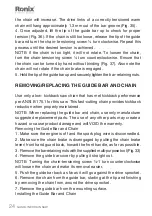
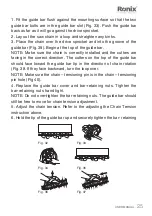
Page 24: ...to stop allow the unit to cool disconnect the spark plug wire and disengage the chain brake 2 Slightly loosen the bar retaining nuts Fig 33 3 Hold the guide bar tip up and rotate the chain tensioning screw Fig 34 Clockwise with a standard screwdriver to tensioni the chain The desired tension depends on the temperature of the chain Cold Chain Tensioning A cold chain is correctly tensioned when ther...

Page 25: ... ANSI B 175 1 for this saw This fast cutting chain provides kickback reduction when properly maintained NOTE When replacing the guide bar and chain use only manufacturer suggested replacement parts The use of any other parts may create a hazard or cause product damage and will VOID the warrenty Removing the Guide Bar and Chain 1 Make sure the engine is off and the spark plug wire is disconnedted 2...

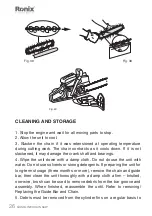
Page 26: ...ect direction The cutters on the top of the guide bar should face toward the guide bar tip in the direction of chain rotation Fig 38 If they face backward turn the loop over NOTE Make sure the chain tensioning pin is in the chain tensioning pin hole Fig 40 4 Replace the guide bar cover and bar retaining nuts Tighten the bar retaining nuts hand tight NOTE Do not over tighten the bar retaining nuts ...

Page 27: ...t and bearings 4 Wipe the unit down with a damp cloth Do not douse the unit with water Do not use solvents or strong detergents If preparing the unit for long term storage three months or more remove the chain and guide bar then clean the unit thoroughly with a damp cloth a firm bristled non wire brush can be used to remove debris from the bar groove and assembly When finished reassemble the until...

Page 28: ... dry high and or locked location out of the reach of children and other unauthorized persons Always store the unit and fuel in a cool well ventilated space where fuel vapors cannot reach sparks or open flames from water heaters electric motors or switches furnaces etx Never store the unit with fuel in the tank inside a building where fumes may reach an open flame or spark Long term storage instruc...

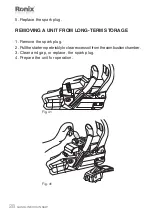
Page 29: ...ark plug REMOVING A UNIT FROM LONG TERM STORAGE 1 Remove the spark plug 2 Pull the starter rope briskly to clear excess oil from the combustion chamber 3 Clean and gap or replace the spark plug 4 Prepare the unit for operation Fig 41 Fig 41 ...

Page 30: ...rrestor screen is dirty Replace the spark arrestor screen The air filter is dirty Replace the air filter The carburetor mixture adjustment setting is incorrect Have the carburetor adjusted by an authorized service center THE ENGINE HESITATE CAUSE SOLUTION The carburetor mixture adjustment set ting is incorrect Have the carburetor adjusted by an authorized service center The fuel is old and or impr...

Page 31: ...t Adjust the chain tension The bar lube reservoir is empty Refill the bar lube reservoir The guide bar groove and or oil passag es are dirty Clean the guide bar groove and oil passages The oil flow from the automatic oiler is too low Increase the oil flow from the automatic oiler THE CHAIN DOES NOT ROTATE WHILE THE ENGINE IS RUNNING CAUSE SOLUTION The chain tension is too tight Adjust the chain te...

Page 32: ...USER MANUAL 31 18 450mm GASOLINE CHAIN SAW ...

Page 33: ......

Reviews: