background image

EN

24

ILLUSTRATION DU 

RETRAIT D’UNE 

JOUE

COMFORT HEADBAND

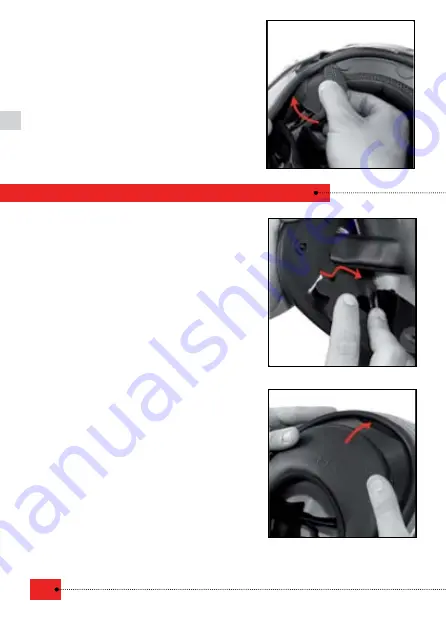
ASSEMBLY OF THE COMFORT HEADBAND
Position the strip centrally (in connection 
with  the  shell)  then  slide  the  plastic  part 
of the strip between the shock absor-
bing  cap  and  the  shell  (see  opposite). 
Press  the  strip  firmly  at  the  bottom  of 
the slot (until you cannot see the seam 
any more) by applying pressure using your 
thumbs. Then slide the ends of the strip into 
the notches that are located on comfort 
cheeks maintenance plates.

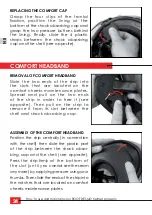
REPLACING THE COMFORT CAP
Grasp the four clips of the frontal 

fixation, position the lining at the 

bottom of the shock absorbing cap and 

grasp the two pressure buttons behind 

the lining. Finally, slide the 4 plastic 

straps between the shock absorbing 

cap and the shell (see opposite).

REMOVAL OF COMFORT HEADBAND
Slide  the  two  ends  of  the  strip  into 

the slots that are located on the 

comfort cheeks maintenance plates. 

Spread  and  pull  on  the  two  ends 

of the strip in order to free it (see 

opposite).  Then  pull  on  the  strip  to 

remove it from its slot between the 

shell and shock absorbing cap.

ILLUSTRATION DU 

RETRAIT D’UNE 

JOUE

ILLUSTRATION DU 

RETRAIT D’UNE 

JOUE

How to use and maintain your ROOF DESMO helmet properly

Summary of Contents for RO31 DESMO

Page 1: ......

Page 2: ...Français 1 16 English 17 32 Deutsch 33 48 Italiano 49 64 Espanol 65 80 ...

Page 3: ...et Always keep your motorcycle and equipment in good condition For maximum protection the helmet must be perfectly adapted to the head and tied under the chin firmly to minimise the risk of serious injury even death A helmet is designed to absorb a single shock Do not continue using a helmet that has seen a shock in its past The shock might have caused partial destruction of the hull and it will a...

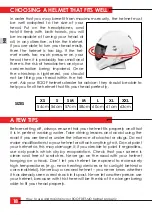
Page 4: ...O helmet properly SIZES XS S SM M L XL XXL 54cm 56cm 57cm 58cm 60cm 61cm 63cm A FEW TIPS Before setting off always ensure that your helmet fits properly and that it is in perfect working water Take driving lessons and avoid using the road if you are tired or under the influence of alcohol or drugs Do not make modifications to your helmet or attach anything to it Do not paint your helmet as this ma...

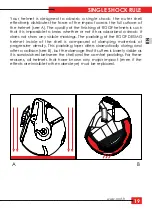
Page 5: ...t has absorbed a shock it does not show any visible markings The padding of the ROOF DESMO helmet inside of the shell is composed of damping materials of progressive density This padding layer alters dramatically during and after a collision see B but the damage that it suffers is barely visible as it is sandwiched between the shell and the comfort padding For these reasons all helmets that have k...

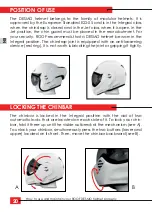
Page 6: ...l position The chinstrap joint is equipped with an anti loosening device red ring It is not worth lubricating the joint or gripping it tightly 20 The chinbar is locked in the Integral position with the aid of two automatic locks that are located on each side of it To lock your chin bar fold it there up until the visible outbreak of the mechanism see A To unlock your chinbar simultaneously press th...

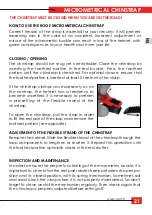
Page 7: ...ontrary the helmet has a tendency to become unsettled it is necessary to perform a pre setting of the flexible strand of the chinstrap To open the chinstrap pull the strap in order to lift the red part of the clasp and remove the toothed portion see opposite ADJUSTMENT OF THE FLEXIBLE STRAND OF THE CHINSTRAP Remove the helmet Slide the flexible strand of the chinstrap through the loop components t...

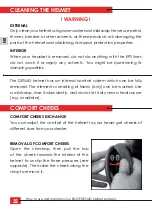
Page 8: ...ping qualities The DESMO helmet has an internal comfort system which can be fully removed The elements consisting of fabric only can be washed Use a mild soap rinse it abundantly and do not let it dry near a heat source e g a radiator COMFORT CHEEKS COMFORT CHEEKS EXCHANGE You can adjust the comfort of the helmet to your head get cheeks of different sizes from your dealer REMOVAL OF COMFORT CHEEKS...

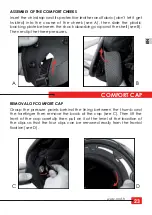
Page 9: ...ISSEMENT DE LA PREPLAQUE SOUS LE CALOTIN ILLUSTRATION DU CLIPSAGE DE LA JOUE SUR LES PRES SIONS A B COMFORT CAP REMOVAL OF COMFORT CAP Grasp the pressure points behind the lining between the thumb and the forefinger then remove the back of the cap see C Then lift the front of the cap carefully then pull on it at the level of the location of the clips so that the four clips can be removed easily fr...

Page 10: ...E COMFORT CAP Grasp the four clips of the frontal fixation position the lining at the bottom of the shock absorbing cap and grasp the two pressure buttons behind the lining Finally slide the 4 plastic straps between the shock absorbing cap and the shell see opposite REMOVAL OF COMFORT HEADBAND Slide the two ends of the strip into the slots that are located on the comfort cheeks maintenance plates ...

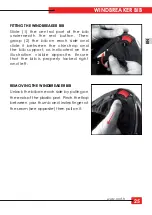
Page 11: ...he flap between your thumb and index finger at the seam see opposite then pull on it FITTING THE WINDBREAKER BIB Slide 1 the central part of the bib underneath the red button Then grasp 2 the bib on each side and slide it between the chinstrap and the bib support as indicated on the illustration visible opposite Ensure that the bib is properly locked right and left ILLUSTRATION DU RETRAIT D UNE JO...

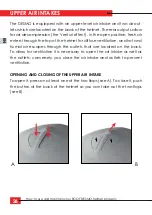
Page 12: ...umid air escapes through the outlets that are located on the back To allow for ventilation it is necessary to open the air intake as well as the outlets conversely you close the air intake and outlets to prevent ventilation UPPER AIR INTAKES OPENING AND CLOSING OF THE UPPER AIR INTAKE To open it press on at least one of the two flaps see A To close it push the button at the back of the helmet so y...

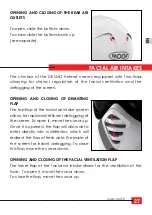
Page 13: ...NG FLAP The top flap of the facial air intake system allows for rapid and efficient defogging of the screen To open it move the cursor up Once it is opened the flap will allow air to enter directly into a deflector which will redirect the flow of fresh air to the inside of the screen for instant defogging To close this flap move the cursor down OPENING AND CLOSING OF THE FACIAL VENTILATION FLAP Th...

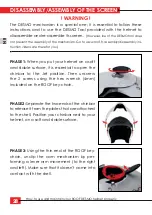
Page 14: ...your helmet on a soft and stable surface it is essential to open the chinbar to the Jet position Then unscrew the 2 screws using the hex wrench 4mm included on the ROOF key chain PHASE 2 Separate the two ends of the chinbar to release it from the plates that are attached to the shell Position your chinbar next to your helmet on a soft and stable surface PHASE 3 Using the thin end of the ROOF key c...

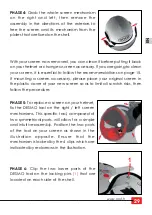
Page 15: ...ool on your screen as shown in the illustration opposite Ensure that the mechanism is locked by the 4 clips which are indicated by red arrows in the illustration PHASE 6 Clip the two lower parts of the DESMO tool on the locking pins 1 that are located on each side of the shell With your screen now removed you can clean it before putting it back on your helmet or change a screen accessory If you ar...

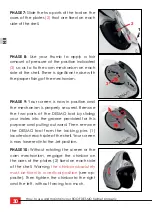
Page 16: ...utward Then remove the DESMO tool from the locking pins 1 located on each side of the shell Your screen is now lowered into the Jet position PHASE 10 Without rotating the screen or the cam mechanism engage the chinbar on the axes of the plates 2 fixed on each side of the shell Warning the chinbar absolutely must be fixed in a vertical position see op posite Then tighten the chinbar to the right an...

Page 17: ...ffective Clean it only with clean water then use a soft cloth to wipe it gently For optimum operation of the anti fog mechanism regular cleaning is advised WARNING In the interest of your security refrain from making manipulations to your helmet when you are riding We remind you that ROOF recommends that DESMO be used in the Integral position ROOF advises you to ensure good safekeeping of this use...

Page 18: ...replacement of it for free or the supply of parts found tobedefective The ROOF company draws the attention of the distributor and the end client to the fact that it acceptsnoresponsibilityinthefollowingcases Normalwearandtear impact misuse deteriorationoraccidentscausedbynegligence lack ofsupervision maintenanceoruse oranykindofmodificationperformedwiththeproduct Repairs changesorusethatareoutside...

Page 19: ...www roof fr Cachet du revendeur Retailer seal Händlerstempel Commerciante sigillo Sello comercial Date de vente Sale date Verkaufsdatum Data di vendita Fecha de compra ...

Page 20: ......
Reviews: