background image

Roper Whitney - Model 3617 Crimping & Beading Machine Manual

3617 MACHINE OPERATING PROCEDURES

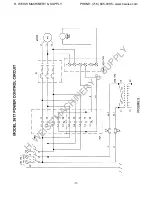
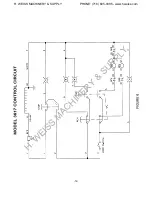
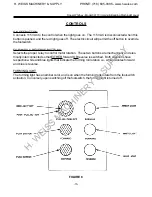
1. Select forward rotation by depressing “Forward” button on control panel (see Page 15).  White

light will be illuminated.  NOTE:  This only determines the direction of rotation the rolls will turn
when rotation is actuated by the footswitch.  Always select direction of rotation when rolls are
not rotating.

2. To initiate rotation of the rolls, depress the footswitch.  Amber light will be illuminated.  This will

cause the material to be fed through the rolls.  Before activating rotation be sure the sheet
material is aligned properly.

3. To stop roll rotation, release the footswitch with an upward movement of the operators foot.  A

very quick stop will occur, because the engaging brake (nearly simultaneously with the motor
power being switched off) will stop all rotating components.  NOTE:  For any Emergency Stop
(roll forming problem, parts of the body or clothing become entangled in the rolls), the rotating
rolls will immediately stop, either from an upward movement at the footswitch or depressing
the “OFF” mushroom button having a red light.

OPERATION  AND  ADJUSTMENT

CAUTION:  Do not operate machine without proper instructions.  Become familiar with controls
and intended operation before using.  Machine to be operated by qualified personnel only.

This PEXTO beading machine is intended for deep throat beading, crimping and other roll opera-
tions on 18 gauge maximum mild steel sheet material.  The positioning gauge is adjustable within
it’s 12” range.

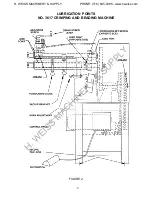
Rolls are secured to the shafts by roll nuts and keys.  The lower shaft horn adjustment will provide
lateral adjustment for alignment of the rolls.  An adjustable “saddle” bracket will provide additional
support for the lower shaft horn when required.  The pivoting upper shaft is spring loaded in the
open position.  Amount of the opening is controlled by the adjusting screw and crank screw lever.
Depth of bead can be limited by the check nuts on the adjusting screw.  The positioning gauge is
adjustable to locate the bead in relation to the end of the material being worked.

LOWER HORN ADJUSTMENT:
To adjust lower horn the lower horn set screw, which is located directly below oil hole on back side
of machine, must be loosened FIRST.  Then loosen lock nut on horn adjustment screw.  Adjust horn
to desired position, tighten locknut and retighten set screw.

-17-

H. WEISS MACHINERY & SUPPLY

H. WEISS MACHINERY & SUPPLY

PHONE: (718) 605-0395 - www.hweiss.com

Summary of Contents for 3617

Page 1: ... PARTS IDENTIFICATION 2833 HUFFMAN BLVD ROCKFORD IL 61103 3990 815 962 3011 FAX 815 962 2227 Website www roperwhitney com Email info roperwhitney com ROPER WHITNEY H W E I S S M A C H I N E R Y S U P P L Y H WEISS MACHINERY SUPPLY PHONE 718 605 0395 www hweiss com ...

Page 2: ...d gauges for all operations except flanging Rolls ordered separately Beading or crimping or special roll operations One piece frame back geared Steel horn bronze bushed bearings Cabinet type floor stand Vee belt drive from geared head motor Enclosed drive for safety STANDARD ELECTRICS 3 4 H P 520 RPM parallel shaft gear motor Guarded foot switch Control Panel to Stop Start and Forward Reverse Wire...

Page 3: ... Never clean forming rolls while rolls are rotating turn power off to clean rolls 4 Machine to be operated by authorized personnel who have been trained by their supervisor with the working and safety features of the machine and by reading and understanding the Operator s Manual 5 Do not operate power crimping and beading machine without reading Operator s Manual and without proper supervisory ins...

Page 4: ...handling of your claim Question Distributor or Roper Whitney Shortages not appearing on the bill of lading or discrep ancies between equipment received and the order should be reported to Roper Whitney Company immediately Leveling Be sure machine is solid and reasonably level on all four points so there is no camber or twist to the machine If machine is shipped on a pallet be sure to remove from p...

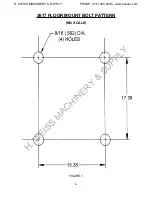
Page 5: ...3617 FLOOR MOUNT BOLT PATTERN NO SCALE 5 FIGURE 1 H W E I S S M A C H I N E R Y S U P P L Y H WEISS MACHINERY SUPPLY PHONE 718 605 0395 www hweiss com ...

Page 6: ...for its intended purpose only and always within rated capacity Do not operate with guards removed nor when inspection indicates possibility of malfunction Correct operation is a necessary safety precaution and is required to avoid operator injury Gears belt drive and motor are fully guarded for operator safety Never leave machine running unattended Keep work area clear and in proper order Parts li...

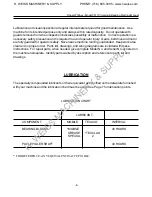
Page 7: ...LUBRICATION POINTS NO 3617 CRIMPING AND BEADING MACHINE 7 FIGURE 2 H W E I S S M A C H I N E R Y S U P P L Y H WEISS MACHINERY SUPPLY PHONE 718 605 0395 www hweiss com ...

Page 8: ... 2 WARNING Electrical connections must be made by a qualified electrician Electrical characteristics shown on the motor plate and control panel must match the power source and all electrically powered equipment must be grounded 3 CAUTION Electricians checking direction of rotation should be cautioned not to operate the machine until it has been thoroughly checked cleaned leveled and lubricated For...

Page 9: ... 9 H W E I S S M A C H I N E R Y S U P P L Y H WEISS MACHINERY SUPPLY PHONE 718 605 0395 www hweiss com ...

Page 10: ... 10 FIGURE 4 3617 CONTROL BOX H W E I S S M A C H I N E R Y S U P P L Y H WEISS MACHINERY SUPPLY PHONE 718 605 0395 www hweiss com ...

Page 11: ... 11 H W E I S S M A C H I N E R Y S U P P L Y H WEISS MACHINERY SUPPLY PHONE 718 605 0395 www hweiss com ...

Page 12: ... 12 H W E I S S M A C H I N E R Y S U P P L Y H WEISS MACHINERY SUPPLY PHONE 718 605 0395 www hweiss com ...

Page 13: ... 13 H W E I S S M A C H I N E R Y S U P P L Y H WEISS MACHINERY SUPPLY PHONE 718 605 0395 www hweiss com ...

Page 14: ...by qualified personnel only WARNING KEEP HANDS AND FINGERS CLEAR OF ROLLS AT ALL TIMES Provide point of operation guarding as required to avoid injury The exact guard needed will be governed by many factors and may require change when going from one cylinder to another All required guarding to be installed and effective before using Some of the factors involved are Diameter of cylinder length of c...

Page 15: ...nterconnected so that EITHER forward OR reverse is switched Both directions have respective white and blue lights that indicate the forming roll rotation i e white denotes forward and blue is reverse FORMINGLIGHT The forming light has an amber color and is on when the forming rolls rotate from the footswitch actuation Conversely upon switching off the footswitch the forming light is turned off Rop...

Page 16: ...ti trip features 1 the foot pedal is covered to prevent someone from stepping on the switch 2 The operator s foot must extend entirely to engage a toe clamp to release the foot pedal allowing actuation of the electric switch Downward foot movement there fore switches electrical power to the motor and upward foot movement switches the motor power off The toe clamp will reset to prevent anti trip wh...

Page 17: ...USTMENT CAUTION Do not operate machine without proper instructions Become familiar with controls and intended operation before using Machine to be operated by qualified personnel only This PEXTO beading machine is intended for deep throat beading crimping and other roll opera tions on 18 gauge maximum mild steel sheet material The positioning gauge is adjustable within it s 12 range Rolls are secu...

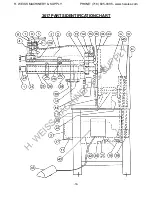
Page 18: ...3617 PARTS IDENTIFICATION CHART 18 H W E I S S M A C H I N E R Y S U P P L Y H WEISS MACHINERY SUPPLY PHONE 718 605 0395 www hweiss com ...

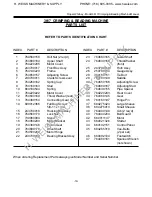
Page 19: ...er 11 764220222 Motor Cover 33 764220203 Rear Cover 12 764830169 Thrust Washer rear 34 764380145 Gear 13 764380154 Connecting Gear 2 35 764160197 Hinge Pin 14 690012366 Full Dog Screw 37 684275423 Large Sheave 5 8 11 x 1 3 4 38 684275410 Small Sheave 15 243700018 Rocking Box Assy 39 764400148 Gib 2 req d 16 764560170 Lock Nut 40 764440204 Belt Guard 17 739060004 Stand 42 660011147 Motor 18 7640602...

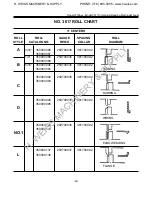
Page 20: ... 259700035 381700092 350000091 TURNING 350000092 259700035 381700092 350000093 C BURRING 350000094 259700035 381700092 350000095 D WIRING 350000122 259700035 381700092 350000123 NO 1 ELBOW EDGING 350000137 259700037 381700092 L 350000138 FLANGE Roper Whitney Model 3617 Crimping Beading Machine Manual 20 H W E I S S M A C H I N E R Y S U P P L Y H WEISS MACHINERY SUPPLY PHONE 718 605 0395 www hweis...

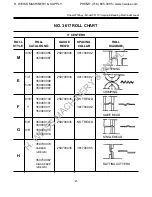
Page 21: ...700034 381700092 E 350000099 5 16 350000096 350000097 CRIMPING 9 16 350000100 259700035 NOT REQ D 350000101 F 1 350000011 381700092 350000012 OGEE BEAD 5 8 350000124 259700035 NOT REQ D 350000125 G 3 8 350000013 350000014 SINGLE BEAD 350700070 CARBON 259700035 381700085 2 REQ D H 350700067 HIGH SPEED SLITTING CUTTERS 2 REQ D 21 H W E I S S M A C H I N E R Y S U P P L Y H WEISS MACHINERY SUPPLY PHO...

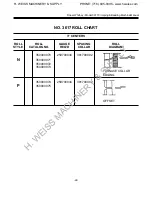
Page 22: ...L GAUGE SPACING ROLL STYLE CATALOG NO REQ D COLLAR DIAGRAM 350000070 259700034 381700092 N 350000071 350000072 350000073 FURNACE COLLAR EDGING 350000074 259700034 381700092 P 350000075 OFFSET 22 H W E I S S M A C H I N E R Y S U P P L Y H WEISS MACHINERY SUPPLY PHONE 718 605 0395 www hweiss com ...

Reviews: