background image

13

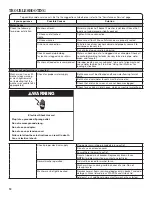
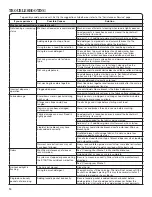
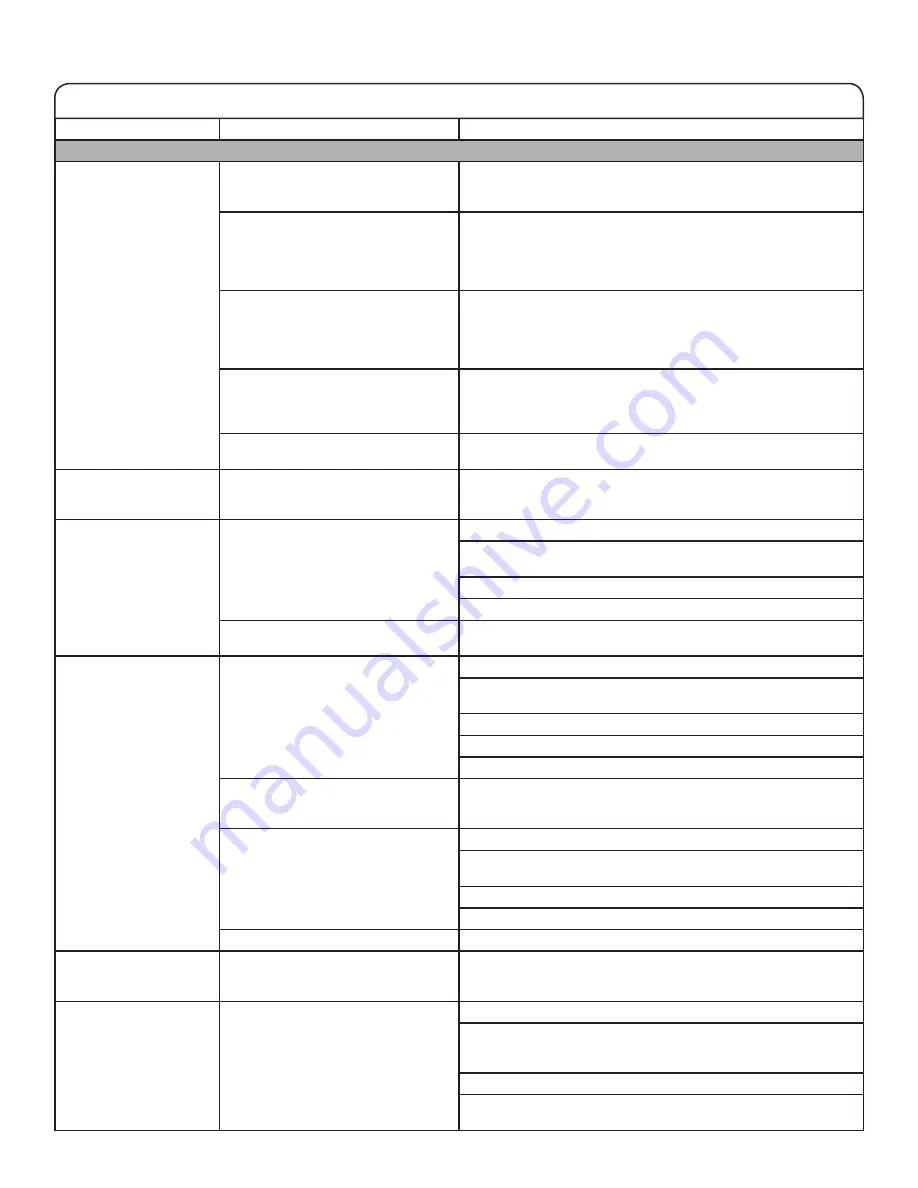
TROUBLESHOOTING

If you experience

Possible Causes

Solution

Washer not performing as expected (cont.)

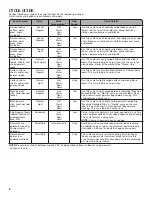
Washer not draining/ 

spinning, loads are  

still wet or spin light 

remains on (indicating 

that the washer was  

unable to pump  

out water within  

10 minutes)

Small items may have been caught 

in pump or between basket and tub, 

which can slow draining. 

Empty pockets and use garment bags for small items.

Use a cycle with a low  

spin speed.

Cycles with lower spin speeds remove less water than cycles 

with high spin speeds. Use the recommended cycle/speed spin 

for your garment. To remove extra water in the load, select Drain/

Spin. Load may need to be rearranged to allow even distribution 

of the load in the basket.

The washer may be tightly  

packed or unbalanced.

Tightly packed or unbalanced loads may not allow the washer to 

spin correctly, leaving the load wetter than normal. Evenly arrange 

the wet load for balanced spinning. Select the Drain/Spin cycle to 

remove excess water. See “Using Your Washer”  

for loading recommendations.

Check plumbing for correct  

drain hose installation. Drain hose 

extends into standpipe farther than  

4.5" (114 mm).

Check drain hose for proper installation. Use drain hose form 

and securely attach to drainpipe or tub. Do not tape over drain 

opening. Lower drain hose if the end is higher than 96" (2.4 m) 

above the floor. Remove any clogs from drain hose.

Too much detergent causing suds to 

slow or stop draining and spinning.

Always measure and follow detergent directions for your load.  

To remove extra suds, select Rinse/Spin. Do not add detergent.

Dry spots on load after 

cycle

High speed spins extract more 

moisture than traditional top-load 

washers. 

The high spin speeds combined with air flow during the final spin 

can cause items near the top of the load to develop dry spots 

during the final spin. This is normal.

Incorrect or wrong  

wash or rinse  

temperatures

Check for proper water supply.

Make sure hot and cold inlet hoses are not reversed.
Both hoses must be attached to both washer and faucet, and  

have both hot and cold water flowing to inlet valve.
Check that inlet valve screens are not clogged.
Remove any kinks in hoses.

Energy saving controlled  

wash temperatures.

This washer uses cooler wash and rinse water temperatures than 

your previous washer. This includes cooler hot and warm washes.

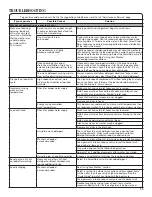
Load not rinsed

Check for proper water supply.

Make sure hot and cold inlet hoses are not reversed.
Both hoses must be attached and have water flowing to the inlet 

valve.
Both hot and cold water faucets must be on.
Inlet valve screens on washer may be clogged.
Remove any kinks in the inlet hose.

Using too much detergent.

The suds from too much detergent can keep washer from 

operating correctly. Always measure detergent and follow 

detergent directions based on load size and soil level.

Washer not loaded  

as recommended.

The washer is less efficient at rinsing when load is tightly packed.
Load garments in loose heaps evenly around the basket wall. 

Load with dry items only.
Use cycle designed for the fabrics being washed.
Add only 1 or 2 additional garments after washer has started.

Using too low a Load Size selection.

Choose a Load Size that matches the load being washed.

Sand, pet hair, lint, etc. 

on load after washing

Heavy sand, pet hair, lint, and 

detergent or bleach residues may 

require additional rinsing.

Select the Rinse/Spin cycle. Do not add detergent.

Load is tangling

Washer not loaded  

as recommended.

See “Using Your Washer” section.
Select a cycle with a slower wash action and spin speed; items 

will be wetter than those using a higher speed spin. See the 

“Cycle Guide” to match your load with the best cycle.
Load garments in loose heaps evenly around the basket wall.
Reduce tangling by mixing types of load items. Use the 

recommended cycle for the type of garments being washed.

To possibly avoid a service call, first try the suggestions listed here or refer to the “Assistance or Service” page.

Summary of Contents for W10420470C

Page 1: ... SÉCURITÉ DE LA LAVEUSE 16 QUOI DE NEUF SOUS LE COUVERCLE 17 TABLEAU DE COMMANDE ET CARACTÉRISTIQUES 18 GUIDE DE PROGRAMMES 20 UTILISATION DE LA LAVEUSE 21 ENTRETIEN DE LA LAVEUSE 24 DÉPANNAGE 26 GARANTIE 31 ASSISTANCE OU SERVICE COUVERTURE ARRIÈRE Para una versión de estas instrucciones en español consulte la página de Ayuda o servicio técnico TOP LOADING WASHER USE AND CARE GUIDE LAVEUSE À CHARG...

Page 2: ...2 WASHER SAFETY ...

Page 3: ... balance load IMPORTANT After the washer basket fills to the selected water level the lid must be closed before the wash cycle can start If filling stops with the lid open close lid and press START button Fabric Softener option must be set to Yes to ensure fabric softener dispenses at the correct time on some models Sounds At different stages of the wash cycle you may hear sounds and pauses that a...

Page 4: ...n in a cold and cool water wash some warm water may be added to the washer to maintain a minimum temperature 1 2 3 4 FABRIC SOFTENER on some models This option can be added to most cycles and must be set to YES if using fabric softener during a cycle It ensures that fabric softener is added at the correct time in the rinse for even distribution WASH CYCLE KNOB Use the Wash Cycle knob to select cyc...

Page 5: ... at different stages in the cycle The wash time is determined by the selected soil level RINSE You will hear sounds similar to the wash cycle as the washer rinses and moves the load You may hear the motor turning on briefly short hum to move the basket while filling Fabric softener will be added if the Fabric Softener knob was set to YES Some cycles use spray rinsing After draining and spinning ou...

Page 6: ...s linens sheets and mixed garment loads Normal Light Hot Warm Cool Cold High Use this cycle for lightly soiled cottons and mixed fabric loads This cycle features a spray rinse Machine wash silks hand washed fabrics Delicate Regular Hot Warm Cool Cold Low Use this cycle to wash soiled garments indicating Machine Washable Silks or Gentle cycle on the care label Place small items in mesh garment bags...

Page 7: ... washable trim and ornaments Mend rips and tears to avoid further damage to garments during washing Helpful Tips When washing water proof or water resistant items load evenly Use mesh garment bags to help avoid tangling when washing delicate or small garments Turn knits inside out to avoid pilling Separate lint takers from lint givers Synthetics knits and corduroy fabrics will pick up lint from to...

Page 8: ...asured recommended amount of liquid fabric softener Do not use more than the recommended amount Close the lid and press the START Pause Unlock Lid button again to start the washer 4 Add liquid chlorine bleach to dispenser Liquid Chlorine Bleach Do not overfill dilute or use more than 1 cup 250 mL Do not use color safe bleach or Oxi products in the same cycle with liquid chlorine bleach 3 Load laun...

Page 9: ...once the washer movement has stopped This may take several minutes if the load was spinning at high speed Then close lid and press START Pause Unlock Lid again to restart the cycle If lid is left open for more than 10 minutes the water will pump out automatically Wash Temp Temperature Suggested Fabrics Hot Some cold water is added to save energy This will be cooler than your hot water heater setti...

Page 10: ...hich soils and detergent may otherwise accumulate in your washer Cleaning the Inside of the Washer To keep your washer odor free follow the usage instructions provided above and use this recommended monthly cleaning procedure Recommended Cycle for Cleaning the Washer Refer to the Cycle Guide for the optimal cycle for cleaning the inside of the washer Use this cycle with affresh Washer Cleaner or l...

Page 11: ...f flooring is uneven a 3 4 19 mm piece of plywood under your washer will reduce sound See Level the Washer in Installation Instructions Load could be unbalanced Load dry garments in loose heaps evenly around basket wall Adding wet garments to washer or adding more water to basket could unbalance washer Wash smaller loads to reduce imbalance Do not tightly pack Avoid washing single garments Use the...

Page 12: ...e out of alignment and cause water to splash off tub See Using Your Washer for loading instructions Washer not performing as expected Washer won t run or fill washer stops working or wash light remains on indicating that the washer was unable to fill appropriately Check for proper water supply Both hoses must be attached and have water flowing to inlet valve Both hot and cold water faucets must be...

Page 13: ...r rinse temperatures Check for proper water supply Make sure hot and cold inlet hoses are not reversed Both hoses must be attached to both washer and faucet and have both hot and cold water flowing to inlet valve Check that inlet valve screens are not clogged Remove any kinks in hoses Energy saving controlled wash temperatures This washer uses cooler wash and rinse water temperatures than your pre...

Page 14: ...before washing to avoid snags and tears Strings and straps could have tangled Tie all strings and straps before starting wash load Items may have been damaged before washing Mend rips and broken threads in seams before washing Fabric damage can occur if load is tightly packed Load garments in loose heaps evenly around the basket wall Load with dry items only Use cycle designed for the fabrics bein...

Page 15: ...be easily determined The cost of repair or replacement under these excluded circumstances shall be borne by the customer DISCLAIMER OF IMPLIED WARRANTIES IMPLIED WARRANTIES INCLUDING ANY IMPLIED WARRANTY OF MERCHANTABILITY OR IMPLIED WARRANTY OF FITNESS FOR A PARTICULAR PURPOSE ARE LIMITED TO ONE YEAR OR THE SHORTEST PERIOD ALLOWED BY LAW Some states and provinces do not allow limitations on the d...

Page 16: ...16 SÉCURITÉ DE LA LAVEUSE ...

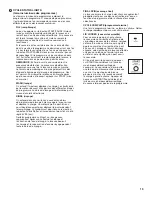
Page 17: ...NT Après que le panier de la laveuse se soit rempli jusqu au niveau d eau sélectionné le couvercle doit être rabattu pour que le programme de lavage puisse commencer Si le remplissage s arrête alors que le couvercle est ouvert fermer le couvercle et appuyer sur le bouton START mise en marche L option Fabric Softener assouplissant pour tissu doit être réglée sur Yes oui pour que l assouplissant pou...

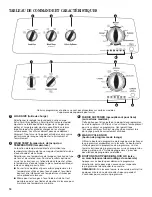
Page 18: ...édente laveuse Même pour les lavages à l eau froide ou fraîche il est possible que de l eau tiède soit ajoutée à la laveuse pour maintenir une température minimale 1 2 3 4 FABRIC SOFTENER assouplissant pour tissu sur certains modèles Cette option peut être ajoutée à la plupart des programmes on doit la régler sur YES oui si l on utilise de l assouplissant pour tissu durant un programme Ceci garant...

Page 19: ... la laveuse se remplit jusqu au niveau d eau sélectionné Si le couvercle est fermé lorsque la machine a fini de se remplir le couvercle se verrouille et la machine commence à fonctionner Si le couvercle est ouvert alors que l eau cesse d entrer dans la machine le programme ne démarre pas tant que l on n a pas fermé le couvercle et que l on n a pas appuyé sur le bouton START PAUSE Unlock mise en ma...

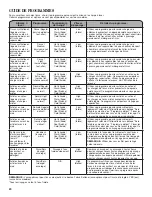
Page 20: ...e comporte un rinçage par vaporisation Articles en coton linge de maison draps et charges mixtes Normal Light service léger normal Hot chaude Warm tiède Cool fraîche Cold froide High élevée Utiliser ce programme pour les articles en coton et les charges de tissus mixtes présentant un degré de saleté légère Ce programme comporte un rinçage par vaporisation Articles en soie lavables en machine artic...

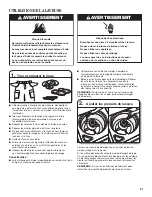
Page 21: ...salis par tout genre d huile y compris les huiles de cuisson Le non respect de ces instructions peut causer un décès une explosion ou un incendie AVERTISSEMENT Risque de choc électrique Brancher sur une prise à 3 alvéoles reliée à la terre Ne pas enlever la broche de liaison à la terre Ne pas utiliser un adaptateur Ne pas utiliser un câble de rallonge Le non respect de ces instructions peut causer...

Page 22: ...ommandée d assouplissant pour tissu liquide Ne pas utiliser plus que la quantité recommandée Fermer le couvercle et appuyer de nouveau sur START Pause Unlock Lid mise en marche pause déverrouillage du couvercle pour mettre la laveuse en marche 4 Ajouter l agent de blanchiment liquide dans le distributeur Liquid Chlorine Bleach Ne pas remplir excessivement le distributeur ni utiliser plus d une tas...

Page 23: ...ent 7 Sélectionner taille de charge 9 Sélectionner les options si désiré sur certains modèles Wash Temp Temperature température de lavage température Chaude Hot De l eau froide est ajoutée pour économiser de l énergie Ceci sera plus froid que le réglage du chauffe eau pour l eau chaude de votre domicile Tiède Warm De l eau froide sera ajoutée l eau sera donc plus froide que celle que fournissait v...

Page 24: ... à toujours laisser la porte de la laveuse entrouverte pour qu elle puisse sécher et pour éviter l accumulation de résidus générateurs d odeurs Nettoyage de la laveuse à chargement par l avant Lire complètement ces instructions avant d entreprendre les opérations de nettoyage de routine recommandées ci dessous Le processus d entretien de la laveuse devrait être exécuté au moins une fois par mois o...

Page 25: ...e gel suivre les instructions de la section Entretien pour entreposage hivernal avant de la déplacer 3 Déconnecter le tuyau de vidange du système de vidange et vidanger l eau restante dans un plat ou un seau Déconnecter le tuyau de vidange à l arrière de la laveuse 4 Débrancher le cordon d alimentation 5 Placer les tuyaux d arrivée d eau dans le panier de la laveuse 6 Faire passer le cordon d alim...

Page 26: ...r entre le panier et la cuve ils peuvent aussi obstruer la pompe Un appel pour intervention de dépannage s avérera peut être nécessaire pour retirer ces objets Il est normal d entendre les articles métalliques des vêtements comme les boutons pression métalliques boucles ou fermetures à glissière toucher le panier Gargouillement ou bourdonnement La laveuse est peut être en train d évacuer de l eau ...

Page 27: ...tuyaux doivent être fixés et l eau doit pénétrer dans la valve d arrivée Les robinets d eau chaude et d eau froide doivent être ouverts tous les deux Vérifier que les tamis des valves d arrivée ne sont pas obstrués Vérifier que les tuyaux d arrivée d eau ne sont pas déformés ceci peut réduire le débit Pour éventuellement éviter une visite de service essayez d abord les solutions suggérées ci desso...

Page 28: ...au de vidange si l extrémité se trouve à plus de 96 2 4 m au dessus du plancher Retirer toute obstruction du tuyau de vidange Un excès de mousse causé par une utilisation excessive de détergent peut ralentir ou arrêter la vidange ou l essorage Toujours mesurer les quantités et suivre les instructions figurant sur le détergent en fonction de la charge Pour éliminer tout excès de mousse sélectionner...

Page 29: ...ser le programme qui correspond le mieux à la charge utilisée Charger les vêtements sans les tasser et de façon uniforme le long de la paroi du panier Réduire l emmêlement en mélangeant plusieurs types d articles dans la charge Utiliser le programme recommandé correspondant aux types de vêtements à laver Ne nettoie ou ne détache pas La laveuse n a pas été chargée tel que recommandé La laveuse effe...

Page 30: ...s une fois que la laveuse a démarré n en rajouter qu un ou deux L agent de blanchiment au chlore n a pas été ajouté correctement Ne pas verser d agent de blanchiment au chlore liquide directement sur la charge Essuyer tous les renversements d agent de blanchiment Un agent de blanchiment non dilué endommagera les tissus Ne pas utiliser plus que la quantité recommandée par le fabricant Ne pas placer...

Page 31: ... d une réparation ou d un remplacement dans le cadre de ces circonstances exclues est à la charge du client CLAUSE D EXONÉRATION DE RESPONSABILITÉ AU TITRE DES GARANTIES IMPLICITES LES GARANTIES IMPLICITES Y COMPRIS LES GARANTIES APPLICABLES DE QUALITÉ MARCHANDE OU D APTITUDE À UN USAGE PARTICULIER SONT LIMITÉES À UN AN OU À LA PLUS COURTE PÉRIODE AUTORISÉE PAR LA LOI Certains États et certaines p...

Page 32: ... Avant de faire un appel pour assistance ou service veuillez vérifier la section Dépannage ou consulter www whirlpool com product_help Cette vérification peut vous faire économiser le coût d une visite de réparation Si vous avez encore besoin d aide suivre les instructions ci dessous Lors d un appel veuillez connaître la date d achat et les numéros au complet de modèle et de série de votre apparei...

Reviews: