background image


Vario puslebord, 40-306XX, 40-308XX 

Brugermanual 
Montageanvisning 

Denne folder skal altid opbevares ved produktet! 


PDF 6126 / 11.12.2014 


Summary of Contents for Vario 40-306 Series

Page 1: ...Vario puslebord 40 306XX 40 308XX Brugermanual Montageanvisning Denne folder skal altid opbevares ved produktet PDF 6126 11 12 2014...

Page 2: ...brug 6 Anbefalinger ved brug 7 Montageanvisning 8 Modtagelse af Vario puslebordet 8 Inden montering p v ggen 9 Forberedelse af montage 10 Montering p v ggen 12 Montage af liggeflade 16 Elektriske komp...

Page 3: ...op til 150Kg Puslebordet kan benyttes i private hjem daginstitutioner eller tilsvarende institutioner for at give korrekte og optimale arbejdsforhold for personalet N r puslebordet ikke er i brug kan...

Page 4: ...622 130 40 30605 40 30623 140 40 30606 40 30624 150 40 30607 40 30625 160 40 30608 40 30626 170 40 30609 40 30627 180 40 30610 40 30628 190 40 30611 40 30629 L ngde L Bredde 70 B Bredde 80 B 90 40 308...

Page 5: ...hvid RAL 9010 mat Chromit Maksimum last 150 kg Tekniske data Madras Produkt Madras med skridsikkert underlag H jde 3 cm L ngde x bredde Som liggeflade se varenummer skema Materiale Betr k Dahlia 9317...

Page 6: ...eindstilling af puslebordet udf res ved at trykke p op ned knapperne p h ndbetjeningen H ndbetjeningen har en spiralledning med en udstrakt l ngde p ca 200cm Efter brug N r puslebordet ikke er I brug...

Page 7: ...ige personer som m tte v re I rummet under brug V r opm rksom p at ingen b rn eller andre befinder sig under puslepladen n r puslebordet indstilles I h jden Hold altid h ndbetjeningen uden for b rns r...

Page 8: ...8 ROPOX 2014 Montageanvisning Modtagelse af Vario puslebordet Vario puslebordet leveres i to kolli Et for l fteenheden og et for liggefladen L fteenhed Liggeflade...

Page 9: ...r er fri plads p alle sider af puslebordet Kabel for hovedstr m 230V har en l ngde p ca 250 cm Udtaget for hovedstr m kan ikke placeres bag ved l fteenheden For anbefalet placering se nedenst ende bil...

Page 10: ...10 ROPOX 2014 Montageanvisning Forberedelse af montage Fjern afd kningspladen p toppen af l fteenheden...

Page 11: ...11 ROPOX 2014 Montageanvisning Forberedelse af montage Skyd frontpladen ud af l fteenheden for at komme ind til montagehullerne for anbringelse p v ggen Pas p ikke at b je eller skramme frontpladen...

Page 12: ...affenhed og styrke og andvende egnede skruer og rawplugs til denne givne type v g Puslebordet har en max brugerv gt p 150kg Maximal belastning i verste skruer er 33kg skrue Kraft for hver af de fire s...

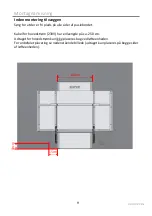
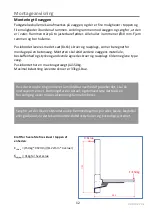
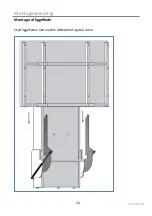
Page 13: ...13 ROPOX 2014 Montageanvisning Monter l fteenheden til v ggen med skruer i top og bund...

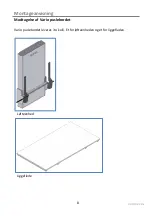
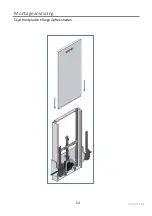
Page 14: ...14 ROPOX 2014 Montageanvisning Skyd frontpladen tilbage i l fteenheden...

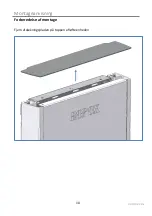
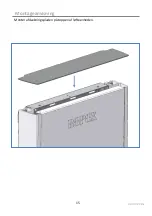
Page 15: ...15 ROPOX 2014 Montageanvisning Monter afd kningspladen p toppen af l fteenheden...

Page 16: ...16 ROPOX 2014 Montageanvisning Montage af liggeflade Skyd liggefladen ned mellem l fteenhed og de 2 arme...

Page 17: ...17 ROPOX 2014 Montageanvisning Monter liggefladen til l fteenhedens 2 arme Der bruges 4stk M8x12...

Page 18: ...afmontere S rg for at alle stik vender korrekt inden de monters i kontrolboksen Stikkene skal trykkes ind indtil O ringen ikke l ngere er synlig Motor kontrolboks og h ndbetjening har t thedsgrad IPX6...

Page 19: ...Inden de resterende kabler kan afmonteres skal sikkerhedsl sebeslaget udl ses fjernes brug f eks en skruetr kker til at fjerne det L seclips i begge ender af l sebeslaget skal udl ses inden l sebeslag...

Page 20: ...Dette produkt lever op til de krav om general safety and functionality I de relevante EU direktiver og standarder EMC information Puslebordet lever op til de krav for electromagnetic compatibility EMC...

Page 21: ...es i en relativ luftfugtighed mellem 5 to 85 ikke kondenserende Faktorer som p virker produktet ved opbevaring og transport Puslebordet k rer ikke op eller ned ved tryk p h ndbetjeningen Unders g om 2...

Page 22: ...uden sulfo da dette med tiden giver en fedtet overflade Pletter der ikke kan fjernes med vand kan ofte fjernes med lige dele klorin og vand eller med acetone Ved brug af disse reng ringsmidler skal D...

Page 23: ...23 ROPOX 2014 Tilbeh r Sengehest Nedklappelig sengehest Kan leveres i l ngderne 88cm og 128 cm som tilbeh r Kontakt Ropox kundeservice for varenumre...

Page 24: ...varenummer 90 70 40 25793 100 70 40 25766 110 70 40 25768 120 70 40 25760 130 70 40 25761 140 70 40 25795 150 70 40 25762 160 70 40 25796 170 70 40 25763 180 70 40 25764 190 70 40 25765 Bordplade l n...

Page 25: ...40 30802 Puslebord Vario 100 x 70 cm 40 30820 Puslebord Vario 100 x 80cm 40 30803 Puslebord Vario 110 x 70 cm 40 30821 Puslebord Vario 110 x 80cm 40 30804 Puslebord Vario 120 x 70 cm 40 30822 Puslebo...

Page 26: ...26 ROPOX 2014 Reklamation Se Generelle salgs og leveringsbetingelser p www ropox dk ROPOX A S Ringstedgade 221 DK 4700 N stved Tel 45 55 75 05 00 Fax 45 55 75 05 50 E mail info ropox dk www ropox dk...

Page 27: ...Vario nursing table 40 306XX 40 308XX User Manual Mounting instruction Keep this folder with the product at all times PDF 6126 11 12 2014...

Page 28: ...Instructions 34 Receiving the Vario nursing table 34 Important info before mounting 35 Prepare the mounting dismount the top cover plate 36 Mounting to the wall 38 Mount the tabletop on the Lifting u...

Page 29: ...adults up to 150Kg The shower bed can be used at home in day care center or institutions to obtain good and correct working conditions for the carer When not in use the plate can be folded up against...

Page 30: ...0 30624 150 40 30607 40 30625 160 40 30608 40 30626 170 40 30609 40 30627 180 40 30610 40 30628 190 40 30611 40 30629 Part numbers Vario nursing table witht bedguard Lenght L Width 70 B Width 80 B 90...

Page 31: ...der coating white RAL 9010 matt Chromate Maximum load 150 kg Technical data Mattress Product Mattress with slip resistant base layer Height 3 cm Length x width Like work plate see part number scheme M...

Page 32: ...e up down bottom on the handheld control switch the height adjustment of the shower bed can be performed The control switch has a spiral cord which can be pulled out to a length of 200cm After use Whe...

Page 33: ...position Pay particular attention to other people in the room when using the nursing table Make sure that no children are playing under or with the table The nursing table is not a playground Keep th...

Page 34: ...34 ROPOX 2014 Mounting Instructions Receiving the Vario nursing table The nursing table will come in two packages One for the Lifting unit and one for the tabletop Lifting unit Table top...

Page 35: ...ee space on all sides of the nursing table The mains cable for 230V has a length of 2 5m The power connection for main electricity must not be placed behind the lifting unit For recommended placement...

Page 36: ...36 ROPOX 2014 Mounting Instructions Prepare mounting dismount the top cover plate Pull up the cover plate on the top of the lifting unit...

Page 37: ...ng Instructions Prepare mounting dismount the front plate Slide the front plate out of the Lifting unit to get access to the wall mounting holes in the unit Be aware not to bend or scratch the front p...

Page 38: ...s in the top and four in the bottom of the frame Place the frame against the wall and make sure it is horizontal The frame is standing on two adjustable feet The holes in the frame are all 10 mm Remov...

Page 39: ...39 ROPOX 2014 Mounting Instructions Mount the lifting unit to the wall with screws at the top and buttom...

Page 40: ...40 ROPOX 2014 Mounting Instructions Slide the front plate back into the Lifting unit...

Page 41: ...41 ROPOX 2014 Mounting Instructions Mount the cover plate on the top of the lifting...

Page 42: ...42 ROPOX 2014 Mounting Instructions Mount the tabletop on the Lifting unit Slide the tabletop in between the Lifting unit and the support arms on the Lifting unit...

Page 43: ...43 ROPOX 2014 Mounting Instructions Fasten the tabletop to the Lifting unit with 4 pcs Screws M8x12 through the bushings in the support arms...

Page 44: ...ositioned correctly before they are pushed into the sockets at the control box The plugs must be pushed into the sockets until the O ring is no longer visible Motor control box and control switch appl...

Page 45: ...fe locking bracket Before the other cables can be disconnected the safe locking bracket needs to be released removed use a screwdriver to remove Locking clips at each end of the safe locking bracket h...

Page 46: ...nctionality in the relevant EU directives and standards EMC information The nursing table complies with the demands for electromagnetic compatibility EMC if installation and daily use is according to...

Page 47: ...ake a reset Simultaneously pres hold up down button of hand control The control box will start to bleep Keep pushbutton presed down until control box stops bleeping approx 10 sec Waste handling Used e...

Page 48: ...result in a greasy surface Stains that cannot be removed with water can often be removed with a mixture of equal parts chlorine bleaching and water or with acetone When using these products see that t...

Page 49: ...49 ROPOX 2014 Accessories Bed guard Bed guard in length 88 and 128 cm is available as an option Contact Ropox for item no...

Page 50: ...40 25793 100 70 40 25766 110 70 40 25768 120 70 40 25760 130 70 40 25761 140 70 40 25795 150 70 40 25762 160 70 40 25796 170 70 40 25763 180 70 40 25764 190 70 40 25765 Length Width Mattress 90 80 40...

Page 51: ...Vario nursing table 100 x 70 cm 40 30820 Vario nursing table 100 x 80cm 40 30803 Vario nursing table 110 x 70 cm 40 30821 Vario nursing table 110 x 80cm 40 30804 Vario nursing table 120 x 70 cm 40 308...

Page 52: ...52 ROPOX 2014 Complaints See General Terms of Sale and Delivery on www ropox com Ropox A S Ringstedgade 221 DK 4700 Naestved Tel 45 55 75 05 00 Fax 45 55 78 05 50 E mail info ropox dk www ropox com...

Page 53: ...Vario Wickeltisch 40 306XX 40 308XX Benutzerhandbuch Montageanleitung Verbleibt beim Produkt PDF 6126 12 12 2014...

Page 54: ...en zur Benutzung Verwendung 59 Montageanleitung 60 Empfang des Vario Wickeltisches 60 Wichtige Hinweise bevor einer Montage 61 Vorbereitung der Montage Demontage der oberen Deckplatte 62 Wandmontage 6...

Page 55: ...u 150kg Der Wickeltisch kommt in Privatwohnungen Tageszentren o dgl zur Sicherstellung der optimalen Arbeitsverh ltnisse des Pflegepersonals zum Einsatz Ist der Wickeltisch nicht in Benutzung kann die...

Page 56: ...0 30622 130 40 30605 40 30623 140 40 30606 40 30624 150 40 30607 40 30625 160 40 30608 40 30626 170 40 30609 40 30627 180 40 30610 40 30628 190 40 30611 40 30629 L nge L Breite 70 B Breite 80 B 90 40...

Page 57: ...AL 9010 matt Chromat Max Belastbarkeit 150kg Technische Daten Matratze Produkt Matratze mit rutschfester Unterlage H he 3cm L nge x Breite Wie Liegefl che siehe Warennummertabelle Material Bezug Dahli...

Page 58: ...nverstellung des Wickeltisches erfolgt durch Dr cken der Taster und der Handbedieneinheit Diese Einheit hat eine Spiralleitung mit einer ausgedehnten L nge von ca 200cm Nach Gebrauch Ist der Wickeltis...

Page 59: ...gefl che herabgeklappt ist und in waagerechter Position ist W hrend der Benutzung auf andere Personen im Raum aufmerksam sein Kinder oder andere Personen d rfen sich nicht bei der H henverstellung unt...

Page 60: ...OPOX 2014 Montageanleitung Empfang des Vario Wickeltisch Der Vario Wickeltisch wird in zwei Kolli geliefert Einer f r die Hebeeinheit und der andere f r die Liegefl che Hebeeinheit Liegefl che Hebeein...

Page 61: ...61 ROPOX 2014 Montageanleitung Wichtige Hinweise bevor einer Montage Sicherstellen dass wie unten abgebildet auf allen Seiten von dem Wickeltisch freier Raum vorhanden ist 60cm 10cm 15cm...

Page 62: ...62 ROPOX 2014 Montageanleitung Vorbereitung der Montage Demontage der oberen Deckplatte Die obere Abdeckung auf der Hebeneinheit entfernen...

Page 63: ...ageanleitung Vorbereitung der Montage Demontage der Frontplatte Die Frontplatte aus der Hebeeinheit schieben um die Wandmontagel cher in der Einheit freizulegen Achtung Dabei nicht die Frontplatte bie...

Page 64: ...M glichkeiten oben und vier M glichkeiten unten am Rahmen Den Rahmen gegen die Wand anbringen und sicherstellen dass er horizontal ist Der Rahmen hat zwei verstellbare F e Alle L cher des Rahmens sin...

Page 65: ...65 ROPOX 2014 Montageanleitung Die Hebeneinheit oben und unten mit Schrauben an der Wand montieren...

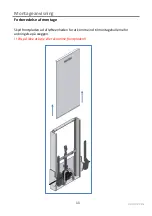
Page 66: ...66 ROPOX 2014 Montageanleitung Die Frontplatte in der Hebeeinheit schieben...

Page 67: ...67 ROPOX 2014 Montageanleitung Die Abdeckplatte oben auf die Hebeneinheit monteren...

Page 68: ...68 ROPOX 2014 Montageanleitung Montage der Liegefl de an der Hebeeinheit Die Liegefl che zwischen der Hebeeinheit und den St tzarmen der Hebeeinheit schieben...

Page 69: ...69 ROPOX 2014 Montageanleitung Die Liegefl che an den St tzarmen der Hebeneinheit mit 4 Stck M8x12 befestigen...

Page 70: ...ker vor Einstecken in die Steuereinheit korrekt positioniert sind Die Stecker m ssen so eingesteckt werden bis der O Ring nicht l nger sichtbar ist Motor Steuereinheit und Handbedienung haben Schutzar...

Page 71: ...kein Verschlussbeschlag Vor Demontage der restlichen Kabel muss der Sicherheitsverschlussbeschlag ausgel st entfernt werden beim Entfernen einen Schraubenzieher verwenden Sperrstifte an beiden Enden d...

Page 72: ...Anforderungen betreffend General Safety and Functionality der relevanten EU Richtlinien und Normen EMC Information Der Wickeltisch entspricht den Anforderungen betreffend Electromagnetic Compatibility...

Page 73: ...den Alle Kabel abmontieren und wieder verbinden Abfallentsorgung Die gebrauchte Ausr stung muss gem nationaler Gesetzgebung entsorgt werden Wir empfehlen Zerlegung des Produktes damit m glichst viele...

Page 74: ...che ergeben wird Flecke die sich nicht mit Wasser entfernen lassen k nnen oft mit einer Mischung von 50 Chlorbleichmittel und 50 Wasser oder mit Aceton entfernt werden Diese Mittel nur in gut bel fte...

Page 75: ...X 2014 Sonderausstattung Seitenschutz versenkbar Ein versenkbarer Seitenschutz in den L ngen 88 und 128cm ist als Sonderausstattung lieferbar Mit Ropox Kundendienst bez glich Artikelnummern Kontakt au...

Page 76: ...t Nr 90 70 40 25793 100 70 40 25766 110 70 40 25768 120 70 40 25760 130 70 40 25761 140 70 40 25795 150 70 40 25762 160 70 40 25796 170 70 40 25763 180 70 40 25764 190 70 40 25765 Liegefl che L nge im...

Page 77: ...tisch Vario 90 x 80cm 40 30802 Wickeltisch Vario 100 x 70 cm 40 30820 Wickeltisch Vario 100 x 80cm 40 30803 Wickeltisch Vario 110 x 70 cm 40 30821 Wickeltisch Vario 110 x 80cm 40 30804 Wickeltisch Var...

Page 78: ...X 2014 Reklamationen Siehe Allgemeine Verkaufs und Lieferungsbedingungen auf www ropox com Ropox A S Ringstedgade 221 DK 4700 Naestved Tel 45 55 75 05 00 Fax 45 55 78 05 50 E mail info ropox dk www ro...

Reviews: