REMOTE OCEAN SYSTEMS
SEASTAR OPERATION AND MAINTENANCE MANUAL
10-01313 REV D
19
5.
Maintenance
5.1.
Scheduled Maintenance
Pre- and post-operation checks are listed in Section 4. No other scheduled maintenance is recommended.
5.2.
Unscheduled Maintenance
5.2.1.
Open the Seastar
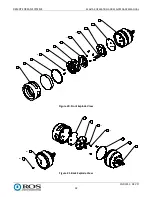
Opening the Seastar entails removing the end bell, bezel, and window. In order to open the Seastar, e.g., to
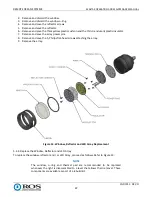
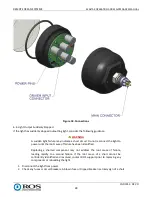
troubleshoot or inspect internal components, proceed as follows. Refer to Figure 11.
WARNING
Disconnect the Seastar from power prior to servicing or troubleshooting internal
components.
CAUTION
The acrylic window and o-rings should not normally be reused once the Seastar
has been disassembled as this may lead to leaks in service. These components
are available as part of a rebuild kit.
1.
Shut off the power to the Seastar and disconnect the power cable.
2.
Use a two-inch wrench, large adjustable wrench, or a vise to hold the end bell, either by the hex flats on
the end bell or the Seastar mounting bracket
CAUTION
The end bell is wired to the driver circuit card. Do not twist the end bell more
than a few degrees to avoid damaging or breaking internal wiring. Avoid pulling
the wires tight before they are disconnected.
3.
Use a strap wrench to unscrew the bezel from the Seastar.
4.
Pull the end bell 1-2 inches off of the housing.
5.
If it is desired to leave the electronics connected, go on to the appropriate procedure at this point.
6.
If required, disconnect the ground lug and the input connector.

