REMOTE OCEAN SYSTEMS
SEASTAR OPERATION AND MAINTENANCE MANUAL
10-01313 REV D
23
1.
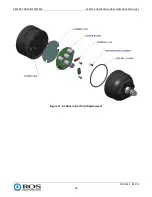
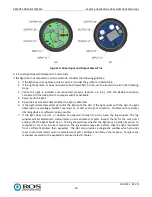
Place the thermal pad in the housing and align the holes.
2.
Place the array in the housing and install the five attaching screws.
CAUTION
Insert the power pins gently and straight-in. It may be necessary to wiggle the
pins slightly to find the sockets on the driver circuit card when seating the pins.
3.
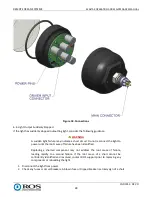
Install the three LED array power pins.
4.
Place the thick plastic cushion over the array and align the holes.
5.
Place the thin, translucent insulator over the cushion and align the holes.
NOTE
If the reflector is severely misaligned to the LEDs, Seastar light output may be
reduced as much as 10%.
6.
Place the reflector over the insulator. Align the cutouts to the LEDS, and install the two reflector screws.
7.
Close the Seastar (5.2.2)
5.2.5.
Replace the Connector
To replace the connector, proceed as follows.
WARNING
Disconnect the Seastar from power prior to servicing or troubleshooting internal
components.
NOTE
The replacement connector comes in a kit from Remote Ocean Systems, which
should include any materials and special hardware required to replace the
connector.
1.
Shut off the power to the Seastar and disconnect the power cable.
2.
Lubricate the replacement connector o-ring, taking care not to get lubricant on the threads.
3.
Apply Vibra-Tite VC-3 1/4
–
1/2 way around the threads of the replacement connector and set it aside to
dry for 30 minutes.
4.
Remove the end bell and disconnect the wiring.
5.
Unscrew the connector from the end bell.
6.
Inspect the sealing surface around the connector hole in the end bell. Replace the end bell if necessary.
CAUTION
Torque values in Table 6 reflect stainless steel connectors with metal wrench
flats. It will be impossible to torque rubber, plastic, or other connectors to these
values without breaking them. Install per manufacturer guidance.
7.
Once the Vibra-Tite on the replacement connector has dried for 30 minutes, thread the connector into
the end bell and torque per Table 6 (metal connectors) or per the manufacturer
’
s guidance (other
connectors).

