Installation and Operations Manual
11
Auto scanning
The auto-scan feature switches between the connected computers, in sequence, at
a pre-defined rate.
(See Table 2, Auto-scan Time T x)
There are two scanning mode options, cycle all ports and cycle only the active ports.
The auto-scan mode option is set in the User Preference, U 7 or U 8 section (See
Table 2).
When option U 8 is selected (Cycle only active ports) when you use the mouse
button or the h tab to change channels, only channels that have an active
computer connected will display, un-active channels will be skipped.
To start the auto-scan mode, using the user console keyboard, press Ctrl + Alt + X.
Scanning will start at the pre-defined rate (T x) and all or only active channels will be
displayed depending on the User Preference setting (U 7 or U 8).
To stop the auto-scanning, press the “COMPUTER” button on the front panel or
select a specific channel using the channel number.
Installing / synchronizing multiple units
If your system requires video from a dual head PC, the Vista DVI Plus unit can be
connected to a second unit to handle the second video. The main unit is connected
to the second unit using a serial synchronization cable.
See Attachment “C” for installation and operation instructions.
OSD – Configuration menus
The Vista DVI Plus 1 x 8 model has an OSD configuration menu that enables you to
configure several settings. To access the configuration menu, simultaneously press
the Ctrl + Alt + M key, then press the F1 key for “More menus”.
Functions
Reset to Factory Defaults
Global Preferences
Mouse Switching
OSD Color
Default Mode
Reminder Banner
Autoscan Mode
Autoscan period
OSD Dwell Time
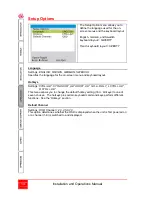
Setup Options
Language
Hotkeys
Default Channel
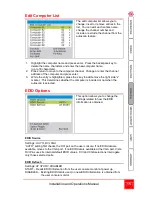
Edit Computer List
EDID Options
EDID Source
EDID Refresh


