background image

Document Number 105478 Rev F 


ELECTRONIC REVISION 

CONTROLLED 

Summary of Contents for 0700-104

Page 1: ...Document Number 105478 Rev F ELECTRONIC REVISION CONTROLLED...

Page 2: ...ny language in any form by any means without the written authorization from Rosen Aviation LLC except as allowed under copyright laws Disclaimer of Liability The information contained in this document...

Page 3: ...g an RDM to a Cosmetic Back 9 4 3 Mounting a Bezel 10 5 SYSTEM CONNECTIONS 10 5 1 Pinout Connections 11 6 RS 232 AND RS 485 CONTROL INPUTS 11 7 INITIAL POWER UP 12 8 IR REMOTE CONTROL 13 9 OSD MENU OP...

Page 4: ...rk ID 28 10 5 Splash Screen 28 10 6 Source Mode 29 10 6 1 Momentary Mode 29 10 6 2 Constant Mode 30 11 TECHNICAL REFERENCES AND SUPPORT 31 11 1 Troubleshooting 31 11 2 Cleaning the Display 32 11 3 RTC...

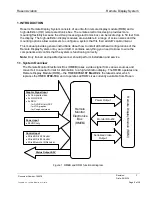
Page 5: ...t contains everything you need to know to wire the components and confirm that the system is functioning correctly Note Only trained and qualified personnel should perform installation and service 1 1...

Page 6: ...R sensor The following options sold separately enable remote inputs with the Remote Display System and adjust the on screen display settings HD Monitor IR Kit P N 0500 023 Universal remote control con...

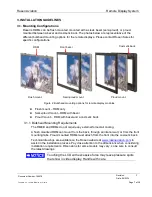
Page 7: ...h bezel Proud mount RDM with bezel and a cosmetic back 3 1 1 Bulkhead Mounting Requirements The RMEB and RDMs do not require any external forced air cooling A flush mounted RDM can mount from the back...

Page 8: ...tches nicks and debris during hardware installation 4 1 Mounting Cosmetic Backs to a Bulkhead The cosmetic backs use two styles of mounting brackets depending on the size of RDM that you install The c...

Page 9: ...100 FHP screws customer supplied Figure 4 3201 4201 and 5501 800 cosmetic back mounting bracket 4 2 Attaching an RDM to a Cosmetic Back Figure 5 shows an exploded view of a proud mount assembly Align...

Page 10: ...ntion fasteners on the bezels See the 55 Bezel Drawing P N 5501 900 for assembly instructions Figure 6 Different bezel retention fasteners 5 SYSTEM CONNECTIONS The RDM receives power control and seria...

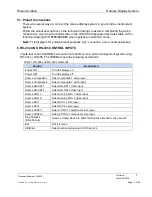
Page 11: ...RDMs can come from an IR or via a cabin management system using RS 232 or RS 485 The RMEB accepts the following commands Table 1 RS 485 and RS 232 commands Control Description Power ON Turn the displa...

Page 12: ...ling the power wire as this can cause heat to build up in the wire If you have more questions about Power Requirements contact Rosen Aviation s Technical Support at 541 434 4512 4 Attach a DA15 interc...

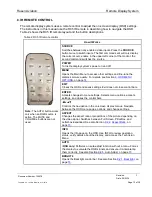
Page 13: ...s the Main Menu to access other settings and fine tune the display s picture quality For details see Section 9 OSD MENU OPTIONS on page 14 EXIT Closes the OSD and saves settings Exit does not close co...

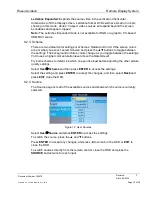
Page 14: ...h source signal is active Press MENU to choose a setting or an option Select the Back option to switch menu pages Press EXIT to close the OSD and save settings Note The on screen display will timeout...

Page 15: ...sely Select User Aspect Ratio and then press ENTER To switch the display between aspect ratio modes described below press the buttons Watch for proportional changes in the background picture and choos...

Page 16: ...e between the settings The background picture s colors change as you toggle between the settings Vivid uses a higher color saturation level above the Natural level Try both schemes to determine which...

Page 17: ...ENTER to change the option values Figure 13 Image Adjust menu options 9 3 1 Scheme Scheme is also available from the Main Menu User page For information about how this option works see Section 9 2 3 o...

Page 18: ...Advanced Submenu Use the Image Adjust Advanced submenu options as shown below to fine tune the primary screen colors and to restore the display s factory screen settings Press the MENU button and the...

Page 19: ...w more cyan colored tones and press the button to intensify the red tones Green Press the button to show more magenta tones and press the button to intensify the green tones Blue Press the button to s...

Page 20: ...Image Position submenu press the button to choose either Horizontal or Vertical and then press ENTER to open a control bar similar to Figure 20 shown below Press the button to shift the picture left u...

Page 21: ...ENTER to open the control bar as shown below Press the button to increase the RGB phase value until the jittering stops Press ENTER to set the phase value and close the control bar Figure 21 RGB Phase...

Page 22: ...ress the following buttons in this order 1 Press INFO 2 With the Back option highlighted on the Main Menu press the buttons and then press MENU 3 The Technician Menu opens The options you see depend o...

Page 23: ...t settings Highlight Advanced Factory Reset and then press ENTER A Reset Complete message appears after the display restores the default settings A Factory Reset will not change the Operation Mode set...

Page 24: ...nu Press EXIT to exit the OSD 10 1 5 3D Comb Filter Composite only When set to Enabled the display will eliminate dot crawl and some noise on stationary portions of the picture Highlight Advanced 3D C...

Page 25: ...setting RJ45 Cable Comp OFF for RJ 45 cable length 0 6 feet Highlight Advanced RJ45 Cable Comp and then press ENTER Use the buttons to set the option and then press ENTER Select Back and press ENTER...

Page 26: ...open not grounded and ignores all power commands from the IR RS 232 and RS 485 This setting will not take effect until you close the OSD Select Back and then press ENTER to return to the Technician M...

Page 27: ...able disable this feature via the RS 232 and RS 485 protocols From the Technician Menu press the button to select Mode Menu SDI Overscan and then press ENTER Use the buttons to set the option to Enabl...

Page 28: ...correspond to the Network ID Each display requires a unique address on the RS 485 network Setting this address sets the value for both interfaces Network settings for Rosen displays are on a scale of...

Page 29: ...e source specified in the Auto Detect option is connected the display will ignore all source commands When that source is removed the monitor will return to normal momentary operation allowing access...

Page 30: ...es between an open state and a ground state Highlight Technician Source Mode Source Select and press ENTER Select Constant and press ENTER Press to select Open and press ENTER Select which video input...

Page 31: ...isplay Check that the Power Control Pin is Open See Power Mode on page 25 for more information Verify that the pinout is correct Screen is black Verify that the display is receiving power Check Power...

Page 32: ...ean the LCD very gently wipe the screen with a clean commercially approved LCD cleaning cloth and alcohol free LCD cleaning solution Use one firm cleaning motion instead of circular or repeated side t...

Page 33: ...rting Under Voltage Operation DC 16 6 1 5 Z Abnormal Operating Conditions 16 6 2 Voltage Steady State DC 16 6 2 1 Z Low Voltage Conditions 16 6 2 2 N A CAT B equip only Momentary Under Voltage DC 16 6...

Page 34: ...CFR 25 853 Appendix F 11 3 1 Other Certification Considerations for RDMs Description Comments Static Abuse Load 300 lbs Testing in accordance with DO 313 section 4 2 a Glass in the Cabin Mechanical St...

Page 35: ...0p 50 1080p 60 11 4 3 VGA Resolutions 640x480p 60 VGA 800x600p 60 SVGA 1024x768p 60 XGA 1152x864p 60 1280x768p 60 WXGA 1360x768p 60 WXGA 1440x900p 60 WSXGA 1280x1024p 60 SXGA 1400x1050p 60 SXGA 1680x1...

Page 36: ...h shell size A DC Direct current DCV Direct Current Volts voltage from an aircraft battery or generator DVI Digital Visual Interface ESD Electrostatic discharge FHP Flat head Phillips HD High Definiti...

Page 37: ...French for sequential color with memory an analog color video system first used in France SVGA Super Video Graphics Array SXGA Super Extended Graphics Array UXGA Ultra Extended Graphics Array VDC Vol...

Page 38: ...t cable and Momentary switch mode remove duplicate content contained in technical drawings consolidate instructions for setting similar Image Adjust and Image Position menu options re sequence Section...

Reviews: