background image

3


•  Do not use electrical appliances inside the food storage   compartments 

of the appliance, unless they are of the type recommended by the manufac-

turer.

•  Do not use water spray and steam to clean the appliance.

•  Clean the appliance with a moist soft cloth. Only use neutral detergents. 

Do not use abrasive products, abrasive cleaning pads, solvents or metal 

objects.

• 

Do not store explosive substances such as aerosol cans with a flammable 

propellant in this appliance.

•  If the supply cord is damaged, it must be replaced by the manufacturer, its 

service agent or similarlyqualified persons in order to avoid a hazard.

Safety Instructions 

Installation


WARNING! 

Only a qualified person must install this ap

-

pliance.

•  Remove all the packaging.
•  Do not install or use a damaged appliance.
•  Obey the installation instruction supplied with the 

appliance.

•  Always be careful when you move the appliance 

because it is heavy. Always wear safety gloves.

•  Make sure the air can circulate around the 

appliance.

•  Wait at least 4 hours before connecting the 

appliance to the power supply. This is to allow the 

oil to flow back in the compressor.

•  Do not install the appliance close to radiators or 

cookers, oven or hobs.

•  The rear of the appliance must stand against the 

wall.

•  Do not install the appliance where there is direct 

sunlight.

•  Do not install this appliance in areas that are 

too humid or too cold, such as the construction 

appendices, garages or wine cellars.

•  When you move the appliance, lift it by the front 

edge to avoid scratching the floor.

Electrical connection


WARNING!


Risk of fire and electrical shock.

•  The appliance must be earthed.
•  All electrical connections should be made by a 

qualified electrician.

•  Make sure that the electrical information on the 

rating plate agrees with the power supply. If not, 

contact an electrician.

•  Always use a correctly installed shockproof socket.
•  Do not use multi-plug adapters and extension 

cables.

•  Make sure not to cause damage to the electrical 

componentThe mains cable must stay below the 

level of the mains plug.

•  Connect the mains plug to the mains socket only 

at the end of the installation. Make sure that there 

is access to the mains plug after the installation.

•  Do not pull the mains cable to disconnect the ap-

pliance. Always pull the mains plug.

Summary of Contents for RSP100A

Page 1: ...Chest Freezer User Manual RSP100A K ytt ohje S ili pakastin Frysbox Bruksanvisning...

Page 2: ...dren play with the appliance Keep all packaging away from children Cleaning and user maintenance shall not be made by children without supervision General Safety This appliance is intended to be used...

Page 3: ...ance to the power supply This is to allow the oil to flow back in the compressor Do not install the appliance close to radiators or cookers oven or hobs The rear of the appliance must stand against th...

Page 4: ...the recharging of the unit Regularly examine the drain of the appliance and if necessary clean it If the drain is blocked defrosted water collects in the bottom of the ap pliance Disposal WARNING Ris...

Page 5: ...starting up or after a period out of use before putting the products in the compartment let the appliance run at least 24 hours Temperature Regulator to the Full Loaded position CAUTION In the event o...

Page 6: ...how the freezing in date on each individual pack to enable you to keep tab of the storage time Hints for storage of frozenfood To obtain the best performance from this appliance you should Make sure t...

Page 7: ...ree hours using this setting 7 Reload the previously removed food into the compartment Periods of non operation When the appliance is not in use for long periods take the following precautions 1 Disco...

Page 8: ...ecessary adjust the door The water drainage plug is not cor rectly positioned Position the water drainage plug in the correct way Temperature is set incorrectly Refer to Operation chapter The temperat...

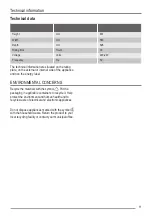
Page 9: ...t range The correct operation can only be guaranteed within the specified tempera turerange If you have any doubts regarding where to install the appliance please turn to the vendor to our customer se...

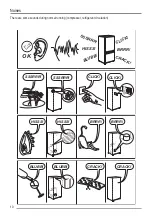
Page 10: ...10 BRRR HISSS CLICK BLUBB CRACK SSSRRR OK CLICK CLICK SSSRRR SSSRRR BRRR BRRR HISSS HISSS BLUBB BLUBB CRACK CRACK Noises There are some sounds during normal running compressor refrigerant circulation...

Page 11: ...de of the appliance and non the energy label ENVIRONMENTAL CONCERNS Recycle the materials with the symbol Put the packaging in applicable containers to recycle it Help protect the environment and huma...

Page 12: ...ttomissa Lapset eiv t saa suorittaa puhdistusta tai huoltoa ilman valvontaa Yleiset turvallisuusohjeet Laite on tarkoitettu k ytett v ksi kotiymp rist iss ja vastaavissa ymp ris t iss kuten maatalot h...

Page 13: ...irtaa takaisin kompressoriin l asenna laitetta l mmittimien tai liesien uunin tai keittotasojen l helle Laitteen takaosa on asetettava sein kohden Laitetta ei saa asentaa suoraan auringonvaloon l asen...

Page 14: ...Ainoas taan p tev alan ammattilainen saa huoltaa yksikk ja t ytt sen uudelleen Tarkista laitteen sulamisveden poistoaukko s nn l lisesti ja puhdista se tarvittaessa Jos poistoaukko on tukossa sulanut...

Page 15: ...n s ilytt minen Kun k yt t pakastinta ensimm ist kertaa tai pitk n k ytt m tt m n jakson j lkeen anna laitteen toimia v hint n 24 tunnin ajan l mp tilan s din T ysi asennossa ennen ruokien asettamista...

Page 16: ...iv m r kaikkiin pakkauk siin jotta voit helposti seurata s ilytysaikoja Pakasteiden s ilytysvihjeit Noudata seuraavia ohjeita varmistaaksesi laitteen parhaan suorituskyvyn Tarkista ett kaupasta ostama...

Page 17: ...a pakasteet takaisin pakastelokeroon Jos laitetta ei k ytet pitk n aikaan Kun laite on pitk n k ytt m tt m n suorita seu raavat toimenpiteet 1 Irrota laite verkkovirrasta 2 Ota kaikki ruoat pois 3 Sul...

Page 18: ...n Puhdista oven tiivisteet S d ovea tarvittaessa Veden poistoputken tulppaa ei ole asetettu oikein Aseta veden poistoputken tulppa oikein L mp tila on asetettu v rin Lue ohjeet K ytt luvusta Laitteen...

Page 19: ...in m ritetyll l mp tilav lill Jos laitteen asennuspaikan valitsemisessa on ep sel vyyksi k nny j lleenmyyj n asiakaspalve lumme tai l himm n huoltopalvelun puoleen Pistokkeen on oltava helposti ulottu...

Page 20: ...RRR HISSS CLICK BLUBB CRACK SSSRRR OK CLICK CLICK SSSRRR SSSRRR BRRR BRRR HISSS HISSS BLUBB BLUBB CRACK CRACK net Tietynlaiset net kuuluvat laitteen normaaliin toimintaan kompressori j hdytysaineen ki...

Page 21: ...nitettyyn arvokilpeen ja energiatarraan YMP RIST NSUOJELU Kierr t materiaalit jotka on merkitty merkill Kierr t pakkaus asettamalla se asianmukaiseen kierr tysastiaan Suojele ymp rist ja ihmisten terv...

Page 22: ...ll ska inte utf ras av barn utan tillsyn Allm n s kerhet Produkten r avsedd att anv ndas i hush ll och liknande anv ndnings omr den som t ex Bondg rdar personalk k i aff rer p kontor och i andra arbe...

Page 23: ...llbaka i kompressorn Installera inte produkten n ra element spisar ugnar eller h llar Produktens bakre yta m ste st llas mot v ggen Installera inte produkten d r den st r i direkt solljus Placera inte...

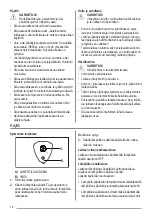
Page 24: ...ga personer f r utf ra underh ll och ladda produkten Unders k regelbundet produktens t mningskanal och reng r den vid behov Om t mningskanalen t pps igen samlas vatten fr n avfrostningen p produktens...

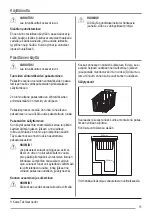
Page 25: ...a period F rvaring av fryst mat N r produkten s tts p f r f rsta g ngen eller har va rit avst ngd en tid b r du l ta produkten vara ig ng i minst 24 timmar med temperaturreglaget inst llt p v lfyllt l...

Page 26: ...met f r infrysning p varje separat f rpackning s att du kan h lla reda p f rvaringstiderna Tips f r f rvaring av fryst mat T nk p f ljande f r att utnyttja produktens prestanda p b sta s tt Kontroller...

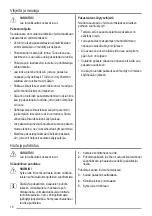
Page 27: ...produkten 6 St ll in temperaturreglaget p h gsta kyleffekt och l t produkten st i tv eller tre timmar med denna inst llning 7 L gg tillbaka matvarorna som du tidigare plock ade ut L nga uppeh ll N r...

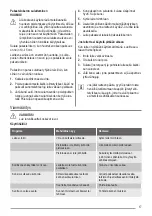
Page 28: ...ller packningen r deformerad smutsig Reng r d rrt tningarna Justera d rren vid behov Vattent mningspluggen r inte korrekt placerad Placera vattent mningspluggen p r tt s tt Temperaturen r felaktigt in...

Page 29: ...kan endast garanteras inom angivet temperaturomr de Om du r os ker p var du ska installera produkten kan du kontakta terf rs ljaren v r kundtj nst eller n rmsta servicecenter N r produkten har instal...

Page 30: ...30 BRRR HISSS CLICK BLUBB CRACK SSSRRR OK CLICK CLICK SSSRRR SSSRRR BRRR BRRR HISSS HISSS BLUBB BLUBB CRACK CRACK Buller Vissa ljud h rs under normal anv ndning kompressor cirkulation av k ldmedel...

Page 31: ...eller inuti produkten och p energim rkningen MILJ SKYDD tervinn material med symbolen tervinn f rpack ningen genom att placera den i l mpligt k rl Bidra till att skydda v r milj och v r h lsa genom a...

Page 32: ...804180528 162013 www electrolux com shop...

Reviews: