4
1100W Oil-Less Low Fat Air Fryer - 2.5 Quart (2.4L)
RHAF-15001 & RHAF-15002
Preheating
1
Plug the power cord into a grounded wall socket.
2
Press the power on/off button to switch on the appliance. (Fig.7)
The display shows the last selected temperature.
3
Press the temperature increase or decrease button to set the required temperature.
See the section titled Temp/Timer in this chapter to determine the right temperature.
(Fig. 6)
Tip: Press the increase or decrease button longer to put the temperature forward or back
ward more quickly.
Note: If you do not want to preheat, but want to start frying immediately, skip step 4 and
follow the instructions in the section titled “Hot air frying” in this chapter.
4
Press the On/Off button. (Fig.7)
The appliance will begin to heat up.
The set temperature will flash until the desired temperature has been reached, then the
appliance will beep and the temperature indicator will display continuously.
Beeping will commence until cooking time as been set (see step 4 in the section titled
“Hot air frying”).
Note: You can also start the preheating process manually by setting the temperature and then
pressing the timer decrease button until ‘- -’ appears. (Fig 5 and Fig 6)
Hot air frying
1
Open the drawer by pulling at the handle. (Fig.1)
2
Put the ingredients in the basket (Fig.3)
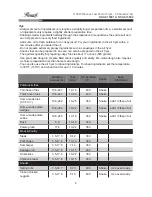
Note: Never fill the basket beyond the MAX indication or exceed the amount indicated in the table
(see section ‘Temp/Timer’ in this chapter), as this could affect the quality of the end result.
3
Slide the drawer back into the air fryer by the handle (Fig.4)
Never use the pan without the basket in it. If you heat up the appliance without basket, use
oven gloves to open the drawer. The edges and inside of the drawer become very hot.
Caution: Do not touch the pan during and some time after use, as it gets very hot.
4
Press the timer increase or decrease button to set the timer to the required cooking
time. See section ‘Temp/Timer’ in this chapter to determine the correct cooking time.
(Fig.5)
Tip: Press the timer increase or decrease button longer to put the time forward or backward more
quickly.
Note: If you have not preheated the appliance, add 3 minutes to the cooking time.
Note: If you do not set the required cooking time within 5 minutes, the appliance switches off
automatically for safety reasons.


