background image

Table of Contents


Page

I.   Notes ..................................................... 1

II.  Specifications ........................................ 2

III. Features and Components .................... 2-3   

IV. Installation and Adjustment ................... 4-5

V.  Control Setting ...................................... 6-7

VI. Drainage Instructions ............................ 8

VII.Maintenance.......................................... 9-10

VIII.Troubleshooting .................................... 11

IX. Appendix ............................................... 12

Summary of Contents for RHPA-18002

Page 1: ...Portable Air Conditioner 3 in 1 12000 BTU User Manual RHPA 18002...

Page 2: ......

Page 3: ...nts Page I Notes 1 II Specifications 2 III Features and Components 2 3 IV Installation and Adjustment 4 5 V Control Setting 6 7 VI Drainage Instructions 8 VII Maintenance 9 10 VIII Troubleshooting 11...

Page 4: ...y from gasoline ammable gas stoves and other heat sources Do not disassemble overhaul and modify the machine arbitrarily otherwise it will cause malfunction or even bring harm to people and property T...

Page 5: ...s body Designed with handles on both sides for easy carry and transport Power cord xing board insertion on the rear of the AC unit for tidy storage of the cord when AC is not in use Exhaust Air Vent...

Page 6: ...Power Cord Plug EVA Filter Exhaust Air Vent CON Filter Screen Drainage Hole Exhaust Heat Pipe Assembly Remote Control LED Control Panel Window Sealing Plate Assembly Swing Leaf Wheel Power Cord Handl...

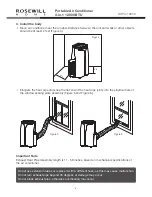
Page 7: ...exhaust port on the rear panel 2 Install the Window Sealing Plate Assembly Open the window halfway and mount the window sealing plate assembly either horizontally or vertically Figure 2 and Figure 3 A...

Page 8: ...window Distance between the unit and walls or other objects should be at least 2 feet Figure 4 Elongate the heat pipe and snap the at end of the heat pipe joints into the elliptical hole of the windo...

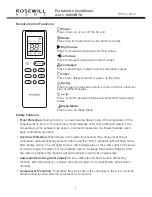
Page 9: ...l or Fan mode Not applicable to Dry mode pressing will cause the fan to default to low speed operation Fan speed adjustments are limited by the unit s anti cold frost protection and may not run accord...

Page 10: ...hine will automatically enter frost protection status if the temperature of the exhaust pipe rises to a normal temperature it will automatically revert back to standard operation Over ow Protection Wh...

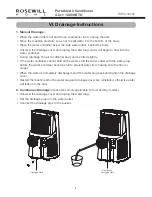
Page 11: ...an be tilted slightly If the water container cannot hold all the water stuff the water outlet with the water plug before the water container becomes full to prevent water from owing onto the oor or ca...

Page 12: ...ioner and avoid dust clogs Cleaning the Upper Filter Screen Frame To remove the lter screen clasp the wedging block of the EVA Filter screen frame with hands Force down from the outside to remove the...

Page 13: ...de and maintain this state until the drainage pipe becomes dry This will keep the inside of the body in a dry state and prevent mildew Turn off the machine unplug the power plug and wrap the power cor...

Page 14: ...nit to a room with curtains or shade Doors or windows are open there are a lot of people or there are other sources of heat Close doors and windows or add more air conditioners The filter screen is di...

Page 15: ...nded outlet 2 Press the TEST button on the LCDI plug This should trip the plug and cut the power to the air conditioner If the plug does not trip and you are able to turn on the unit please contact Ro...

Page 16: ...m 1 800 575 9885 Thank you for purchasing a quality Rosewill product Please register your product at www rosewill com for complete warranty information and support for your product For disposal of the...

Reviews: