background image

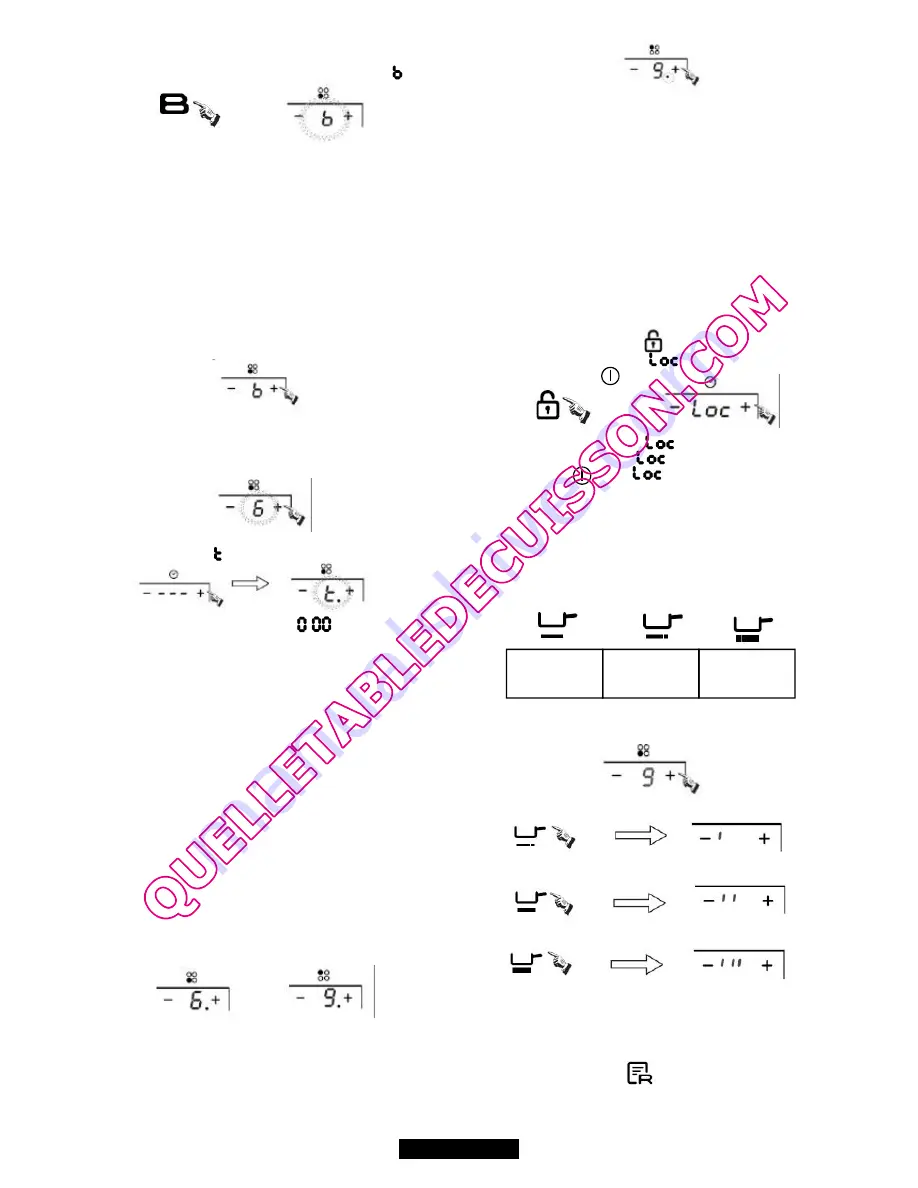
Boost function

Press the“

" key, the power level indicator showing "

"

B

12 GB - IE

Warning:

1. The boost function only operates for 5 minutes, after which

the cooking zone will revert to its original setting.

2. The boost function works on the all cooking zone.

3. As the boost function of the 1st cooking zone is activated, the

2nd cooking zone is limited under level 2 automatically, vice

versa. As the boost function of the 3rd cooking zone is

activated, the 4th cooking zone is limited under level 2

automatically, vice versa. In the 5Kw model as the boost

function of one cooking zone is activated, the other cooking

zones are limited under level 3 automatically, and vice versa.

Cancelling the "BOOST" mode

Cancel the "Boost" mode by pressing the "+" or "-" key of the

corresponding zone.

Timer function

Ifmorethan1zoneisswitchon:

- activate the selected zone by pushing "+" or "-" key of that zone,

the corresponding digits will be flashing.

- Then press the “+” or “-“ timer key. Power level indicator will be

flashing and showing “

”; the timer indicator will be flashing.

- To begin with the indicator shows "

", set the time by

pressing the "+" or "-" key. After setting the time, you can select

the power level of the cooking zone.

- Press the "+" key once increases the time by one minute ; hold

down the "+" key increases the time by 10 minutes ; When the

time exceeds 1 hour, hold down the "+" key increases the time by

30minutes .

- Press the "-" key once decreases the time by one minute ; hold

down the "-" key decreases the time by 10 minutes ; When the

time exceeds 2 hours, hold down the "-" key decreases the time

by 30 minutes .

- You can set the power level during the timer mode.

- Then set the time for between 1 minute and 9 hours 59 minutes

by pressing the "+" or "-" key.

:

If the timer is set onmorethan1zone:

- Timer can be set on all 4 cooking zones. When you set the time

for several cooking zones simultaneously, decimal dots of the

relevant cooking zones are on.

- on the timer display will be shown the timer than will expire first.

The dot of the corresponding zone will be on but flashing. Once

the countdown timer expires the corresponding zone will be

switch off. Then it will be shown the new first expiring timer and

the corresponding zone will have the dot flashing.

- If the timer is set but not active on any zone, it will work simply as

timer countdown.

1.Whenthetimeris0minute,thetimeriscancelled.

2.Whentimeelapses, the relevant cooking zone is switched off.

3. After setting the timer, the timing indicator has been flashing for

5 seconds, the set time will be automatically confirmed.

4. In timer mode, pressing the "+" or "-" key of the timer

simultaneously, timer setting returns to “0", time is cancelled.

Note:

Safetymode

To ensure the safety of children, the induction hob is fitted with

an interlock device.

In working mode, press the "

" key, the hob then goes into the

lock mode, timer will display "

" and the rest of the keys are

disabled except the "

" key.

In standby mode, press the "lock" key, the hob then goes into the

lock mode, the timer shows "

" and the rest of the keys are

disabled.The timer shows "

" for a while and then goes out.

If you press the

key, "

“ will be displayed for a while.

Hold down the"Lock" key for 3 second, and the lock function will

be deactivate.

- Lock:

- Unlock:

Special function

- Activate the selected zone by pushing "+" or "-".

press the SIMMERING key, the indicator will be show “ ”

press the MEDIUM key, the indicator will be show “ ”

press the HIGH key, the indicator will be show “

I

II

III

SIMMERING

key

(level 1)

MEDIUM key

(level 8)

HIGH key

(level 15)

Memory function

You can use the memory function to store the power level settings

and duration for one zone.

Summary of Contents for RIL635GE

Page 1: ...HOBS USER INSTRUCTIONS GB USINES DE ROSIÈRES 30 rue Y LACELLE Rosières 18400 Lunery France TABLE DE CUISSON NOTICE D EMPLOI ET D INSTALLATION FR ...

Page 2: ...Protection Of The Environment Declaration of compliance 0 1 10 10 10 11 11 11 11 13 14 14 14 14 FR CONTENU 1 1 1 Encastrement 2 Installation Raccordement Electrique Utilisation e a Table Maintenance t Entretien Assistance Technique Protection e L environnement 2 1 Raccordement au réseau électrique 3 Avertissements généraux 4 Induction 5 Le choix des ustensiles 6 d l 7 e 8 9 Problèmes et solutions ...

Page 3: ...es Zones de cuisson Installed electric power Puissance électrique installée Product size D x W x H mm Dimensions appareil P x L x H mm 4 INDUCTION 7300 W 7300 W 590 x 520 x 55 4 zone models Modèle 4 zones 3 zone models Modèle 3 zones Table A 5 3 6 3 INDUCTION ...

Page 4: ...maximale des zones de cuisson est la suivante The above may vary according to the size of the pan and the material it is made from Ceci peut varier en fonction de la taille et du matériau de la casserole Table B B 8 7 4 zone models Modèle 4 zones 3 zone models Modèle 3 zones 2200 1500 2400 3000 2000 4000 Heating Zone Zone cuisson Normal Boost 1 2 3 4 2100 1500 2100 1500 3000 2000 3000 2000 1500 21...

Page 5: ...upe circuit omnipolaire avec une fente d ouverture d aumoins 3 mm Si l appareil a une prise de courant il doit être installé de telle sorte que la prise de courant soit accessible Le fil jaune vert du câble d alimentation doit être relié à la fois à la terre de l alimentation et à celle des terminaux de l appareil Le fabricant ne peut être tenu responsable des accidents résultants de l utilisation...

Page 6: ...araît pour vous avertir de rester éloigné de cette zone de chaleur Une autre sécurité de la table à induction est l arrêt automatique Cela se produit chaque fois que vous oubliez d éteindre une zone de cuisson Les temps d arrêt par défaut sont indiqués dans le tableau C Quand le récipient est retiré de la zone de cuisson immédiatement celle ci ne chauffe plus et elle s éteint après que le buzzer r...

Page 7: ...e plusieurs zones de cuisson en même temps les points décimaux des zones de cuisson concernées s affichent Le temps qui apparaît sur l afficheur est celui qui expirera en premier Le point de la zone correspondante est éclairé mais clignote Une fois que le compte à rebours du premier minuteur est terminé la zone correspondante s éteint Le temps qui apparaît sur l afficheur correspond alors au proch...

Page 8: ...mémorisée Ensuite le s affiche et l enregistrement du cycle de la zone sélectionnée démarre Comment enregistrer un nouveau cycle de cuisson si vous en avez déjà enregistré un 7 MAINTENANCE ET ENTRETIEN Avant d effectuer tout travail d entretien sur la table de cuisson laissez la refroidir Seuls les produits crèmes et grattoirs spécialement conçus pour les surfaces vitrocéramiques doivent être util...

Page 9: ...ne pas La table ne fonctionne pas La table ne se coupe pas Normal La turbine de refroidissement des composants électroniques est en fonctionnement Normal Selon la fréquence de fonctionnement des inducteurs un léger sifflement peut se produire lors de l utilisation de plusieurs foyers à puissance maximale N utiliser que des récipents à fond plat Le fond du récipient doit recouvrir entièrement le di...

Page 10: ... with the dimensions indicated You can not build the hob in above an oven with no fan a dishwasher fridge freezer or washing machine It is essential that the induction hob is well ventilated and that the air intake and exit are not blocked Make sure the hob is correctly installed as shown in Figure 2 NB For safety the gap between the hob and any cupboard above it should be at least 760mm Installat...

Page 11: ...setting the best performance from your hob using this type of cookware will prevent hot spots that cause food to stick Thick metal pots and pans will provide an even distribution of heat when filling pans with liquid or using one that has been stored in the refrigerator ensure that the base of the pan is completely dry before placing it on the hob This will help to avoid staining the hob When usin...

Page 12: ...r key If the timer is set onmorethan1zone Timer can be set on all 4 cooking zones When you set the time for several cooking zones simultaneously decimal dots of the relevant cooking zones are on on the timer display will be shown the timer than will expire first The dot of the corresponding zone will be on but flashing Once the countdown timer expires the corresponding zone will be switch off Then...

Page 13: ...y pressing or Hold down the key for a while and the will appear means cooking zone stored in memory Then the will be displayed the recording of the cycle on the selected zone starts How to record one new cooking cycle if we have already recorded one Before carrying out any maintenance work on the hob allow it to cool down Only products creams and scrapers specifically designed for glass ceramic su...

Page 14: ... is out of order or some heat zones do not work The hob does not operate The hob does not cut off Normal The cooking fan of the electronic components is on Normal According to the working frequency of the inductors a light whistling can occur when using several cooking zones on maximum power Youmustusepanswhichareabsolutelyflat Pan bottoms should closely match the diameter of the heat zone Selecte...

Page 15: ...même dans l intérêt de l utilisation sans causer de préjudices aux caractéristiques de fonctionnement de sécurité des appareils GB IE The manufacturer will not be responsible for any inaccuracy resulting from printing or transcript errors contained in this brochure We reserve the right To carry out modifications to products as required including the interests of con sumption without prejudice to t...

Reviews: