background image

45

English

If, when setting the temperature for the core temperature sensor, you press the Temp up arrow (2) 
until 121°C is displayed and then press it once more, the ITC displays "NOPR". In this setting, alt-
hough the ITC shows the temperature of the meat, it does not automatically switch to Done mode at 
any temperature.

If you are not using the core temperature sensor, you should not leave it in the grill. 
Please keep the core temperature sensor and lead as clean and dry as possible. Clean the sensor with a 
damp sponge or cloth moistened with a little alcohol cleaner. 
If the core temperature sensor and lead are exposed to damp for an extended period, false temperature 
readings may be indicated on the ITC display. In extreme cases, the display may constantly show 
"0°C"/"32°F". To rectify this problem, the core temperature sensor and lead must be completely dried out. 
Once completely dried out, the sensor will be fully functional again. 
When cleaning the core temperature sensor and lead, DO NOT immerse them in water and DO NOT clean 
the sensor in a dishwasher.

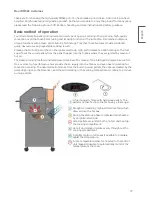
#HQDBSÄA@QADBTDHMFÄVHSGÄ#HQDBSÄ%K@LDÄHMRDQS

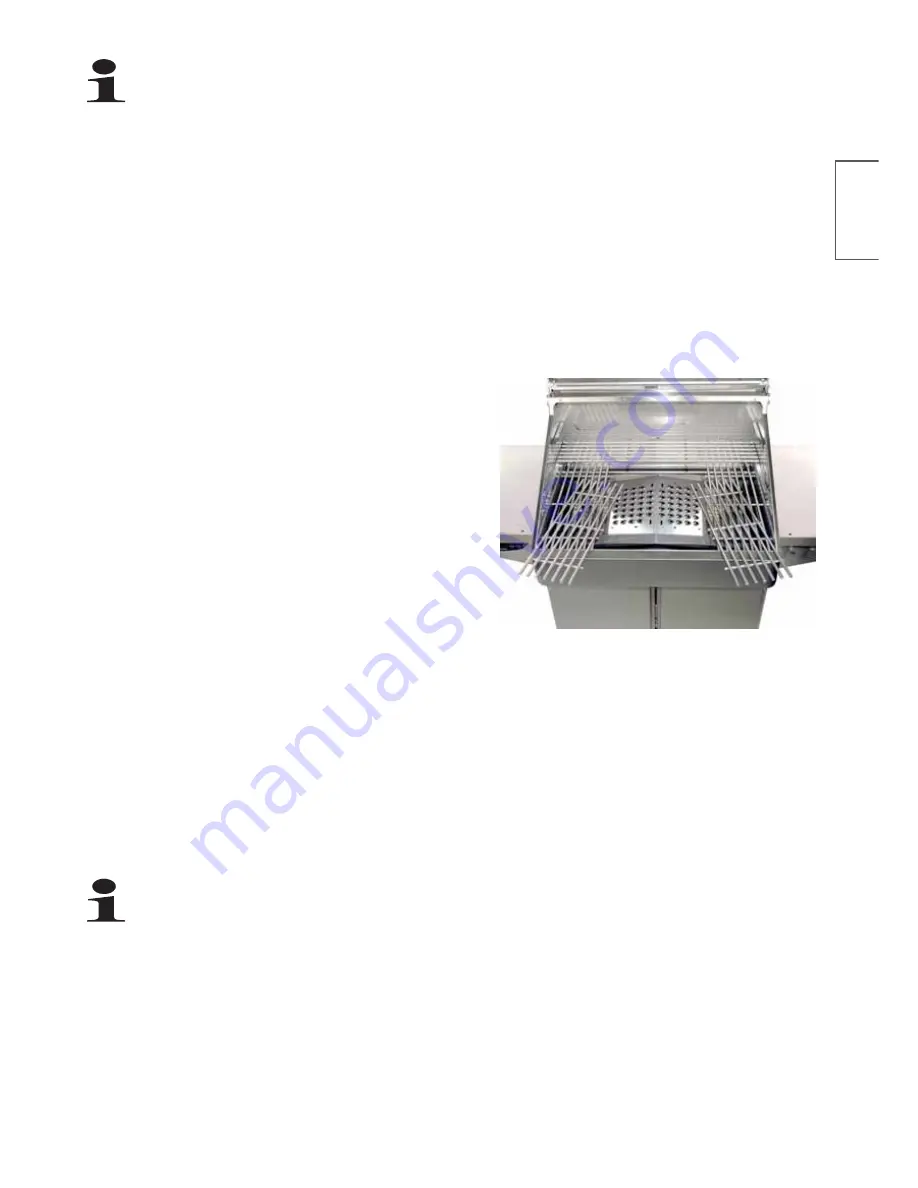
With the direct method, the food is cooked directly over the pellets. Food that requires less than 25 minutes 
to cook is cooked by the direct method. To make sure the 
food is evenly cooked all the way through, it should be 
turned once after half the cooking time. Foods such as 
steaks, chops, kebabs and vegetables can be cooked in this 
way. The Direct Flame insert is interchangeable with the 
EZ-Access insert and thus enables direct barbecueing above 

RFCk?KCQMDRFCNCJJCCKNFGQ"GPCAR$J?KC

Flavorizer insert is compatible with the Memphis Elite, Pro, 
Advantage Plus and Built-In models.

q

Remove the grates and the EZ-Access Flavorizer insert, 
e.g. with the aid of Genie Multi-Tool.

q

Replace the EZ-Access Flavorizer insert with the Direct 
Flame insert.

q 0CjRRFCEP?RCQ?LBAJMQCRFCJGBMDRFCEPGJJRM@CEGL

with.

q

Switch the grill on and increase the temperature to 
the highest possible setting (Elite 370°C, Pro 344°C, Advantage Plus 316°C). Now wait until the grill has 
reached the maximum temperature and keep the lid of the grill closed for the time being.

q

As soon as the maximum temperature is reached and the temperature is also shown on the ACTUAL dis-
play, press the 

×

 arrow button once to switch to Open Flame mode OF-1. Pressing the 

×

 arrow button 

again switches to OF-2 mode, and a further press switches to OF-3 mode (OF-3 mode is not available 
on the Advantage Plus model). OF-3 (or OF-2 on the Advantage Plus model) is the hottest direct barbe-
cueing mode.

q

Now it is essential that you open the grill lid in this mode. The display shows the message "OF". In this 
mode, display of the internal grill temperature (ACTUAL) is deactivated as it would indicate unreliable 
readings with the lid open (e.g. due to the effect of wind, etc.). Nor is it possible to set core temperature 
control (Meat Probe) in OF mode.

q

Place the food on the grill grate.

Only ever use the grill with the lid closed unless you are using Direct Flame mode. In Direct Flame 
mode, the appliance may only be operated with the lid open as described in the instructions above. 
If you were to leave the lid permanently closed in Direct Flame mode, malfunctions due to excessi-
vely high temperatures could occur. In that event the appliance automatically cuts out for safety rea-

sons. The fault code "ER-1" then appears on the ITC display. Only ever activate Direct Flame mode if you 

F?TCNPCTGMSQJWGLQCPRCBRFC"GPCAR$J?KCGLQCPR?T?GJ?@JCQNCAGjA?JJWDMPRFCNSPNMQCGLRFC$J?TMPGXCP

Summary of Contents for Elite Built-In 25345

Page 1: ... O Q D Ä5DTHKKDYÄKHQDÄ SSDMSHUDLDMSÄ et entièrement les consignes suivantes avant de LNMSDQÄDSÄCiTSHKHRDQÄKDÄA QADBTD Ä NMRDQUDYÄKDÄ L MTDKÄCiTSHKHR SHNMÄ ÄKi AQHÄ Æ ÄMÄCDÄONTUNHQÄ BNMRTKSDQÄKDRÄCHEE QDMSRÄONHMSRÄ ÄSNTSÄLNLDMS Ä NTQÄTSHKHR SHNMÄDWS QHDTQDÄTMHPTDLDMS DÄLNMS FDG MCKDHCHMFÄUNNQÄCDÄ RRDLAK FDÄ UHMCSÄTÄHMÄCDÄRDO Q SDÄAHIK FD Ä DDRÄ T A ÄCDÄUNK gende instructies aandachtig en volledig d...

Page 2: ...11 Elektrischer Anschluss 11 Erstes Freibrennen nach Inbetriebnahme bzw län gerer Standzeit 11 HME BGDÄ2BGQHSSDÄYTLÄ QHKKOQNÆ 11 Garen mit dem RÖSLE Grill 12 Einheizen des Grills 12 Automatischer Start 13 Betrieb 13 ITC Kerntemperaturfühler verwenden 14 Direktes Grillen mit Direct Flame Einsatz 15 Indirekt Grillen mit Flavorizer Einsatz 16 Grillanleitung 17 Anleitung zum Räuchern 20 Ungefähre Räuc...

Page 3: ...rillbaren Speisen eingesetzt werden Dieses Gerät ist ohne weitere Vorkehrungen nur zum Grillen im Freien bestimmt Jede andere Verwendung ist nicht gestattet und kann gefährlich sein Auch die Verwendung als eine Feuerstelle ist untersagt Das Ge rät ist für den privaten Gebrauch konzipiert und nicht für gewerbliche Zwecke geeignet 5 12 3ÏÄ 1 Ä 1Ä5 Ä 1 Ä 1 3 Ï Ä5 16 4 Ä Ä 1 Ä 1Ä 16 Ï Verwenden Sie de...

Page 4: ... nicht das Gehäuse Andernfalls besteht die Gefahr eines elektrischen Schlags Das Berühren Spannung führender Teile ist lebensgefährlich q Versuchen Sie niemals ein defektes Gerät selbst zu reparieren Wenden Sie sich immer an Ihren Händler q Öffnen Sie das Gerät auf keinen Fall dies darf nur der Fachmann q Fremdkörper z B Nadeln Münzen etc dürfen nicht in das Innere des Gerätes fallen q Es dürfen k...

Page 5: ...eanleitung Verwenden Sie diesen Grill erst wenn alle Teile ordnungsgemäß montiert sind q Betreiben Sie den Grill niemals ohne das fest montierte Schutzgitter über der Förderschnecke Gehen Sie beim Umgang mit dem Grill entsprechend vorsichtig vor Der Grill erhitzt sich beim Grillen Lassen Sie den Grill während der Verwendung nie unbeaufsichtigt q Benutzen Sie den Grill immer nur mit geschlossenem D...

Page 6: ... beispielsweise jedoch nicht ausschließlich Holz behandel te Holzböden Holzterrassen und Holzvorbauten Lagern Sie keine brennbaren Gegenstände unter Ihrem Grill Lassen Sie keine verpackten Lebensmittel auf oder in der Nähe Ihres Grills liegen q 2P ECL 1GC U FPCLB BCP 4CPUCLBSLE BCQ PGJJQ ICGLC JCGBSLE KGR JMAICP kGCECLBCL PKCJL q Schützen Sie sich vor Funken und heißen Fettspritzern Zum Schutz der...

Page 7: ...währten Pellet Verbrennungstechnologie Zusammen sorgen sie für kontrol lierte schnelle wohlschmeckende und wiederholbare Kochergebnisse Durch Drücken der Einschalttaste werden Glühstab Hochleistungslüfter und Förderschnecke aktiviert Aus dem Pelletbehälter werden die Holzpellets mit der Förderschnecke in die Brennkammer befördert wo sie mittels Heißluft entzündet werden Die gewünschte Kochmethode ...

Page 8: ...e hochwertigen Pellets haben eine Länge von K VGK J AK GC ÊPXC BCP CJJCRQ QMPER DÊP CGLC FÅFCPC Dj XGCLX SLB eine gleichmäßigere Temperatur Hochwertige Pellets bestehen zu 100 aus Hartholz Bitte vermeiden Sie Pellets aus Weichholz wie z B Pinie weil diese zu einem terpentinartigen Geschmack führen Sägemehl und saubere Holzschnitzel werden pulverisiert und getrocknet Das getrocknete Material wird d...

Page 9: ...e 8 Grillpelletbehälter Modell Advantage auf Vorderseite 3 Temperaturfühler 9 Lüftungsöffnungen wichtig frei halten um korrekte Funktion zu gewährleisten 4 Garkammer mit Grillrost darunter Direct Flame Einsatz oder EZ Access Flavorizer Insert Brennkammer 10 Fettauffangbehälter 5 Deckel mit Griff 11 Stauraum 6 Ablage für Grillgut 12 Tür Modell Advantage Plus 8 7 1 ...

Page 10: ...emp Display Taste für Temperaturdar stellung aktuelle Temperatur eingestell te Temperatur 4 LED Anzeige Betriebszustand Blinken bei aktivem Zünder oder wenn das Gerät in Abkühlphase ist Actual aktuelle Temperatur Grillraum Grill Eingestellte Temperatur Grillraum Meat aktuelle Temperatur des Kerntem peraturfühlers Set leuchtet im Einstellmodus 8 Pellet Prime Manuelle Pelletförderung zusätzliche Pel...

Page 11: ... noch schwer wieder vom Metall zu entfernen q Entnehmen Sie die Grillroste und waschen Sie diese mit einem milden Reinigungsmittel ab q Legen Sie die Grillroste wieder ein q Schalten Sie den Grill ein und lassen Sie ihn bei einer Temperatur von 230 C bei geschlossener Haube ca 20 Minuten heizen Nach dem Freibrennen schalten Sie das Gerät aus HME BGDÄ2BGQHSSDÄYTLÄ QHKKOQNÆ q Lesen Sie sich das Reze...

Page 12: ...eistung erzielen Wie oft diese Überprüfung notwendig ist hängt von der Nutzung und dem verwendeten Brennmaterial ab q Öffnen Sie die Haube und entnehmen Sie die Grillroste q Entnehmen Sie den Flavorizer Der Flavorizer sorgt für die Hitzeverteilung schützt vor Flugasche und verhindert den direkten Kontakt der Flammen mit Ihrem Grillgut q Überprüfen Sie ggf den Bereich der Brennkammer und entfernen ...

Page 13: ...lt Bevor Sie das Feuer erneut entzünden sollten Sie die überschüssigen Pellets aus der Brennkammer entfernen und die oben genannten Schritte wiederholen Betrieb Sobald der Pelletgrill gestartet wurde sind die weiteren Abläufe folgendermaßen Vorheizen Dies ist die Startphase beim Grillen oder Räuchern Dabei wird das Brennmaterial entzündet und der Grill wird so schnell wie möglich auf die eingestel...

Page 14: ... und stellen Sie die gewünschte Grilltemperatur ein q Schalten Sie mit Probe Display 6 auf Meat um Die LED Meat 4 leuchtet q Wenn der Kerntemperaturfühler nicht angeschlossen ist ist das Umschalten nicht möglich q Stellen Sie mit Temp Display 7 auf Set und stellen Sie mit Temp 2 die gewünschte Kerntemperatur ein Die LED Set 4 leuchtet q Tasten mit den Pfeilen nach oben oder unten drücken Die Tempe...

Page 15: ...antage Plus und Built In Einbaugrills q Entfernen Sie die Grillroste und den EZ Access Flavori zer Einsatz mithilfe des Multi Genie Tools q Ersetzen Sie den EZ Access Flavorizer Insert mit dem Direct Flame Insert q Setzen Sie die Grillroste wieder ein und schließen Sie zunächst den Deckel des Grills q Schalten Sie den Grill ein und erhöhen Sie die Temperatur auf den jeweilig höchsten einstellbaren...

Page 16: ...es EZ Access Flavorizer Einsatzes Der Einsatz ist nicht fest arretiert und kann ebenfalls z B bequem mithilfe des Multi Genie Tools oder auch einer passenden Grillzange oder eines Spachtels entnommen werden Hinweis Versuchen Sie niemals den Einsatz ohne den Gebrauch von Grill Schutzhandschuhen zu entnehmen solange der Grill in Betrieb und heiß ist 3 Wartung und Reinigung der Brennkammer Sobald Sie...

Page 17: ...lfe der in der Tabelle angegebene Zeit Alternativ kann ein Bratenthermometer verwen det werden das die gewünschte Kerntemperatur anzeigt Die Grillzeiten für Rind beziehen sich auf eine mittlere Garstufe medium falls nicht anders angegeben CLSRXCL 1GC GKKCP CGL JCGQAFRFCPKMKCRCP SK QGAFCPXSECFCL B QQ JCGQAF SLB CkÊECJ SAF TML GL nen ausreichend gar ist Nicht durchgegartes Fleisch kann ernsthafte ge...

Page 18: ...e blutig 62 medium 72 Schinken vollständig gekocht indirekte Hitze jede Größe 176 190 19 21 min kg 60 vorgekocht indirekte Hitze ganz 4 5 6 4 kg halb 2 3 3 2 kg Portion 1 4 1 8 kg 176 190 26 30 min kg 30 36 min kg 69 75 min kg 72 76 Lamm Koteletts Schulter Len de oder Rippe 2 5 cm dick 176 190 5 min Seite 62 72 Steaks Filet oder Keule 2 5 cm dick 176 190 5 min Seite 62 72 Fleisch Spieße 2 5 cm Wür...

Page 19: ...115 g 160 C 10 15 min Seite 6 8 min Seite 76 C andere Teile Beine oder Schenkel Keulen Flügel Wings 170 225 g 170 g 55 85 g 160 C 10 15 min Seite 8 12 min Seite 8 12 min Seite 82 C Ente Gans Kleine Ente ganz indirekte Hitze geviertelt indirekte Hitze 2 kg nicht gefüllt 160 C 2 5 h 1 h 25 min 82 85 C Gans ganz indirekte Hitze 3 6 5 5 kg 160 C 40 44 min kg 82 85 C Truthahn Truthahn ganz indirekte Hi...

Page 20: ...ie meisten Fleischsorten im Räuchermodus eine Temperatur von 105 135 C einstellen Wenn Sie einen stärkeren Rauchgeschmack erzielen wollen und die Zeit dazu haben können Sie die Temperatur bis auf 90 80 C herunterschalten aber im Allgemei nen lohnt sich das nicht Sie sollten auch beachten dass es beim Räuchern bei warmen Außentemperaturen sonniges Wetter mit Temperaturen über 32 C schwierig sein ka...

Page 21: ...er vor dem Räuchern und auch nach längeren Räuchervor gängen zu säubern Ascheansammlungen könnten dazu führen dass Ihr Grill die Räuchertemperatur nicht gleichmäßig halten kann Vorsicht Wir raten Ihnen davon ab mit niedrigen Temperaturen bei kaltem und windigem Wetter zu räuchern Bei Temperaturen von weniger als 105 C kann durch das Kondensieren von Rauch möglicherweise Kreosot entstehen Verlassen...

Page 22: ...iegt Grill lässt sich nicht einschalten Der Grill ist nicht an die Steckdose angeschlossen Überprüfen Sie ob Ihr Grill an eine funktionierende Steck dose mit Fehlerstromschutzschalter angeschlossen ist Eine Spannungsspitze hat die Sicherung auf der ITC Platine durchgebrannt Die Sicherung muss manuell ersetzt werden Siehe die entsprechende Anleitung am Ende dieses Abschnitts Grill erzeugt zu viel o...

Page 23: ...rfärbt kann diese Verfärbung mit einem Edelstahl reiniger sowie einem groben nicht metallischen Putzschwamm entfernt werden Flavorizer Wir empfehlen Ihnen den Flavorizer vor jedem Grillvorgang von Speise und Fettrückständen zu reinigen Ein sauberer Flavorizer vermindert außer dem das Hochschlagen von Flammen Bürsten oder kratzen Sie Rückstände mit einer Grillbürste oder einem Spachtel ab Reinigen ...

Page 24: ...baut werden Dazu müssen nur vier Kreuz schlitzschrauben samt Unterlegscheiben entfernt werden Achten Sie dar auf die Brennkammer beim Wiedereinsetzen in die richtige Position zu bringen Die Brennkammer sollte mittig eingebaut werden und fest sitzen aber nicht zu stramm Ebenso sollten Sie die Luftlöcher des Zünderrohrs auf Sauberkeit untersuchen wie in der Abbildung rechts gezeigt Entfer nen Sie al...

Page 25: ...erung falscher Anwendung höherer Gewalt willkürlicher Beschädigung falschem Zusammenbau oder falscher Wartung bzw falschem Service Darüber hinaus ist die Garantie nichtig wenn die normalen Wartungs und Reinigungsarbeiten nicht regelmäßig durchgeführt werden Eine Zustandsverschlechterung oder Beschädigung aufgrund extremer Wetterbedingungen wie Hagel Erdbeben oder Wirbelstürme sowie Farbveränderung...

Page 26: ...ät ist entsprechend der Richtlinie 2002 96 EG über Elektro und Elektronik Altgeräte WEEE gekennzeichnet Dieses Produkt darf am Ende seiner Lebensdauer nicht über den normalen Haushaltsabfall entsorgt werden sondern muss an einem Sammelpunkt für das Recycling von elektrischen und elektronischen Geräten abgegeben werden Das Symbol auf dem Produkt der Gebrauchs anleitung oder der Verpackung weist dar...

Page 27: ...5 4 Max mögliche Grill roste 9 9 7 7 8 Räder feststellbar 4x 4x 4x 4x 4x Räder mit Gummi Ø in cm 9 5 7 5 7 5 Spritzwasserfest 3 3 3 3 3 Grillbereich PGJJk AFC GL AKÞ 5447 5447 3631 3631 2753 NRGML JC PGJJk AFC max 8082 8082 5388 5388 6266 Grillbereich in cm 94 x 44 94 x 44 63 x 44 63 x 44 63 x 44 Max Höhe des Gar gutes in cm 26 26 26 26 26 Grillvolumen in Liter 104 104 69 69 69 Maße und Gewicht Br...

Page 28: ...e 25375 Auffangschalen Elite PRO 6er Set 25376 Auffangschalen Advantage 6er Set 25373 Warmhalteroste Elite 2er Set 25374 Warmhalteroste PRO Advan tage 2er Set QHKK BBDRRNHQDR 25050 Barbecue Wender 25053 Barbecue Reinigungsbürste 25054 Barbecue Grillzange 40 cm 25056 Barbecue Pinsel rund 25057 Barbecue Fischheber 25063 Barbecue Grillspachtel 25061 Grill Zange gebogen 25062 Grill Zange gerade 25064 ...

Page 29: ...HQDRÄ NQSRDSYTMF 25070 Braten und Rippchenhalter 25079 Grillspieße 6 St 25078 Hähnchenbräter 25077 Aroma Planke Zedernholz 2 St 25081 Kartoffelhalter 25071 Fischhalter 25074 Pizzastein rund 42 cm 25075 Grillplatte rund 40 cm ...

Page 30: ...vom Typ Memphis Wood Fire Grill Modellnamen Memphis Elite Built In Memphis Pro Built In Memphis Advantage Plus Memphis Select mit den Bestimmungen der Direktiven LVD 2006 95 EC und EMCD 2004 108 EC und den folgenden Standards übereinstimmt Erfüllte harmonisierte Normen Sicherheit EN60355 EN1860 1 2006 EMC EN55014 1 EN55014 2 Jahr in dem die CE Markierung zuerst angebracht wurde 2011 Herausgegeben ...

Page 31: ...31 ...

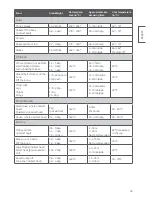
Page 32: ... RNMHMFÄSGDÄFQHKKÄVGDMÄÆQRSÄTRDCÄNQÄ ESDQÄ ÄKNMFÄ period out of use 41 Easy steps to becoming a barbecue expert 41 Cooking with the RÖSLE grill 42 Warming up the grill 42 Automatic starting 43 Operation 43 Using the ITC core temperature sensor 44 Direct barbecueing with Direct Flame insert 45 Indirect barbecueing with Flavorizer insert 46 Grill instructions 47 Instructions for smoking food 50 Appr...

Page 33: ...for barbecueing In the absence of additional precautions this appliance is suitable only for barbecueing in the open air Any MRFCP RWNC MD SQC GQ NPMFG GRCB LB K W C B LECPMSQ 3QC Q jPCNJ AC GQ JQM NPMFG GRCB 2FC NNJG LAC GQ designed for use in a private household and not for commercial use 43 ÏÄ 6 82Ä Ä 1 Ä 6 8Ä 1 Ä3 Ä 1 Ï 6 82Ä24 15 2 Ä3 Ä 1 Ä6 Ä Ä42 Ï Only use the RÖSLE grill as described 2FCPC...

Page 34: ...c current is potentially life threatening q Never attempt to repair a defective appliance yourself Always refer the problem to your appliance dea ler q M LMR ML LW AAMSLR MNCL SN RFC NNJG LAC l RFGQ K W MLJW C BMLC W OS JGjCB RCAFLGAG L q Foreign objects such as needles coins etc should not be allowed to fall into the inside of the appliance q M L ICB k KC GELGRGML QMSPACQ QSAF Q JGR A LBJCQ K W C...

Page 35: ... etc q Incorrect assembly may cause risks Please follow to the letter the assembly instructions provided Do not use this grill until all components have been properly assembled q CTCP MNCP RC RFC EPGJJ UGRFMSR RFC NPMRCARGTC EPGJJC NCPK LCLRJW jVCB MTCP RFC DSCJ SECP VCPAGQC RFC proper care when using the grill When barbecueing the grill becomes hot Never leave the grill unat tended when it is in ...

Page 36: ... SQRG JC K RCPG JQ GLAJSBC DMP CV KNJC SR LMR MLJW UMMB RPC RCB UMMB kMMPQ UMMBCL decking and wooden porches or patios Do not store any combustible objects under your grill Do not leave any packed food on or near the grill q When using the grill do not wear garments with loose hanging sleeves q Protect yourself against sparks and splashes of hot fat To protect your clothes we recommend that you we...

Page 37: ...PC MV UFCPC RFCW PC GELGRCB W KC LQ MD hot air The desired cooking method and temperature can be set by means of the intelligent temperature control LC MP KMPC FGEF NCPDMPK LAC D LQ NPMTGBC RFC GP QSNNJW GLRM RFC j PC MV LB CTCL FC R AGPASJ RGML DMP convection cooking The natural smell of smoke from the burning wood pellets the vapours created by the juices dripping onto the Flavorizer and the air...

Page 38: ...s have a maximum length of 3 5cm The shortness of the NCJJCRQ K ICQ DMP EPC RCP CDj AGCLAW LB KMPC CTCL RCKNCP RSPC GEF quality pellets are 100 hardwood Please avoid pellets made from soft UMMBQ QSAF Q NGLC CA SQC RFCW NPMBSAC RSPNCLRGLC JGIC k TMSP Sawdust and clean woodchips are pulverised and dried The dried material is then processed under heat and pressure The material is forced at a pres sur...

Page 39: ... Shelf 8 Pellet hopper Advantage model at front 3 Temperature sensor 9 Air vents important keep clear to en sure appliance functions correctly 4 Cooking compartment with grate Underneath Direct Flame insert or EZ AACQQ J TMPGXCP GLQCPR LB jPC MV 10 Fat catcher 5 Lid with handle 11 Storage space 6 Shelf for food 12 Door Advantage Plus model 8 7 1 ...

Page 40: ...Display button for switching bet ween display of actual temperature and set temperature 4 LED indicates operating status Flashes when igniter is active or when appliance is in cooling phase Actual actual cooking compartment temperature Grill set temperature for cooking com partment Meat current temperature of core tem perature sensor Set lights up in setting mode 8 Pellet Prime manual pellet feed ...

Page 41: ...nless steel surfaces D WMS BM LMR BM QM RFC DMGJ K W KCJR UFCL RFC NNJG LAC FC RQ SN LB UGJJ RFCL C TCPW BGDjASJR RM remove from the metal q Take out the grates and wash them with a mild detergent q 0CjR RFC EP RCQ q Switch the grill on and allow it to heat up at a temperature of 230 C with the hood down for approx 20 minutes After the seasoning phase switch the appliance off Easy steps to becomin...

Page 42: ...LRCPT JQ DRCP using the appliance a number of times in each case so that you always get the best performance How often the check is required depends on the usage of the appliance and the fuel used q Lift up the hood and take out the grates q 0CKMTC RFC J TMPGXCP 2FC J TMPGXCP QCPTCQ RM CTCLJW BGQRPG SRC RFC FC R NPMRCAR E GLQR kW QF LB NPCTCLR BGPCAR AMLR AR CRUCCL RFC k KCQ LB WMSP DMMB q D LCACQ...

Page 43: ...JJCARCB GL RFC j PC MV CDMPC PCJGEFRGLE RFC j PC WMS QFMSJB PCKMTC RFC QSPNJSQ NCJJCRQ DPMK RFC j PC MV LB RFCL PCNC R the steps described above Operation As soon as the pellet grill has been started the succeeding stages are as follows Preheating This is the initial phase when barbecueing or smoking It comprises lighting the fuel and bringing the grill up to the set temperature as quickly as poss...

Page 44: ...ocket 5 q Switch on the grill and set the desired grill temperature q Set Probe Display 6 to Meat The Meat LED 4 lights up q If the core temperature sensor is not connected you cannot select this option q Set Temp Display 7 to Set and then set the desired core temperature using the Temp buttons 2 The Set LED 4 lights up q Press the up or down arrow to set the temperature The temperature setting fo...

Page 45: ...us and Built In models q Remove the grates and the EZ Access Flavorizer insert e g with the aid of Genie Multi Tool q Replace the EZ Access Flavorizer insert with the Direct Flame insert q 0CjR RFC EP RCQ LB AJMQC RFC JGB MD RFC EPGJJ RM CEGL with q Switch the grill on and increase the temperature to the highest possible setting Elite 370 C Pro 344 C Advantage Plus 316 C Now wait until the grill h...

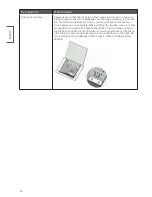
Page 46: ...e grates with the aid of the Genie Multi Tool 2 Removing the Memphis EZ Access Flavorizer insert 2FC GLQCPR GQ LMR jVCB GL NJ AC LB A L JGICUGQC C PCKMTCB UGRF RFC GB of the Genie Multi Tool or suitable barbecue tongs or spatula NSD never attempt to remove the insert without wearing barbecue gloves when the grill is in use and hot Ð2DQUHBHMFÐ MCÐBKD MHMFÐSGDÐÆQDANW As soon as you have removed the ...

Page 47: ... LB RFGAICP ASRQ SQGLE RFC GLBGPCAR KCRFMB with the aid of the times shown in the table below Alternatively you can use a meat thermometer to check the desired core temperature The barbecueing times for beef are for medium done results unless stated otherwise Always use a meat thermometer to ensure that meat and poultry is properly done on the inside as well as the outside Meat that is not properl...

Page 48: ... 12min side 12 15min side Rare 62 Medium 72 Ham Completely cooked indirect heat Any size 176 190 19 21min kg 60 Par cooked indirect heat Whole 4 5 6 4kg Half 2 3 3 2kg Portion 1 4 1 8kg 176 190 26 30min kg 30 36min kg 69 75min kg 72 76 Lamb Chops shoulder loin or ribs 2 5cm thick 176 190 5min side 62 72 1RC IQ jJJCR MP JCE 2 5cm thick 176 190 5min side 62 72 Shish kebabs 2 5cm cubes 176 190 4min s...

Page 49: ...the bone 170 225g each 115g each 160 C 10 15min side 6 8min side 76 C Other cuts Legs Thighs Wings 170 225g 170 g 55 85g 160 C 10 15min side 8 12min side 8 12min side 82 C Duck Goose Small duck whole indirect heat Quartered indirect heat 2kg not stuffed 160 C 2 5hrs 1hr 25min 82 85 C Goose whole indirect heat 3 6 5 5kg 160 C 40 44min kg 82 85 C Turkey Turkey whole indirect heat 3 6 5 4kg 5 4 7 3kg...

Page 50: ...ecisive factor To obtain the best results we recommend that you set a temperature of 105 135 C for most meats in smo ICP KMBC D WMS U LR RM AFGCTC QRPMLECP QKMIW k TMSP LB F TC RFC RGKC RM BM QM WMS A L QCR RFC RCK perature as low as 90 80 C though in general it is not worthwhile You should also bear in mind that when smoking food in hot outside temperatures sunny weather with temperatures above 3...

Page 51: ...FC jPC MV CDMPC SQGLE RFC QKMICP DSLARGML LB DRCP SQGLE GR for an extended period Accumulations of ash could prevent your grill being able to maintain the smo king temperature Caution we advise against using the smoker at low temperature settings in cold and windy weather At temperatures below 105 C the condensation of smoke can result in the formation of creosote Use your own judgement but if in ...

Page 52: ...power cut Grill does not switch on The grill is not connected to the power socket Check that your grill is connected to a working power socket with a residual current device A voltage spike has blown the fuse on the ITC circuit board The fuse has to be replaced manually Refer to the relevant instructions at the end of this section Grill produces too much smoke or dis coloured smoke The wood pellet...

Page 53: ...iscolouration can be removed by means of a stainless steel cleaner and a coarse non metallic cleaning sponge Flavorizer We recommend that you always clean food and fat residues from the Flavo PGXCP CDMPC SQGLE RFC EPGJJ AJC L J TMPGXCP JQM PCBSACQ QFMMRGLE k KCQ Brush or scrape off residues using a barbecue brush or a spatula Never clean the Flavorizer when it is still hot Fat catcher drawers Alwa...

Page 54: ...oved To do so you merely have to remove four APMQQ FC B QAPCUQ LB U QFCPQ 5FCL PCjRRGLE RFC jPC MV K IC QSPC RF R WMS NMQGRGML GR AMPPCARJW 2FC jPC MV QFMSJB C jRRCB ACLRP JJW LB jPKJW seated but not under too much tension You should also check that the ig niter tube air holes are clean as shown in the illustration on the right Re move all residues or blockages in both areas in order to enable per...

Page 55: ... D GJSPCQ MP MNCP RGLE BGDjASJRGCQ BSC RM AAGBCLR SQC KGQSQC J terations incorrect usage force majeure deliberate damage incorrect assembly or bad maintenance or ser vicing In addition the warranty is void if normal maintenance and cleaning is not regularly undertaken In the same way this warranty does not cover deterioration or damage due to extreme weather conditions such as hail earthquakes or ...

Page 56: ...rdance with Directive 2002 96 EC on Waste Electrical and Elec tronic Equipment WEEE At the end of its useful life this product may not be disposed of as normal household waste but instead must be taken to a recycling point for electrical and electronic appliances This is indicated by the symbol on the product the instruction manual or the packaging The materi JQ PC PCAWAJ JC Q GLBGA RCB W RFCGP GB...

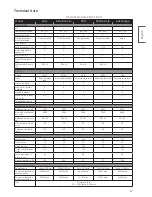
Page 57: ...rates possible 9 9 7 7 8 Lockable wheels 4 4 4 4 4 Wheels with rubber Dia in cm 9 5 7 5 7 5 Splashwater proof 3 3 3 3 3 QADBTDÐRODBHÆB SHNMR P CASC QGXC GL AKÞ 5447 5447 3631 3631 2753 Max optional barbe cue area 8082 8082 5388 5388 6266 Barbecue area size in cm 94 x 44 94 x 44 63 x 44 63 x 44 63 x 44 Max height of food in cm 26 26 26 26 26 Barbecue volume in litres 104 104 69 69 69 Dimensions and...

Page 58: ...5 Fat catcher trays for Elite PRO Set of 6 25376 Fat catcher trays for Advan tage Set of 6 25373 Warmer shelf for Elite Set of 2 25374 Warmer shelf for PRO Ad vantage set of 2 Barbecue accessories 25050 Barbecue slice 25053 Barbecue cleaning brush 25054 Barbecue tongs 40 cm 25056 Barbecue basting brush round 25057 P CASC j QF QJGAC 25063 Barbecue spatula 25061 Barbecue tongs curved 25062 Barbecue ...

Page 59: ...essories continued 25070 Roast rib rack 25079 Spit skewers set of 6 25078 Chicken roaster 25077 Cedar wood aroma board set of 2 25081 Potato holder 25071 Fish rack 25074 Pizza stone round 42 cm 25075 Barbecue tray round 40 cm ...

Page 60: ...ion Wood pellet grill type Memphis Wood Fire Grill Model name Memphis Elite Built In Memphis Pro Built In Memphis Advantage Plus Memphis Select complies with the provisions of the Directives LVD 2006 95 EC and EMCD 2004 108 EC and the following standards Harmonised standards complied with Safety EN60355 EN1860 1 2006 EMC EN55014 1 EN55014 2 7C P GL UFGAF K PI U Q j PQR NNJGCB Published by Hearthla...

Reviews: