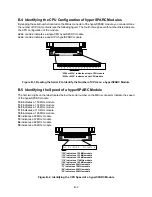
5-4
5.3 Removing and Replacing the Boot PROMs
Warning: Record NVRAM configuration parameters (especially those that are non-standard) before
installing the new boot PROM(s), as the new boot PROM(s) will reset values to the default setting. To print
NVRAM configuration parameters type:
eeprom | lp
(for systems running Solaris 2.x) or
eeprom | lpr
(for systems running SunOS)
Resetting NVRAM parameters to their defaults includes turning on diagnostic mode and setting the default
diagnostic boot device to network.
Use the following command to turn off the diagnostic switch:
setenv diag–switch? false
Note: Replacing the boot PROM will
not change the system’s host id.
Caution: Use ESD kit P/N 250-1088 (or equivalent) when installing integrated circuits, printed circuit boards,
and drives in a SPARCserver 600MP. ESD kit P/N 250-1088 contains the Sun approved ESD mat that has
0.25” of cushioning to protect underside components, prevent board flexing, and provide ESD protection.
Follow the instructions printed on the ESD mat and use the wrist grounding strap.
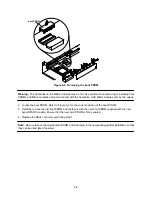
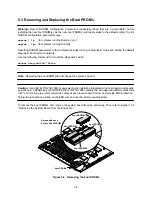
To remove the boot PROMs, first remove the system board from the card cage. Then refer to Section 5.2
“Removing the System Board from the Enclosure.”
boot PROMs
Note position and
# of each boot PROM
boot PROM #3
boot PROM #4
boot PROM #2
boot PROM #1
Figure 5-3. Removing the boot PROMs
Summary of Contents for hyperSPARC
Page 2: ...hyperSPARC Module Installation Guide TM...
Page 9: ...1 4...
Page 21: ...2 12...
Page 55: ...5 10...

