MUX-8258 Series User Guide (v9.0)
Physical Installation • 21
Physical Installation
This chapter outlines how to install the MUX-8258 card and rear module in an openGear frame. The same
procedure applies regardless of the frame or card type. However, the specific rear module you need to install
depends on your application and the openGear frame you are using.
Before You Begin
Before proceeding with the instructions in this chapter, ensure that your openGear frame is properly installed
according to the instructions in its manual.
Static Discharge
Throughout this chapter, please heed the following cautionary note:
Unpacking
Unpack each MUX-8258 you received from the shipping container and ensure that all items are included. If any
items are missing or damaged, contact your sales representative or Ross Video directly.
Installing a Rear Module
If the Rear Module is already installed, proceed to the section “
Installing the MUX-8258 Card into the openGear
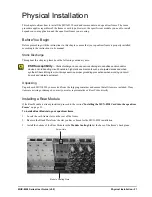
To install a Rear Module in your openGear frame
1. Locate the card frame slots on the rear of the frame.
2. Remove the Blank Plate from the slot you have chosen for the MUX-8258 installation.
3. Install the bottom of the Rear Module in the
Module Seating Slot
at the base of the frame’s back plane.
ESD Susceptibility
— Static discharge can cause serious damage to sensitive semiconductor
devices. Avoid handling circuit boards in high static environments such as carpeted areas and when
synthetic fiber clothing is worn. Always exercise proper grounding precautions when working on circuit
boards and related equipment.
Screw Hole
Module Seating Slots
Summary of Contents for MUX-8258 Series
Page 1: ...MUX 8258 Series User Guide...
Page 6: ......
Page 14: ...14 Before You Begin MUX 8258 Series User Guide v9 0...
Page 28: ...28 Configuration MUX 8258 Series User Guide v9 0...
Page 30: ...30 Software Upgrades MUX 8258 Series User Guide v9 0...
Page 46: ...46 Card edge Menus MUX 8258 Series User Guide v9 0...

