Mounting
10
AY-H6355BT Installation and User Manual
3.
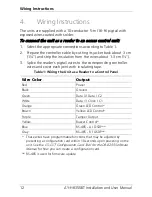
Mounting
Before mounting, you should determine the best location for the
reader.
To mount the units:
1.
Peel off the back of the self-adhesive mounting label template
and place it at the required mounting location.
2.
Using the template as a guide, drill two holes (sizes indicated on
the template) used for mounting the back plate onto the surface.
3.
Insert a suitable wall plug into each screw hole.
4.
Drill a 10-mm (7/16”) hole for the cable. If mounting on metal,
place a grommet or electrical tape around the edge of the hole.
5.
Wire the reader as described in Chapter
4. A linear type power
supply is recommended.
6.
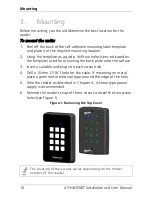
Remove the reader's snap-off front cover to reveal the two screw
holes (see Figure 1).
Figure 1: Removing the Top Cover
The location of the screws varies depending on the model
number of the reader.


