background image

Element   30   Manual   

Original   instructions   

Jan   2015   

21   


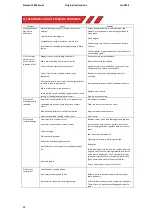
20)   TROUBLE   SHOOTING


Magnet   and   motor   do   not   function   

-­‐   The   magnet   switch   is   not   connected   to   the   power   supply   

-­‐   Damaged   or   defective   wiring   
-­‐   Defective   fuse   
-­‐   Defective   magnet   switch   

-­‐   Defective   control   unit   
-­‐   Defective   power   supply   

Magnet   does   function,   the   motor   does   not   

-­‐   Damaged   or   defective   wiring   

-­‐   Carbon   brushes   are   stuck   or   worn   out   
-­‐   Defective   magnet   switch      
-­‐   Defective   on   /   off   switch   
-­‐   Defective   control   unit      

-­‐   Defective   armature   and/or   field   
-­‐   defective   protective   reed   switch   

Magnet   does   not   function,   the   motor   does   

-­‐   Defective   magnet   

-­‐   Defective   fuse   
-­‐   Defective   control   unit   

Hole   cutters   break   quickly,   holes   are   bigger   
than   the   hole   cutter   

-­‐   Play   in   the   guide   
-­‐   Bent   spindle   

-­‐   Shaft   extending   from   the   motor   is   bent   
-­‐   Pilot   bent   

Motor   running   roughly   and/or   seizing   up   

-­‐   Bent   spindle   
-­‐   Shaft   extending   from   the   motor   is   bent   

-­‐   Triangular   guide   not   mounted   straight   
-­‐   Dirt   between   spindle   and   triangular   guide   

Motor   making   a   rattling   sound   

-­‐   Gear   ring   (bottom   of   the   armature)   worn   out   

-­‐   Gear(s)   worn   out   
-­‐   No   grease   in   gear   box   

Motor   humming,   big   sparks   and   motor   has   no   
force   

-­‐   Armature   damaged   
-­‐   Field   burned   

-­‐   Carbon   brushes   worn   out   

Motor   does   not   start   or   fails.      
   

-­‐   Damaged   or   defective   wiring   
-­‐   Damage   to   armature   or   field   coil   

-­‐   Damaged   or   defective   brushes   

Guiding   takes   a   great   deal   of   effort   

-­‐   Guide   is   set   too   tight   
-­‐   Guide   is   dry   
-­‐   Guide/gear-­‐   rack/rotation   system   is   dirty   or   damaged   

Insufficient   magnetic   force   

-­‐   Damaged   or   defective   wiring   

-­‐   Bottom   of   magnet   not   clean   and   dry   
-­‐   Bottom   of   magnet   not   flat   
-­‐   Work   piece   is   not   bare   metal   

-­‐   Work   piece   is   not   flat   
-­‐   Work   piece   is   too   thin   less   than   10mm   
-­‐   Defective   control   unit   

-­‐   Defective   magnet   

Frame   under   voltage   

-­‐   Damaged   /   defective   wiring   
-­‐   Defective   magnet   
-­‐   Motor   seriously   dirty   

Fuse   blows   when   magnet   switch   is   turned   on   

-­‐   Damaged   or   defective   wiring   
-­‐   Wrong   value   fuse   
-­‐   Defective   magnet   switch   

-­‐   Defective   control   unit   
-­‐   Defective   magnet   

Fuse   blows   when   motor   is   started   up   

-­‐   Damaged   or   defective   wiring   
-­‐   Wrong   value   fuse   

-­‐   Motor   running   roughly      
-­‐   Defective   armature      and   /   or   field   
-­‐   Carbon   brushes   worn   out   

-­‐   Defective   control   unit   

Rotation   system   free   stroke   too   long   

-­‐   Loose   or   defective   gear-­‐rack   
-­‐   Defective   rotation   system   


Summary of Contents for Element 30 Series

Page 1: ... 1 Element30 3 This machine Serial Number is CE approved Rotabroach Ltd Imperial Works Sheffield Road Sheffield South Yorkshire United Kingdom S9 2YL Tel 44 0 114 2212 510 Fax 44 0 114 2212 563 Email info rotabroach co uk Website www rotabroach co uk ...

Page 2: ...t 30 Manual Original instructions Jan 2015 2 Thank you for purchasing our Element 30 magnetic drill We would really like your feedback on this machine Other Products by Rotabroach Thank you for your purchase ...

Page 3: ...edies for hole making problems Wiring diagram Exploded view of complete machines Exploded view of gearbox and motor units Control Panel and parts list Pipe adapter kit RD2311 Fitting the chuck Maintenance Trouble shooting Cutter selection speeds and feeds Warranty 4 4 5 6 7 7 8 9 9 9 10 11 12 13 15 17 18 19 19 21 22 23 P N List of Contents with Magnetic Drill Unit RD4329 Safety Strap RD4088 4mm A ...

Page 4: ...area 5 Store idle tools when not in use All tools should be stored in a dry locked up place out of reach of children 6 Do not force the machine It will do the job better and safer at the rate for which it was intended 7 Use the right tool Do not force small tools to do the job of a heavy duty tool Do not use this tool for purposes not intended e g do not use the magnetic drill to cut tree logs 8 D...

Page 5: ...he tool when you are tired DO NOT operate the machine when under the influence of alcohol or ANY illegal substances 21 Check for damaged or missing parts before use of the tool it should be carefully checked to determine that it will operate properly for its intended function 22 Warning The use of any accessory or attachment other than ones recommended in this instruction manual may present a risk...

Page 6: ...ett Weight 10 5kgs Element 30 1 Element 30 3 Vibration total values triax vector sum in accordance with EN61029 1 Vibration emission value ah 2 273m s 2 Uncertainty K 1 5m s Vibration emission value ah 1 935 m s Uncertainty K 1 5m s Level of sound pressure in accordance with EN61029 1 Sound pressure LpA 87 9 dB A Acoustic power LwA 100 9 dB A uncertainty K 3dB A Sound pressure LpA 86 0 dB A Acoust...

Page 7: ...examine the machine for signs of damage and check that it functions correctly BEFORE resuming drilling Regularly inspect the machine and check for any damaged or loose parts ALWAYS ensure when using the machine in an inverted position that only the minimum amount of coolant is used and that care is taken to ensure that coolant does not enter the motor unit Cutting tools may shatter ALWAYS position...

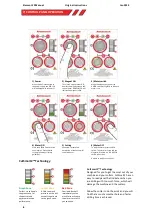
Page 8: ... stop the motor press the RED switch The motor will stop and the magnet will remain on The GREEN switch will turn on Go back to step 3 to start over CutSmart2 Technology Green Zone Perfect try to keep in the green zone for the best cut and optimum machine performance Yellow Zone A little too much pressure on the drill ease off to get back to the green zone Red Zone Overload Back off immediately as...

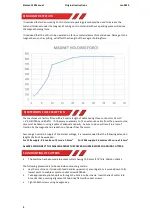
Page 9: ...dequate capacity Failure to do so will result in a loss of traction by the magnet and a reduction of power from the motor Assuming a normal AC supply of the correct voltage it is recommended that the following extension lengths shall not be exceeded For 110v supply 3 5 metres of 3 core x 1 5mm For 230v supply 26 metres of 3 core x 1 5mm ALWAYS DISCONNECT THE MACHINE FROM THE POWER SOURCE BEFORE CH...

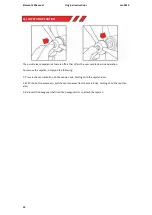
Page 10: ... user simple dual side operation To remove the capstan simply do the following 1 Press in the central button on the capstan hub holding onto the capstan arms 2 With the button pressed in pull the capstan away from the main body holding on to the capstan arms 3 Re insert the hexagonal shaft into the hexagonal slot to attach the capstan ...

Page 11: ...orn parts Replace part or parts Adjust where necessary 3 Excessive drilling pressure required Incorrectly re sharpened worn or chipped cutter Coming down on swarf lying on surface of work piece Gibs out of adjustment or lack of lubrication Swarf accumulated packed inside cutter Re sharpen or replace Take care not to start a cut on swarf Adjust setscrews and lubricate Clear cutter 4 Excessive cutte...

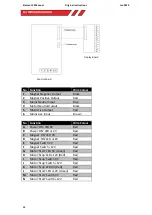
Page 12: ... Start LED 0V Green Red H Motor Stop LED 12V Red Red I Motor Stop Switch 0V Red J Motor Stop Switch 12V Red K Motor Stop LED 0V Red Red L Motor Start LED 12V Green Red M Motor Start Switch 0V Red N Motor Start Switch 12V Red No Function Wire Colour 1 Magnet Negative Output Black 2 Magnet Positive Output Red 3 Mains Neutral Input Blue 4 Motor Neutral Output Black 5 Motor Live Output Red 6 Mains Liv...

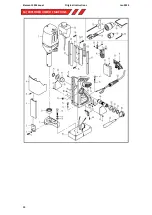
Page 13: ...Element 30 Manual Original instructions Jan 2015 13 14 EXPLODED VIEW OF MACHINE ...

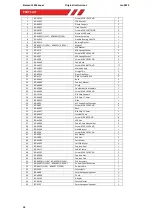
Page 14: ...tle Assembly 1 26 RDA4029 Screw M6 X 16 CAP HD 1 27 RD33105 Gib Strip Support 1 28 RDA3038 Gib Strip 17 5mm 1 29 RDA3035 Slide 1 30 RD4092 M5 Shake Proof Washer 4 31 RD4091 Screw M5 X 22 CAP HD 4 32 RDA3027 Rack 1 33 RDA3037 Gib Strip 13 5mm 1 34 RDA2016 Internal Chain 1 35 RDA4204 Screw M3 X 8 CSK HD 8 36 RDA4205 M3 Nut 4 37 RDA3045 Cable Chain Attachment 2 38 RDA4206 Screw M4 X 12 CSK HD 2 40 RD...

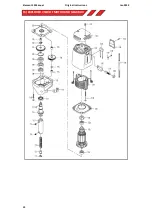
Page 15: ...Element 30 Manual Original instructions Jan 2015 15 15 EXPLODED VIEW OF MOTOR AND GEARBOX ...

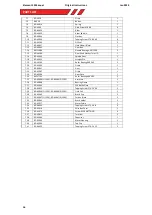
Page 16: ...03 RS 2 7 20 RD43306 Circlip 1 7 21 RDA3041 Gear 1 7 22 RD43087 Circlip 1 7 23 RDA3006 Gear Plate 1 7 24 RM17134 Roller Bearing 608 2RS 2 7 25 RDA3060 1 110V RDA3060 3 230V Armature 1 7 26 RDA3068 Bearing Sleeve 1 7 27 RDA5004 E30 Baffle Plate 1 7 28 RDA4032 Tapping Screw ST 4 2 X 50 2 7 29 9 RDA3066 1 110V RDA3066 3 230V Field Coil 1 7 30 RDA3064 Brush Cap 2 7 31 RDA3067 1 110V RDA3067 3 230V Car...

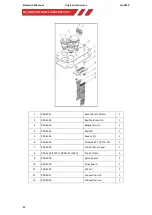
Page 17: ... Red Motor Switch 1 3 RDA4050 Magnet Switch 1 4 RDA4053 Red LED 1 5 RDA4054 Green LED 1 6 RDA4036 Screw M3 X 12 BTTN HD 2 7 RDA3028 Control Panel Cover 1 8 RDA3100 110V RDA3101 230V Control Plate 1 9 RDA4019 Nylon Spacer 2 10 RDA4055 Array Board 1 11 RDA4205 M3 Nut 2 12 RDA4057 Connection Line 1 13 RDA4056 Connection Line 1 ...

Page 18: ...ing care that the magnet is in line with the longitudinal axis of the pipe Switch on the magnet and move the sliding plates down to the outside diameter of the pipe Tighten the screws on both sides by hand then check once again that the full length of the moving plates is touching the pipe at the front and back fasten the plate securely Feed the safety strap through the lugs at the front of the ho...

Page 19: ...ine is in good working order and that there are no damaged or loose parts Any loose parts must be tightened Before proceeding with any maintenance work be certain that the power supply is disconnected Description Every operation 1 week 1 Month Visual check of machine for damage X Operation of machine X Check brush wear X Check magnetic base X Check alignment of the machine X Check grease X Check a...

Page 20: ...middle screws gently feed in all the screws until slight resistance is encountered 4 Operate the slide up and down a few times to test the movement and make any further necessary adjustments Try to ensure that all the screws are exerting a uniform pressure on the slide from top to bottom A perfectly adjusted slide will operate freely up and down without any sideways movement 5 Now raise the slide ...

Page 21: ...ttom of the armature worn out Gear s worn out No grease in gear box Motor humming big sparks and motor has no force Armature damaged Field burned Carbon brushes worn out Motor does not start or fails Damaged or defective wiring Damage to armature or field coil Damaged or defective brushes Guiding takes a great deal of effort Guide is set too tight Guide is dry Guide gear rack rotation system is di...

Page 22: ...N mm SRCV or SRCVL Plate and sheet steel 700N mm RAP or RAPL Plate and sheet steel 850N mm SRCV or SRCVL Aluminium 750Nmm RAP or RAPL Aluminium 850N mm SRCV or SRCVL Brass 700N mm RAP or RAPL Brass 850N mm SRCV or SRCVL Cast iron 700N mm RAP or RAPL Cast iron 850N mm SRCV or SRCVL Stainless steel 700N mm RAP or RAPL Stainless steel 850N mm SRCV or SRCVL Stainless steel 850N mm CWC to CWCX Rail tra...

Page 23: ...ent servicing or maintenance 3 Defects caused by using accessories components or spare parts other than original Rotabroach parts 4 Tools to which changes or additions have been made 5 Electrical components are subject to manufacturer s warranty Your online registration can be submitted at www rotabroach co uk The warranty claim must be logged within the warranty period This requires the submissio...

Reviews: