3
x
Installation
20
FA ROTEX Solaris RPS3 P2 - 06/2012
3.6.2 Installing FlowGuard
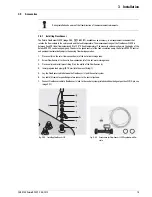
The Solaris FlowGuard FLG (image 3-41,
16 41 02
) is also available as an accessory. It
is a regulating valve with an
integrated flow volume indicator that can be used to adjust the flow volume through the solar panels. The display range is
between 2 and 16 l/min.
1. Place seal (b) on the solar flow connection (a) of the hot water storage tank.
2. Screw FlowGuard (d) to the solar flow connection (a) of the hot water storage tank.
3. Place seal (e) and install press fitting (f) on the outlet of the FlowGuard (c).
4. Insert prepared feed pipe (g) (Ø 22 mm) into the press fitting (f).
5. Lay cable (i) from solar panel temperature sensor to the control systems.
3.6.3 Connecting multiple Sanicube hot water tanks
The Solaris storage tank extension set is a system of Sanicube connection pipes that enable parallel connection of multiple
Sanicube Solaris to form large systems with and without solar support.
The Solaris storage tank extension kit CON SX (
16 01 07
) allows 2 Sanicube Solaris to be connected for each
Solaris RPS3 P2 control and pump unit (image 3-43).
Operation
– The solar return flow from the RPWT1 plate heat exchanger comes from the solar zone of both storage tanks via the return
flow connection line (image 3-43, item 5).
– Common return flow is pumped to the RPWT1 plate heat exchanger via the Solaris RPS3 P2 control and pump unit
(image 3-43, item 4).
– The water is heated in the RPWT1 plate heat exchanger and flows as the solar inflow through the flow connection line
(two equally long insulated flexible pipes; item 6, image 3-43) into the two storage tanks.
Because the flow volume may differ during suction and inflow of the water circulating in the unpressurised circulation in spite of
equalisation in the two Sanicubes by the two reducing valves (FLG), one of the two Sanicubes may overflow if there is a fault in
a compensation line (image 3-43, item 5). This connection line prevents the level from rising excessively in one storage tank.
Fig. 3-41 Installing FlowGuard FLG
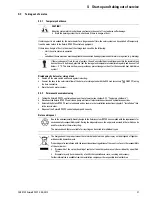
Fig. 3-42 FlowGuard accessories
The optionally available ROTEX FlowGuard FLG (
1
6 41 02
) ensures that both Sanicubes are filled evenly.
This requires installation of one FlowGuard per tank with a common inflow to the FlowSensor.
Observe the system for at least 2 h after connection and adjust the FlowGuard if necessary.


