4
x
Start-up and taking out of service
24
FA ROTEX Solaris RPS3 P2 - 06/2012
5. Connect filler/rinsing pump with hose on top filling and draining cock (see also item 9, image 3-14) to RDS1 pressure station.
6. Connect return flow hose to lower filling and draining cock (see also item 9, image 3-14) of RDS1 pressure station and guide
into fill container, from which the ROTEX Solarfluid CORACON SOL 5F solar fluid is filled in the solar panel circuit.
7. Start filling and draining cock and filler/rinsing pump.
8. Fill and flush the solar panel circuit until the solar fluid flows back into the filling container cleanly and without any bubbles.
9. The pressure measured by the pressure gauge of the RDS1 pressure station must not exceed the maximum permissible
system pressure p
e
(tab. 4-1).
10. Close lower filling and draining cock.
11. Increase the solar panel circuit pressure to at least 0.3 bar above the pressure set at the diaphragm expansion vessel (MAG)
(see system fill pressure tab. 4-1).
12. Close upper filling and draining cock.
13. Vent the system as follows:
• Direct the venting hose of the venting pot into a suitable collection vessel.
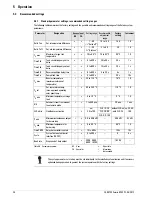
• Open valve (item 3, image 4-1) of the venting pot (item 1, image 4-1).
Î
Displaced air escapes from the venting pot.
• Close the valve as soon as solar fluid comes out of the venting pot.
14. Check system pressure on pressure gauge of RDS1 pressure station again.
– The system pressure must not drop over a period of 1/2 hour.
– If the pressure drops, check the solar panel circuit and connections for leaks and repair if necessary.
– Vent solar panel circuit again (residual air in system).
– If necessary, correct the system pressure by adding solar fluid (see working step 4 onwards).
15. Disconnect filler/rinsing pump with hoses from the RDS1 pressure station.
16. Open the blocking of the flow meter completely (slot vertical).
Fig. 4-1
Filling and venting the solar panel circuit
HYC
SCS
RDS1
RPWT1
1
2
3


