5
x
Operation
36
FA ROTEX Solaris RPS3 P2 - 06/2012
5.3.4 Password input
The technician area of the settings menu is protected by a password, which is entered when opening the settings menu. The user
level can also be password-protected. The user level and the technician level are shown in different colours in the settings menu.
In addition to the path described in image 5-9 the user can press and hold the up arrow key (+) to open the settings menu during
the control systems start display.
Password input is not required while the unit is under manual operation. A password remains valid for approx. 10 min after the
last pushbutton press. After entering the password, the desired level is available for 2 s:
– "User OK",
– "Technician OK" or
– "Password incorrect".
User password
This password is not activated in the factory setting of the Solaris R3P control systems. A 4-digit numerical code can be entered
to protect all adjustable parameters in the user level from unauthorised access (child protection or concierge function). The
parameters of the user level can only be modified with a deactivated user password or with a valid user password.
A user password can be activated and changed or reassigned in the following menu path: "Selection 1/2" -> "Functions" ->
"Change passw." (see image 5-9):
• Enter old password into "current 0000" and new into "new 0000". Confirm every digit of the password with OK.
• For a new password, enter the new password in "current 0000" and also in "new 0000".
If the user password is activated, the menu path "Selection 1/2" only shows "Password 0000". The user password is only active
after 10 min or after restarting the Solaris R3P control system.
Technician password
The password is entered in the menu path: "Selection 1/2" at "Password 0000". It activates all important systems parameters
in the settings menu for technicians (see image 5-9).
5.3.5 Language selection
At initial start-up or after a global reset the display (image 5-7) stops during start-up and the user is prompted to select the
language.
• Select a language with arrow keys and confirm with OK.
Open the settings menu in the menu path: "Selection 1/2" -> "Functions" -> "Change language" to select a different language
(see image 5-9):
5.3.6 Setting and resetting parameters
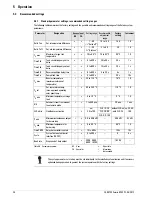
Setting the parameters is in accordance with image 5-9. All adjustable parameters are shown with access level, adjustment range
and factory setting in the table 5-5. In the menu path: "Selection 1/2" -> "Parameter selection" -> "Reset" the maximum
values and calculated values (see table 5-3) can be reset. The selected maximum value is immediately reset to zero when OK is
pressed. Cancel the action with the down arrow key and the cursor returns to the left. Press OK to confirm the selection. Press
the down arrow key repeatedly to open "Selection 2/2". Confirm "back" to return to the operating display. In the menu path:
"Selection 2/2" -> "System" -> "Reset" all system parameters can be reset to the factory settings. The system is then
restarted (see also section 5.2.7).
5.3.7 Manual setting of pump speed control
At some output stages of the speed-controlled pump P1 noise problems may be encountered occasionally The actual output of
the selected stage is displayed as a percentage in the bottom line "Flow" in the operating display (see image 5-8).
• Note the output of the problematic stage.
• In the menu path: "Selection 2/2" -> "System" -> "Modulation" go to "Stage" (see image 5-9).
Up to 10 speed stages can be disabled here. The percentage output for the various stages is displayed under "Output" as well as
the allocation number of the output stage (starting with 01 for the lowest output) and the activity status.
• Set the noise-intensive stage to "no" under the parameter "active".
Î
The stage will be skipped during actuation of pump P1.


