background image

rothaudio.co.uk     

|


3

User Manual


English

Important Safety Precautions

READ BEFORE OPERATING EQUIPMENT

Read  all  the  instructions  carefully  before  using  the  unit  and  keep 
them  for  future  reference.  Check  that  the  voltage  marked  on  the 
rating label matches your mains voltage. 

Location of Unit 

-  The unit must be placed on a flat stable surface and should not be 

subjected to vibrations. 

-  Do not place the unit on sloped or unstable surfaces as the unit 

may fall off or tip over. 

-  The mains socket must be located near the unit and should be 

easily accessible. 

-  Avoid extreme degrees of temperature, either hot or cold. Place the 

unit well away from heat sources such as radiators or gas/electric 
fires. Avoid exposure to direct sunlight and other sources of heat. 

-  Never place any type of candle or naked flame on the top of or 

near the unit. 

-  To reduce the risk of fire, electric shock or product damage, do not 

expose this unit to rain, moisture, dripping or splashing. No objects 
filled with liquids, such as vases, should be placed on the unit. 

-  If you spill any liquid into the unit, it can cause serious damage. 

Switch it off at the mains immediately. Withdraw the mains plug 
and consult your dealer. 

-  To  prevent  the  risk  of  electric  shock  or  fire  hazard  due  to 

overheating,  ensure  that  curtains  and  other  materials  do  not 
obstruct the ventilation vents. 

-  Do not install or place this unit in a bookcase, built-in cabinet or in 

another confined space, ensure that a minimum of 10cm should 
be kept around the apparatus for ventilation. 

Safety

-  Always  disconnect  the  unit  from  the  mains  supply  before 

connecting/disconnecting other devices or moving the unit. 

-  Unplug the unit from the mains socket during a lightning storm. 

-  This unit will become warm when used for a long period of time. 

This is normal and does not indicate a problem with the unit.

Mains Cable 

-  Make sure the unit is not resting on top of the mains cable, as the weight 

of the unit may damage the mains cable and create a safety hazard. 

-  If  the  mains  cable  is  damaged  it  must  be  replaced  by  the 

manufacturer, its service agent, or similarly qualified persons in order 
to avoid a hazard. 

Interference 

-  The normal function of the product may be disturbed by Strong Electro 

Magnetic Interference. If so, simply reset the product to resume normal 
operation by following the instruction manual. In case the function 
could not resume, please use the product in other location. 

-  This unit includes micro-processors which may malfunction as a result 

of external electrical interference/noise or electrostatic discharge. If 
the unit is not working properly, disconnect the power source and 
then reconnect it. 

Supervision 

-  Children should be supervised to ensure that they do not play with 

the unit. 

-  Never let anyone especially children push anything into the holes, 

slots or any other openings in the case - this could result in a fatal 
electric shock. 

Service / Maintenance 

-  To  reduce  the  risk  of  electric  shock,  do  not  remove  screws.  The 

unit  does  not  contain  any  user-serviceable  parts.  Please  leave  all 
maintenance work to qualified personnel. 

-  Do not open any fixed covers as this may expose dangerous voltages. 

-  Ensure to unplug the unit from the mains socket before cleaning. Do 

not use any type of abrasive pad or abrasive cleaning solutions as these 
may damage the unit’s surface. Do not use liquids to clean the unit.

ATTENTION


The owner’s manual contains important operating and  maintenance 
instructions, for your safety, it is necessary to refer to the manual. 

DANGEROUS VOLTAGE 

Conductor dangerous voltage, that may be of sufficient magnitude to constitute  
 a risk of electric shock to persons is present within this product’s enclosure. 

Caution: to ReduCe the Risk of eleCtRiC shoCk, do not 

Remove CoveR (oR baCk). no useR seRviCeable paRts inside. 

RefeR seRviCing to qualified seRviCe peRsonnel.

Caution

RISk OF ELECTRIC ShOCk DO NOT OPEN!

DBT-001 Manual VJ.indd   3

7/8/12   13:23:10

Summary of Contents for DBT-001

Page 1: ...DBT 001 FM DAB Radio with Bluetooth Receiver User Manual English ...

Page 2: ...nd Recalling Stored Stations 7 Factory Reset 8 Alarm Function 8 9 Bluetooth Mode 10 11 Aux Input USB Port Headphone Jack Display Backlight 11 Specifications Back Page Thank you Thank you for purchasing the Roth DBT 001 FM DAB DAB Bluetooth radio We sincerely hope that you enjoy using this radio for many years to come Turn It Up ...

Page 3: ...ins Cable Make sure the unit is not resting on top of the mains cable as the weight of the unit may damage the mains cable and create a safety hazard If the mains cable is damaged it must be replaced by the manufacturer its service agent or similarly qualified persons in order to avoid a hazard Interference The normal function of the product may be disturbed by Strong Electro Magnetic Interference...

Page 4: ...r The First Time When the radio is connected to the AC power for the first time it will be in standby mode The display backlight will be on for a few seconds the display will first show the greetings and finally the clock Press the button once to turn the radio on it will then automatically enter into the DAB mode and perform auto scan function Clock setting The clock will only set and be updated ...

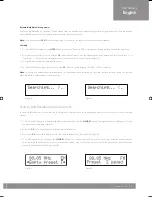
Page 5: ...station To explore the found stations rotate the OK control and when you find a station that you would like to listen to press on the OK control Figure 2 Note If there is no stations found after auto scan the radio will then enter into the Tune Select Menu you can now rotate the OK control followed by pressing on the same control to select Manual tune or Autoscan for stations DAB auto scan The aut...

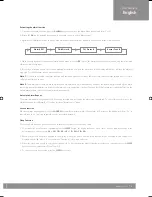
Page 6: ...ect the secondary station press on the OK control once DAB display modes Every time you press the INFO button the display will cycle through the following display modes Time and date The time and date will be automatically updated by the broadcasted information it is no need to set the clock manually In the unlikely event that no clock information is received the display will show TIME DATE Freque...

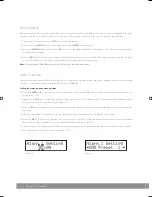
Page 7: ...tween the Auto or Mono selection Note The radio will automatically switch between the stereo and mono reception but you can override this and switch this function manually which is helpful for poor signal reception Storing and Recalling Stored Stations In either DAB or FM mode you can store up to 10 stations to the favourite presets this will enable you to get direct access to your favourite stati...

Page 8: ... individual alarm wake up time and wake up mode settings to wake you to an electronic buzzer tone or your favourite radio station DAB FM Setting the alarm time and wake up mode 1 Press the ALARM button once to enter into the Alarm Menu then rotate the OK control followed by pressing on the same control to select Alarm 1 or 2 2 Again rotate the OK control followed by pressing on the same control to...

Page 9: ... the first alarm is switched off before the second alarm arrives then the second alarm will be activated Automatic Alarm Repeat The alarm will automatically repeat each day at the selected time as long as the alarm icon is displayed To cancel this function go to the Alarm Menu and select Alarm off in the associated Alarm Source menu Snooze function When the alarm has triggered press the SNOOZE but...

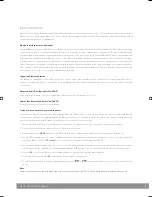
Page 10: ...nected concurrently Advanced Audio Distribution Profile A2DP High quality stereo audio connection Streaming of stereo music from PC mobile phones etc Audio Video Remote Control Profile AVRCP Device remote control Control connected device Stereo music connection to your mobile phones This connection requires a mobile phone supporting the Bluetooth A2DP profile for stereo music connection In order t...

Page 11: ...Switch to AUX is displayed the audio will be switched to the aux input signal and you can adjust the volume control for your desired sound output level Note To further enhance energy saving if the unit is left in AUX mode and without any user operation for three hours the unit will switch itself to standby automatically To toggle select this function between on off During unit on press and hold th...

Page 12: ...ake Up Mode Radio Buzzer Electronic Rotary Jog Select Controls Performance Output Power 5W RMS High Acoustic Performance Inputs Outputs Stereo Earphone Output Auxiliary Input Frequency Range DAB 174 240 MHz FM 87 5 108 MHz Power Supply AC 100 240V 60 50Hz Dimensions L 115mm W 128mm H 190mm Weight 1 3Kgs rothaudio co uk In accordance with our policy of continuous development we reserve the right to...

Reviews: