background image

SAFE JETTING

PREPARATION FOR USE


1. Be sure to diligently check the oil in the pump,  
    and engine daily. 
 
NOTE there are separate oil reservoirs for the pump and 
engine. 
 
2. With the machine placed upon a level surface, the 
    pump oil level should cover the red dot located in    
    the oil level sight glass on the side of the pump. 
 
If necessary, top-up the oil level (use non foaming type 
of oil [refer to pump manufacturers manual]). Be very 
careful to not mix different oil grades as this may prove 
detrimental to the machine’s performance. If you are 

planning to use alternative oil, be sure to first empty 

the remaining oil by unscrewing the drain plug at the 
bottom of the pump.
 

3. After filling the oil to an adequate level, ensure that 


    the breather plugs is fitted back to the pump.


4. Remember to carefully check the engine’s oil level on  
    a daily basis. Please refer to the engine  
    manufacturer’s separate handbook for further  
    guidance.


1. Pull a sufficient amount of water supply hose 


    off the reel and connect this to the water tap. 
 

NOTE the break tank is fitted with a low water cut 

off switch. This means that the engine will not run 
if the water level drops below a certain point. 
 
2. Turn on water supply 

NOTE the tap should be fully on. Please ensure 
that there are no leaks throughout the supply 
hose and/or connections. 
 

3. Ensure that the break tank is full, and the float 


    valve has shut off. 
 
4. Engage the battery isolator and check that the  
    emergency stop button is reset.  
 
5. Ensure that your main hose is connected to the  
    safe starting connector.
 
NOTE If your jetter does not have a safety starting 
connector, you can hold an open-ended hose in 
your hand and simply point it downwards.


Ensure that no nozzle is fitted to the


hose. It must be open flow.


6. Ensure that the ball valve is in the  
    

OPEN

 position. 

 
7. Ensure that the engine choke is fully on.     
    Then, proceed to turn the key to 

start the  

    engine

. Please refer to the engine manual  

    for further details.
 
8. Adjust throttle speed as required. 
 
9. Once the engine has been started, 

close the  

    ball valve

, at which point the pump will  

    now go into bypass mode, and 

release the  

    engine choke

.

OIL PROPERTIES 


Oil loses its lubricity over time. Therefore, change the 
pump oil during regular service. Failure to carry out 
the regular maintenance voids warranty. For more 
information, refer to page 17.

BATTERY MAINTENACE 


The ROTHENBERGER jetter is fitted with a lead acid 

battery. It may be necessary to run the jetter for at least 
20 minutes to recharge the battery as required.  

If the battery is flat, it may be recharged using a 

battery charger. Contact a battery specialist for further 
assistance.  

8

Summary of Contents for ROBLAST JETTER

Page 1: ...ROTHENBERGER ROBLAST JETTER MANUAL ...

Page 2: ...event is very unlikely to occur Specific controls must be taken in order to mitigate risk and where possible eliminate it completely L i k e l i h o o d Use the matrix to determine the risk Consequences Insignificant Minor Moderate Major Catastrophic Almost certain High 11 High 16 Extreme 20 Extreme 20 Extreme 25 Likely Moderate 7 High 12 High 17 Extreme 21 Extreme 24 Possible Low 4 Moderate 8 Hig...

Page 3: ...thout suitable ventilation w User to undertake confined spaces training Manual handling Personal injury 18 w Operator s manual w Staff training in manual handling w Long handled drain cover keys High temperature from en gine muffler and other compo nents Burns to the operator 11 w Warning sticker on engine w Keep clear of hot engine parts Fire or explosion Serious injury burns 18 w Do not operate ...

Page 4: ...k that you please read it carefully and understand it clearly before operating your machine Additionally please note that the drain and sewer cleaning procedures must be followed diligently If not this could result in severe injury and in some cases death Appropriate safety clothing and equip ment must be used at all times Drain cleaning jetters utilise water at extremely high pressures in order t...

Page 5: ...ch and every use 12 Do not join any jetting hoses together as couplings may fail or get jammed within the drains 13 Use your machine only in a well ventilated area 14 Ensure the unit remains level during operation as low oil levels may lead to engine damage 15 Do not attempt to disconnect any hose or coupling whilst pressurised 16 Do not operate the machine when standing on ladders Rather use a pl...

Page 6: ...ake some time to cool down For more information please refer to page 3 JETTER WARNING Before commencing the operation of your drain cleaning jetter ensure that you have read and fully comprehend this manual Note Certification of the operator is mandatory for Class B machines refer to AS NZS4233 1 WASH DOWN OPERATION Never spray any person s or animal s whilst operating your jetter with the wash do...

Page 7: ...g failure Remote Mini Reel RB5002 a mobile hose reel that is fitted with 60 m of 1 4 lightweight Armadillo Red flex jetting hose Whip Hose RB5004 1 8 very flexible hose ideal for small drains and tight bends such as those measuring 40 mm or smaller complete with a compressor nozzle and quick fit tail Drain Cleaning in Progress safety sign RB5006 to visually warn those in the vicinity to exercise c...

Page 8: ...E the tap should be fully on Please ensure that there are no leaks throughout the supply hose and or connections 3 Ensure that the break tank is full and the float valve has shut off 4 Engage the battery isolator and check that the emergency stop button is reset 5 Ensure that your main hose is connected to the safe starting connector NOTE If your jetter does not have a safety starting connector yo...

Page 9: ...er to page 13 CHANGING NOZZLES ALWAYS WEAR PROTECTIVE GLOVES 1 Ensure that the ball valve is turned to the OFF position before removing the hose from the drain 2 Wait for the hose to depressurise 3 Change the nozzle as required ensuring that the replacement nozzle is correctly snapped into position WARNING When removing the hose from the drain be sure to turn the ball valve OFF before the 1 metre ...

Page 10: ... entrance to the drain with safety plate 11 Turn on ball valve on the jetter and then turn on the ball valve on the Remote Mini Reel to activate the high pressure jet to the nozzle 12 Ease the hose down the drain Twist the hose to aid the nozzle in negotiating bends and turns The nozzle will create a gentle pulling action on the hose If it becomes stuck a sharp tug should free it up NOTE the ball ...

Page 11: ...ered by unauthorised persons Over speed ing or over pressurising of the pumping system can be extremely dangerous and will significantly reduce the life of your Draining Cleaning Jetter It may also result in injury or death ROTHENBERGER SAFETY PROTECTION Your high pressure pumping system operates as the heart of your drain cleaning jetter Accordingly the Pump has been specifically designed to oper...

Page 12: ... individual fit should be worn at all times when in the vicinity of any water blasting operations Where the liquid is likely to cause eye damage and thus the individual operator is vulnerable full visor and goggles are recommended Body Protection In compliance with AS NZS 3765 1 or AS NZS 3765 2 if working with hazardous chemicals all persons should wear suitable waterproof clothing applicable to ...

Page 13: ... twisting it Doing so will maintain the turbine on a straight path If your hose happens to become jammed which is a fairly common occurrence pull the hose hard and then let it go quickly so that it may snap back and loosen itself Additionally turn off the jet pull the hose and then turn the jet back on once more When accessing a square junction down a shaft a section of 50mm of pipe with an elbow ...

Page 14: ... in case nozzle turns through 180 in the pipe and returns back to the entry The bend radius of the hose coupling nozzle combined should be more than the internal diameter of the pipe If not a starter bar a length of rigid pipe should be fitted to increase the bend radius as necessary Root Ranger Turbo Nozzle Never use the Root Ranger nozzle in the drain with a diameter that is larger than 150mm 6 ...

Page 15: ...ely and maintained until medical treatment may be arranged and Provide the name s and phone numbers of medicos that should be contacted in order to obtain expert medical advice for the treatment of high pressure water blasting injuries Additionally the card may Identify the worker and Outline medical information concerning the worker such as one s blood type allergies and other unique conditions s...

Page 16: ...SAFE JETTING SERVICE RECORD Refer to page 17 for details of service schedule A service record must be maintained to keep warranty valid Date Description of Work Done Invoice Signed 16 ...

Page 17: ...TER DAILY CHECKLIST 1 Check pump oil level 2 Check engine oil level 3 Check nozzle for wear 4 Check all high pressure components for any leaks damage wear or corrosion such as the gun lance jetting hose and connections and all fittings 5 Check the water filter and clean when necessary 6 Check unloader and safety valve for any leaks 7 Check the hose marking that marks the last metre of the hose and...

Page 18: ...SAFE JETTING 18 NOTES ...

Page 19: ...NOTES 19 ...

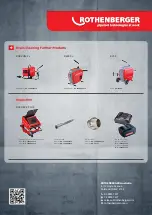
Page 20: ...oducts ROCAM 4 PLUS Battery charger No 1000001655 4 Ah li ion battery No 1000001653 Guide skids 30 mm No 1500000120 40 mm No 69111 Camera heads 30 mm No 1500000123 40 mm No 1500000122 Inspection R600 CL RODRUM CL No 1000003410 R750 No 72904 R750 ROCAM 4 PLUS Inspection Camera 30 m No 1500002617 65 m No 1500002619 ROCAM 4 PLUS RODRUM CL RODRUMCL No 1000003416 ...

Reviews: