ENGLISH
19
If no keys are pressed, the display indicates the actual temperature, the controller automatically
sets the new temperature parameter. As long as the actual temperature is lower than the setpoint
temperature, the red arrow flashes (low). If the actual value is larger than the setpoint value, the
red arrow flashes (high). If the actual temperature corresponds with the setpoint temperature, the
green bar illuminates. Should the actual surface temperature of the heating plate not correspond
with the actual temperature indicated, it is possible to enter an “offset”. To define the offset,
press and hold the
F
key until “InP” appears in the display (approx. 7 sec.); release
F
key,
then press the
F
key as many times as required until “oFS” appears. Correct this value as
required. To save the new settings, press and hold
F
key until the actual value reappears in
the display
Warning! Do not change any other heating plate parameters!
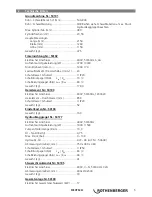
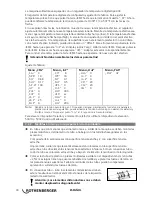
Factory settings:
Menü „CFG“
„S.tu“ 0
„h.Pb“ 1.0
„h.lt“
0.68
„h.dt“ 0.17
„h.P.H“ 100
„rst“
0
„P.rE“ 0
„SoF“ 0
„Lb.t“ 0
„Lb.P“ 25
„FA.P“ 0
Menü „InP“
„Ctr“
8
„tYP“
16
„FLt“
0.1
„FLd“
0.5
„dP.S.“ 0
„Lo.S“ 0
„HI.S“ 300
„oFS“ xx
„HI.A“ 0
„Lo.L“ 0
„HI.L“ 280
Menü „Out“
„AL.n“ 0
„r.o.1“ 0
„r.o.2“ 0
„Ct.1“ 20
„Ct.2“ 20
„rEL.“ 0
Menü „PAS“
„Prot“ 32
Note:
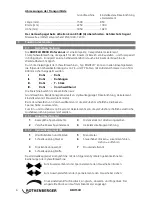
The autotuning function could cause the details under “CFG” to deviate minutely. Should hunting
occur, the autotuning function can be activated while the heating plate is cold (set the menue item
“S.tu” to “2” (two) in CFG menue, the system automatically resets the parameter to “0” (zero).
For lifting the milling equipment and the heating element, use lifting device 53410 or 53323, or a
suitable tool.
3.2.2 Welding preparations
Pipes smaller than the maximum welding range (diameter) of the machine, mount the
adapter clamping inserts suited for the pipe diameter with the screws found in the
accessories kit.
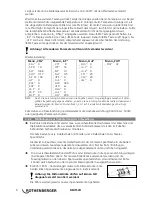
The set is consisting of six wide-surface shells and two small-surface shells.
In so doing, please observe that the small-surface shells are mounted to the two lower
external main clamps. These are used in the left basic clamping element below and above
only for pipe to pipe bend connections.
Insert the plastic pipe or fitting in the clamping device (use dolly with longer pipe sections)
and tighten brass nut on the upper clamps. Adjust brass nuts (tighten or loosen) to
compensate for any ovalness.
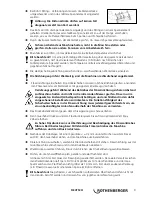
For pipe-to-pipe connections, the two spacers must be engaged
in both left clamping elements (standard configuration at
delivery).
Attention: Under no circumstances should the spacers
be installed diagonally offset!
The pipes are each held by two clamping elements.
Summary of Contents for ROWELD P 800 B
Page 2: ...A Basic Unit B Hydraulik Unit 2 1 3 4 1 2 3 7 4 5 6 ...
Page 49: ...47 Notes ...
Page 50: ...48 Notes ...
Page 51: ...49 Notes ...

