ENGLISH
13
Using the micro burner:
-
Next unscrew the flame tube with the swivel nut.
-
Then screw the micro nozzle adaptor directly to the torch handle using the swivel nut.
-
Attach the desired micro burner, and screw the safety adaptor onto the micro nozzle
adaptor to secure it from coming off.
-
Set the flame as needed. Beware of an extremely short fuel gas flame that already burns
visibly at the nozzle tip.
Shut-down:
Shut the device down in the opposite sequence, but first always turn off the gas. Always close
the tank valve when work is interrupted.
5
Start-up
5.1
Lighting
the
burner
First open the gas regulator valve and light the gas; then open the oxygen valve and then adjust
the flame. The flame must already be burning visibly from the nozzle tip.
Ignite the gas / oxygen mixture by using one of the appropriate gas lighters at the burner nozzle.
(It can create black soot).
5.2
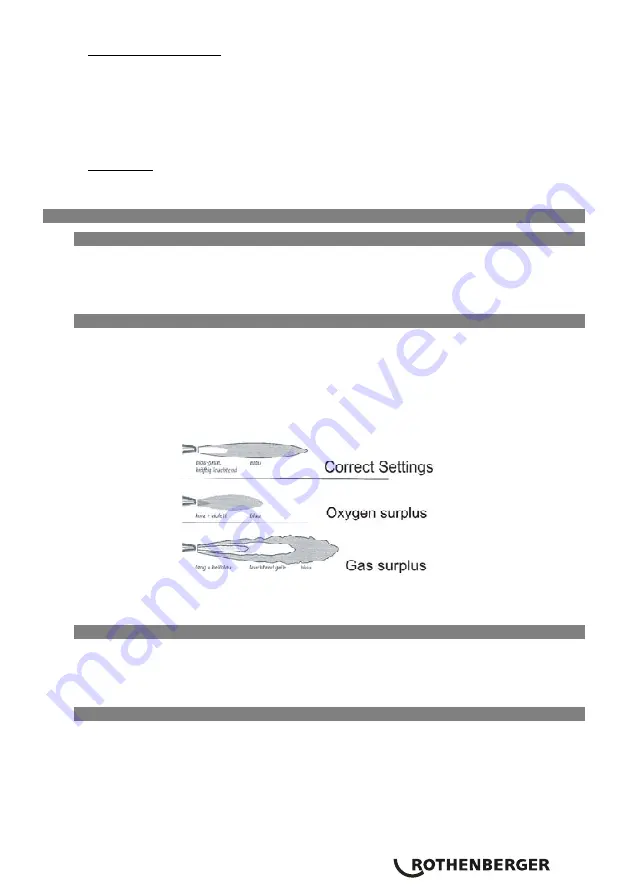
Setting the flame
With the hand dial marked orange on the handle, adjust the size and appearance of the flame. If
the flame cannot be ignited or cuts off, the gas pressure is too high. In that case, choke off the
gas at the torch handle (the dial marked orange) by turning it rightward.
The oxygen valve (the dial marked blue) must be completely open at the torch handle.
If the flame looks yellow, there is too much gas. Carefully choke the gas valve (the dial marked
orange) at the torch handle by turning it farther leftward.
Then set to a neutral flame. This means that the strongly glowing blue-green core of the flame
must be sharply delineated from the blue border of the flame (the secondary flame).
5.3
Extinguishing the flame
To extinguish the flame, first close the gas valve (the dial marked red) and then the oxygen
valve (the dial marked blue) at the torch handle by turning rightward.
Close the gas cartridge valve and the oxygen tank valve by turning them rightward. Also close
these valves during extended breaks.
5.4
Replacing the gas cartridge
Î
Close the gas cartridge valve by turning it rightward.
Î
Pull the Maxi gas cartridge tank with its gas cartridge valve and the hose line upward and
out of the mounting.
Î
Unscrew the Maxi gas cartridge leftward from the gas cartridge valve.
Î
Make sure that the gasket in the gas cartridge valve is present and intact.
Î
Only original Rothenberger Maxi gas cartridges may be used. Install a full Maxi gas
cartridge into the gas cartridge valve by turning it rightward.
Summary of Contents for ROXY 140L
Page 2: ...A 1 2 9 6 4 5 3 8 10 12 7 11 14 13 ROXY 140L 400L ROXY KIT 9 2 A B C E F D ...
Page 3: ......
Page 128: ...NOTES 124 ...
Page 129: ...NOTES 125 ...
Page 130: ...NOTES 126 ...
Page 131: ...127 NOTES ...


