background image

Rotor Gastronom GT95

CH-3661 Uetendorf

6

© Rotor Lips AG

Bedienungsanleitung

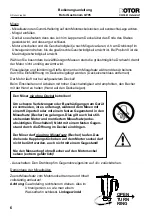
- Ausschalten: Den Drehknopf im Gegenuhrzeigersinn auf «0» zurückdrehen.

Demontage der Mixaufsätze
Zuerst Mixaufsatz vom Motorsockel trennen und Inhalt 

vollständig entleeren!


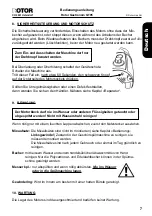
Achtung:

 Gewindering rechtsherum drehen. Also im 


Uhrzeigersinn, so wie man einem  


Wasserhahn schliesst.

 Linksgewinde!


OPEN

TURN

RING

Den Mixer 

nie ohne Deckel

 betreiben!

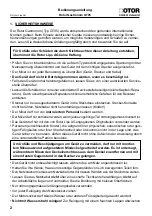
Um schwere Verletzungen oder Beschädigungen am Gerät 

zu vermeiden, ist es untersagt, während dem Mixen mit

einem Körperteil oder mit einem festen Gegenstand in den  

Mixaufsatz (Becher) zu gelangen. Dies gilt auch bei still- 

stehendem Motor und montiertem Mixaufsatz (unbe- 

absichtigtes Einschalten!) Nicht mit einem festen Gegen-

stand durch die Öffnung im Deckel eindringen.   

Der Mixer darf 

nie ohne Mixaufsatz

 (Becher) laufen. Das 

drehende Kupplungstück oben auf dem Mortorsockel darf 

nicht berührt werden, auch nicht mit einem Gegestand! 


Nie den Messerkopf ohne Becher auf den Motorsockel 

setzen (extrem gefährlich)!

Mixen
- Mixaufsatz in den Gummi-Haltering auf dem Motorsockel stecken, auf senkrechte Lage achten.
- Mixgut einfüllen.
- Deckel so aufsetzen dass das Loch im Lappen am Deckel über das Ende des Stabes 

gesteckt wird, und dass er gut schliesst.

- Motor einschalten und die Geschwindigkeit je nach Mixgut variieren, d.h. am Drehknopf im 

Uhrzeigersinn drehen, bis die gewünschte Geschwindigkeit erreicht ist. Bei Postion 8 ist die 

Maximalgeschwindigkeit erreicht.

Wählen Sie besonders bei zähflüssigen Massen stets die grösstmögliche Drehzahl, damit 

der Motor nicht unnötig erwärmt wird.
Flüssigkeiten und feinkörnige Stoffe können beim Mixaufsatz während des Arbeitens 

durch die Einfüllöffnung im Deckel beigefügt werden. (Deckelverschluss entfernen)
Der Motor läuft nur bei aufgesetztem Deckel!
Beim Einschalten und Arbeiten mit hoher Geschwindigkeit wird empfohlen, den Becher 

mit der Hand zu halten (Hand auf den Deckel legen).

Summary of Contents for 1122.001

Page 1: ...utting the machine into operation and keep them on hand for future reference Lisez attentivement ce mode d emploi avant d effectuer la mise en service et conservez le avec précaution afin de pouvoir vous y référer ultérieurement Lesen Sie diese Anleitung vor der Inbetriebnahme sorgfältig durch und bewahren Sie sie zum späteren Nachschlagen gut auf Lea las instrucciones detalladamente antes de la ut...

Page 2: ......

Page 3: ...bersicht 3 4 Technische Daten 4 5 Elektrischer Anschluss 5 6 Inbetriebnahme 5 7 Bedienung 5 6 8 Sicherheitssteuerung und Motorschutz 7 9 Reinigung 7 10 Wartung 7 11 Störungsbehebung 8 12 Reparatur 8 13 Entsorgung Recycling 9 14 Garantie 9 15 CE Konformitäts Erklärung 9 Ersatzteilliste Mixaufsatz 4 l Polycarbonat CE 37 MIX2inox Mixaufsatz 2 l Edelstahl CE 38 MIX4inox Mixaufsatz 4 l Edelstahl CE 39 ...

Page 4: ...ehörige Teil ordnungsgemäss montiert ist Das Gerät darf nur mit den von Rotor Lips AG angegebenen Originalteilen verwendet werden Personen einschliesslich Kinder die aufgrund ihrer physischen sensorischen oder geis tigen Fähigkeiten oder ihrer Unerfahrenheit oder Unkenntnis nicht in der Lage sind das Gerät sicher zu benutzen dürfen dieses Gerät nicht ohne Aufsicht oder Anweisung durch eine verantw...

Page 5: ...Drehzahl zu verwenden Verwendung der Mixaufsätze 2 l Polycarbonat transparent für kleinere Mengen leicht und handlich 2 l Edelstahl robust geeignet für Dauerbetrieb für kleinere Mengen 4 l Polycarbonat leicht und handlich transparent für grössere Mengen 4 l Edelstahl robust geeignet für Dauerbetrieb für grössere Mengen Wird der Rotor Gastronom GT95 zweckentfremdet abgeändert oder unsachgemäss verw...

Page 6: ...geregelte Konstanthaltung der Drehzahl Ist Sollwert Vergleich Thermischer Geräteschutzschalter und elektronische Überwachung Elektrische Ausrüstung Sicherheitssteuerung für Deckelüberwachung Schutzklasse I gemäss EN 60335 1 funkentstört nach EMV Richtlinie 89 336 EWG Ausführung Motorsockel aus Zinkdruckguss verchromt Messer aus rostfreiem Messerstahl Gewicht 4 6 kg 550 W bzw 5 5 kg 800 W netto ohn...

Page 7: ...ng aussetzen Ersatz des Netzkabels siehe Kapitel Reparatur 6 INBETRIEBNAHME Vor der ersten Inbetriebnahme das Gerät gründlich reinigen Befolgen Sie die Richt linien in Kapitel Reinigung Den Rotor Gastronom auf eine feste flache Unterlage stellen und an einer naheliegenden des Steckers entsprechenden Steckdose anschliessen Zur Beachtung Die Wicklungen des Rotor Kollektormotors sind mit einem hochwer...

Page 8: ...auf dem Mortorsockel darf nicht berührt werden auch nicht mit einem Gegestand Nie den Messerkopf ohne Becher auf den Motorsockel setzen extrem gefährlich Mixen Mixaufsatz in den Gummi Haltering auf dem Motorsockel stecken auf senkrechte Lage achten Mixgut einfüllen Deckel so aufsetzen dass das Loch im Lappen am Deckel über das Ende des Stabes gesteckt wird und dass er gut schliesst Motor einschalt...

Page 9: ...rf nur der Drehknopf benutzt werden 8 SICHERHEITSSTEUERUNG UND MOTORSCHUTZ 9 REINIGUNG Wenn nötig nur mit einem feuchten Lappen abwischen zuerst den Netzstecker ausziehen Mixaufsatz Die Mixaufsätze sind nicht im montierten siehe Kapitel Bedienung Linksgewinde Zustand in der Geschirrspülmaschine zu reinigen sie müssen demontiert werden Die Mixaufsätze sind nach jedem Gebrauch oder einmal im Tag grü...

Page 10: ...rden SYMPTOM URSACHE UND ODER ABHILFE Das Gerät läuft nicht Siehe Kapitel Sicherheitssteuerung und Motorschutz Geräteschutz Schalter Netzkabel mit einer Wandsteckdose verbinden Sicherung im betreffenden Hausschaltkreis überprüfen Kohlen sind abgenützt über 1000 Betriebs Stunden Reparatur durch unsere Service Stelle Motor läuft immer auf maximaler Drehzahl Elektronik Baustein defekt Service Stelle ...

Page 11: ...ntsorgen 14 GARANTIE Die Garantiebestimmungen gelten gemäss den Verkaufs und Lieferbedingungen der Rotor Lips AG 15 Konformitäts Erklärung Wir Rotor Lips AG Glütschbachstrasse 91 CH 3661 Uetendorf Schweiz erklären in alleiniger Verantwortung dass die Maschine Standmixer Gastronom Typen GT95 auf die sich diese Erklärung bezieht mit folgenden Normen oder normativen Dokumenten übereinstimmt EN 60335 ...

Page 12: ... Technical data 13 5 Electrical connection 14 6 Putting into operation 14 7 Operation instruction 14 15 8 Safety features and motor protection 16 9 Cleaning 16 10 Maintenance 16 11 Troubleshooting 17 12 Repairs 17 13 Disposal recycling 18 14 Guarantee 18 15 CE Declaration of conformity 18 Spare parts list container 4 l polycarbonate CE 37 MIX2inox container 2 l stainless steel CE 38 MIX4inox conta...

Page 13: ...ould only be used by instructed personnel The mixer should only be used when all the parts have been properly installed Use only appropriate original spare parts from Rotor Lips Ltd All persons including children who are not in the situation to use the appliance in a proper way due to their physical sensoric or mental capability their inexperience or ignorance may only use this machine under super...

Page 14: ...he appropriate speed Container uses 2 l Polycarbonate transparent for small amounts light and manageable 2 l Stainless steel solid suitable for continuous use for small amounts 4 l Polycarbonate light and manageable transparent for larger amounts 4 l Stainless steel solid suitable for continuous use for larger amounts If the Rotor Gastronom GT95 is used for any other purposes or altered Rotor cann...

Page 15: ...d desired value comparison the motor has a thermal protection switch and is electronically monitored Electrical equipment safety control system for lid monitor grounded with additional double insulation according to standard EN 60335 1 electromagnetically shielded accordance with EMC Directives 89 336 EEC Construction Motor base is constructed of chromium plated casting Cutter blades of stainless ...

Page 16: ...not subject the mains cable to strong tension or pressure To replace the cable see chapter Repairs 6 PUTTING INTO OPERATION Before using the appliance for the first time it must be thoroughly cleaned Follow the instructions in the chapter Cleaning Place the Rotor Gastronom on a firm flat base and plug it into a nearby appropriate electrical outlet Note The windings of the Rotor commutator motors are ...

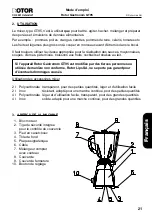
Page 17: ...tating coupling piece on top of the motorbase Never put a cutter assembly on the motor base without the container extremely dangerously OPEN TURN RING Mix Insert the container into the retaining ring on the motor base taking care to keep it vertical Add ingredients to be mixed Place the lid in such a way that the hole in the tab at the lid sticks over the end of the rod that the lid is firmly close...

Page 18: ...ts please contact your supplier For more information see chapter Repairs 9 CLEANING If necessary clean the motor unit with a damp cloth Container The mixing container should not be cleaned in the dishwasher while still installed see chapter Operating instructions left threaded They must first be dismantled The container should be cleaned thoroughly after each use or once a day Bowl clean by hand us...

Page 19: ...N The appliance doesn t run See chapter Safety features and Protection overload switches Make sure the mains cable is plugged into a wall socket Check the fuse in the applicable building electrical circuit Brushes worn more than 1000 operating hours contact your service center The motor only runs at highest speed when the appliance is switched on Defective electronics service center The motor is d...

Page 20: ...te 14 GUARANTEE The terms of the guarantee are in accordance with the sales and delivery regulations of Rotor Lips Ltd 15 Declaration of conformity We Rotor Lips Ltd Glütschbachstrasse 91 CH 3661 Uetendorf Switzerland declare under our sole responsibility that the machine Blender Gastronom Type GT95 to which this declaration relates is in conformity with the following standards or other normative ...

Page 21: ...ne 21 4 Caractéristiques techniques 22 5 Branchement électrique 23 6 Mise en service 23 7 Commande 23 24 8 Dispositif de sécurité et disjoncteur protecteur 25 9 Nettoyage 25 10 Entretien 25 11 Suppression des pannes 26 12 Réparation 26 13 Elimination recyclage 27 14 Garantie 27 15 Déclaration de conformité CE 27 Liste de pièces de rechange mélangeur 4 l polycarbonate CE 37 MIX2inox mélangeur 2 l i...

Page 22: ...reil N utilisez le mixer que si toutes les pièces sont montées correctement L appareil ne peut être utilisé qu avec les pièces originales citées par Rotor Lips SA Les personnes enfants inclus qui ne sont pas en état physique ou sensoriel non aptes à juger le danger sans connaissances de la machine ou ne sont pas capables d utiliser l appareil d une manière sûre ne sont pas autorisées à utiliser l ...

Page 23: ...s et émulsions de denrées alimentaires Par exemple pommes poires oranges carottes pommes de terre céleris tomates etc Les fruits et légumes plus gros sont à couper en morceaux avant d être mis dans le bocal Il faut toujours utiliser la vitesse appropriée pour la réalisation des sauces mayonnaises soupes crèmes pâte mixée boissons aux fruits cocktails et shakes au lait Si l appareil Rotor Gastronom...

Page 24: ...onique Par comparaison de la valeur effective à la valeur de consigne Disjoncteur thermique de surcharge et contrôle électronique Equipement électrique Dispositif de sécurité pour contrôle du couvercle Classe de protection I conformément EN 60335 1 Déparasité selon la directive de compatibilité électromagnétique 89 336 C E E Modèle Bloc moteur en zinc moulé sous pression chromé Couteau en acier de...

Page 25: ...e à une forte traction ou pression Remplacement du câble voir chapitre Réparation 6 MISE EN SERVICE Nettoyer à fond l appareil avant la première mise en service Respectez les directives données au chapitre Nettoyage Placer le Rotor Gastronom sur une surface bien plane et stable et brancher la fiche à une prise de courant proche et correspondante à la fiche Remarque importante Les bobines des moteurs...

Page 26: ...ntenu Attention Afin de détacher la bague en plastique tourner vers la droite dans le sens des aiguilles d une montre car filetage à gauche OPEN TURN RING Mélanger Poser l ensemble du mixer dans la fixation en caoutchouc sur le bloc moteur veiller à respecter la position verticale Verser les denrées à mélanger Fermer le couvercle de manière à ce que l encoche du couvercle soit placée sur la tige de s...

Page 27: ...ur plus de détails voir au chapitre Réparation 9 NETTOYAGE Essuyer au besoin la carcasse avec un chiffon humide retirer la fiche auparavant de la prise de courant Mélangeur Il ne faut pas nettoyer dans le lave vaisselle les mélangeur montés voir chapitre commande filetage à gauche il faut tout d abord les démonter Les mélangeurs sont à nettoyer minutieusement après chaque utilisation ou une fois pa...

Page 28: ...rite et discjoncteur protecteur Relier le câble avec une prise de courant murale Contrôler tout d abord les fusibles de votre propre alimentation Si les charbons sont usés après 1000 heures env la réparation se fait par l intermédiaire de notre Service d entretien Le motor tourne toujours à la vitesse maximale Le dispositif électronique est défectueux Service d entretien Le moteur ne se laisse pas...

Page 29: ... déchet ménager 14 GARANTIE La réglementation concernant la garantie est à appliquer conformément aux conditions de vente et de livraison de Rotor Lips SA 15 Déclaration de conformité Nous Rotor Lips SA Glütschbachstrasse 91 CH 3661 Uetendorf Suisse déclarons sous notre propre responsabilité que la machine Mixer de table Gastronom Types GT95 à laquelle se réfère cette déclaration satisfait aux nor...

Page 30: ...ticas técnicas 31 5 Conexión eléctrica 32 6 Puesta en marcha 32 7 Instrucciones de manejo 32 33 8 Dispositivos de seguridad y disyuntor protector 34 9 Limpieza 34 10 Mantenimiento 34 11 Resolución de problemas 35 12 Reparación 35 13 Eliminación reciclaje 36 14 Garantía 36 15 Declaración de conformidad CE 36 Lista de repuestos Accesorio batidor policarbonato 4 l CE 37 MIX2Inox Accesorio batidor 2 l...

Page 31: ...personal instruido El batidor deberá ser utilizado cuando todas las partes hayan sido bien montadas Se deberán utilizar solamente las piezas originales recomendadas por Rotor Lips S A Todas las personas incluidos los niños que a causa de sus capacidades físicas sensoriales o mentales o su inexperiencia o desconocimiento no están en condición de utilizar el aparato de forma segura no deberán utiliz...

Page 32: ...del accesorio batidor 2 l Policarbonato transparente para pequeñas cantidades ligero y manejable 2 l Acero inoxidable robusto apropiado para un uso continuo y pequeñas cantidades 4 l Policarbonato transparente para pequeñas cantidades ligero y manejable 4 l Acero inoxidable robusto apropiado para un uso continuo y grandes cantidades En caso de que el aparato Rotor Gastronom GT95 sea utilizado para...

Page 33: ...lor real y deseado Motor con protección térmica y control electrónico Equipamiento eléctrico Dispositivo de seguridad para el control de la tapa Doble aislamiento protección de Clase 1 de acuerdo con la norma EN 60335 1 Desparasitado según la Directiva de Compatibilidad Electromagnética de 89 336 EEC Construcción Base del motor en zinc moldeado a presión cromado Cuchillas en acero inoxidable Peso ...

Page 34: ...lo Reparación 6 PUESTA EN MARCHA Antes de utilizar el aparato por primera vez deberá de ser limpiado en profundidad Para ello lea las Instrucciones dadas en el capítulo Limpieza Coloque el aparato Rotor Gastronom en una superficie lisa y firme y enchúfelo a la toma más cercana y apropiada Nota importante Las bobinas de los motores con colector Rotor están protegidos con una capa de barniz de alta ca...

Page 35: ... correctamente colocada Para trabajos a altas velocidades se recomienda sujetar el vaso con la mano colocando una mano sobre la tapa Apagado Gire el pomo del control de velocidad en el sentido contrario a las agujas del reloj hasta la posición 0 No accionar nunca el batidor sin la tapa Para evitar accidentes y daños al aparato está prohibido durante la utilización introducir en el vaso cualquier o...

Page 36: ... lea el capítulo Reparación Solo se podrá utilizar el pomo de control de velocidad para encender y apagar la máquina 8 DISPOSITIVOS DE SEGURIDAD Y DISYUNTOR PROTECTOR 9 LIMPIEZA Frote la carcasa en caso necesario con un trapo húmedo retirando antes la clavija de la red eléctrica Accesorio batidor Los accesorios no se podrán limpiar en lavavajillas mientras no sean desmontados primeramente lea el c...

Page 37: ...LEMA CAUSA SOLUCIÓN El aparato no funciona Lea el capítulo dispositivos de seguridad y disyuntor protector Asegúrese de que el cable esté enchufado a la red Verificar primero los fusibles de la alimentación Escobillas gastadas más de 1000 horas de servicio La reparación será efectuada por nuestro servicio técnico autorizado El motor va siempre a la máxima velocidad Dispositivo electrónico defectuos...

Page 38: ... GARANTÍA Los términos de la garantía estarán de acuerdo con las condiciones de venta y entrega de Rotor Lips S A 15 Declaración de conformidad Nosotros Rotor Lips S A Glütschbachstrasse 91 CH 3661 Uetendorf Suiza Declaramos bajo nuestra responsabilidad que la máquina Batidor de vaso Gastronom Tipos GT95 a la que se refiere esta declaración está en conformidad con las siguientes normas o documentos...

Page 39: ... polycarbonate vaso 4 l policarbonato 1 1121 112 MIX1 Gewindering MIX1 threaded ring MIX1 bague filetée MIX1 anilla roscada 1 1121 301 MK2 Messer kpl MK2 cutter asm MK2 ens couteau MK2 conjunto cuchilla 1 1123 494 Deckelverschluss lid lock couvercle fermeture cierre de la tapa 1 1123 495 Deckel gross schwarz kpl bowl lid small black asm ens couvercle bocal grande noir conjunto tapa vaso grande negr...

Page 40: ...ignée pour bocal mélangeur set asa para vaso batidor 1 1123 477 MIX2inox Abdeckkappe zu Griff MIX2inox cap too handle MIX2inox chapeau à la poignée MIX2inox casquillo para asa 1 1121 301 MK2 Messer kpl MK2 cutter asm MK2 ens couteau MK2 conjunto cuchilla 1 1121 112 MIX1 Gewindering MIX1 threaded ring MIX1 bague filetée MIX1 anilla roscada 1 1123 492 Deckel klein schwarz kpl bowl lid small black asm...

Page 41: ...IX2inox handle set to mixing bowl set poignée pour bocal mélangeur set asa para vaso batidor 1 1121 301 MK2 Messer kpl MKC cutter asm MK2 ens couteau MK2 conjunto cuchilla 1 1121 112 MIX1 Gewindering MIX1 threaded ring MIX1 bague filetée MIX2 anilla roscada 1 1123 494 Deckelverschluss Lexan lid lock polycarbonate couvercle fermeture cierre de la tapa 1 1123 495 Deckel gross schwarz kpl bowl lid sma...

Page 42: ...MIX1 threaded ring MIX1 bague filetée MIX1 anilla roscada 1 1123 492 Deckel klein schwarz kpl bowl lid small black asm ens couvercle bocal pt noir conjunto tapa vaso negra 1 1123 493 Deckel klein schwarz bowl lid small black couvercle bocal pt noir tapa vaso pequeña negra 1 1123 494 Deckelverschluss Lexan lid lock polycarbonate couvercle fermeture cierre de la tapa 1 1121 306 MK2 Barmesser kpl MK2 ...

Page 43: ...tmutter h 14mm MK cap nut h 14mm MK ecrou borgne h 14mm MK tapón rosca h 14 mm 1 1121 366 MK Messerklinge zwei Schneiden MK cutter blade two edges MK couteau deux lame MK cuchilla doble cantos 1 1121 365 MK Messerklinge vier Schneiden MK cutter blade four edges MK couteau quatre lame MK cuchilla cuatro cantos 1 1121 324 MK Dichtungsring MK gasket MK joint MK junta 1 1121 348 MK Stossdämpfer d10x13...

Page 44: ...zeichnung Designation Désignation Designación St Qte Cant 1121 363 MK Hutmutter h 16mm MK cap nut h 16mm MK ecrou borgne h 16mm MK tapón rosca h 16 mm 1 1121 368 MK Messerklinge Barmixer MK cutter blade barblender MK couteau pour bar MK cuchilla para bar 1 1121 324 MK Dichtungsring MK gasket MK joint MK junta 1 1121 348 MK Stossdämpfer d10x13mm schwarz MK shock absorber d10x13 black MK amortisseur...

Reviews: