background image

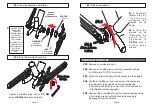
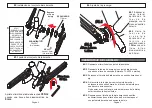
#R3

Allen 8mm

#R4

TL-LR15

3D+ Carretera


MANUAL DE INSTALACIÓN.

CUADROS BB Right

BCD 130 / BCD 110

ROTOR COMPONENTES TECNOLÓGICOS SL

Pol.Ind. Conmar. C/Miño, 16-18. 28864, Ajalvir, Madrid, Spain.

Telef:  91 884 38 46 / Fax: 91 884 38 65

Service@rotorbike.com

DESMONTAJE DE LAS BIELAS (Cont.)

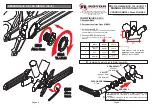
#1.

 Instalación del conjunto biela izquierda.

#R5

Allen
8mm

*

SOLO  NECESARIO  CUANDO  LOS  RODAMIENTOS  SE 
INSTALAN DIRECTAMENTE EN EL CUADRO.
EN CUAROS CON CAZOLETAS PRESS FIT, LAS CAZOLETAS 
SUSTITUYEN AL RODAMIENTO Y AL SELLO.

ARANDELA

1mm

W

D

1. Estándar BB30.


(Ver manual de instalación de 3D+ para el sistema BB30)

2. Estándar cazoletas Press fit BB30.


(Ver manual de instalación de 3D+ para el sistema BB30)

3. Estándar de rosca BSA.


(Ver el manual de instalación de las cazoletas ROTOR BSA30;


Pedallier BSA30 no incluido con bielas 3D+)

4. Estándar BB Right de Cervélo.

COMPATIBILIDAD 3D+:

Esta  manual  sólo  es  válido 
para  cuadros  BB  Right  de 
carretera.

Revisado: 09/2010

Nota: las epecificaciones pueden cambiar por mejoras sin previo aviso.

1

2

3

W

D

BB30

Press Fit

BB30

BSA

68mm

68mm

68mm

42mm

46mm

BSA

Thread

4

BB Right

79mm

42mm /

46mm 

(PressFit)

Página 4

Página 1

RODAMIENTO

30x42x7 

(No incluido)

*

SELLO

Ancho 1.6mm

(No incluido)

Summary of Contents for ALDHU 3D Plus

Page 1: ...TH THE BEARINGAND SEAL SEAL 1 6mm width Not included BEARING 30x42x7 Not included SPACER 11 5mm W D 1 BB30 standard 2 BB30 Press fit cups standard 3 BSAthread standard Read ROTOR BSA30 cups installati...

Page 2: ...L LR15 or similar R3 Screw the drive side alloy bolt clockwise into the spindle R4 Flip the drive side nut over and screw it clockwise into the crank arm to be used as a self extracting cap It must be...

Page 3: ...SUSTITUYEN ALRODAMIENTOYALSELLO SELLO Ancho 1 6mm No incluido RODAMIENTO 30x42x7 No incluido ESPACIADOR 11 5mm W D 1 2 Est ndar cazoletas Press fit BB30 3 Ver el manual de instalaci n de las cazoleta...

Page 4: ...R5 Desenrosque el tornillo de la biela derecha en sentido antihorario usando una llave allen de 8 mm hasta que el conjunto biela derecha se desmonte del eje P gina 2 P gina 3 4 1 4 2 Allen 2 5mm 1 2N...

Page 5: ...HE CUPS REPLACE BOTHTHE BEARINGAND SEAL WASHER 1mm SEAL 1 6mm width Not included W D 1 BB30 standard Read 3D installation guide for BB30 system 2 BB30 Press fit cups standard Read 3D installation guid...

Page 6: ...imano TL LR15 or similar R3 Screw the drive side alloy bolt clockwise into the spindle R4 Flip the drive side nut over and screw it clockwise into the crank arm to be used as a self extracting cap It...

Page 7: ...ARANDELA 1mm W D 1 Est ndar BB30 Ver manual de instalaci n de 3D para el sistema BB30 2 Est ndar cazoletas Press fit BB30 Ver manual de instalaci n de 3D para el sistema BB30 3 Est ndar de rosca BSA V...

Page 8: ...Shimano TL LR15 similar R3 Enrosque el tornillo del conjunto biela derecha en sentido horario en el eje R4 D la vuelta a la tuerca del conjunto biela derecha y enr squela en sentido horario en el bra...

Page 9: ...o instalaci n de piezas inadecuadas SAFETYWARNING This owners manual contains important and useful information regarding the proper installation operation care and maintenance of your ROTOR product C...

Reviews: