ROMpak
Installation Manual
18
Commissioning
Optional Extras
Current position transmitter (CPT) and
Folomatic combined PCB.
CPT
The CPT gives continuous indication of valve
position and is factory set to give 4 mA Close
20 mA Open.
Folomatic Proportional Control
The Folomatic proportional control sets the valve
position relating to an input signal. The Folomatic is
also factory set to operate 4 mA Close 20 mA Open.
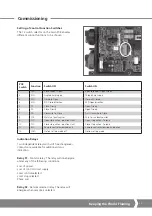
For normal Folomatic control connect the internal
DC supply terminals 27 to 21 and 28 to 22. Refer to
wiring diagram for all connections.
For Folomatic or other remote control options
the main PCB control function switch 11 must
be set to ON.
Manual / Auto Selection
Using a switched input you can select between
Folomatic (Auto) and hardwired (Manual) operation.
This can be used in applications where it is necessary
for the operation to override the Folomatic to allow
full manual control of the actuator via hardwired
inputs. Refer to wiring diagram for all connections.
CPT and Folomatic Adjustment
The CPT and Folomatic are factory set and usually
need no adjustment. If the gearbox stop bolts have
been adjusted conduct the Initialisation process as
descibed on page 12.
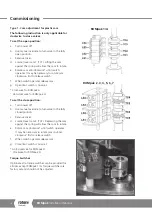
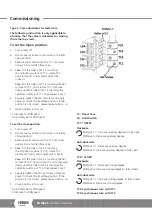
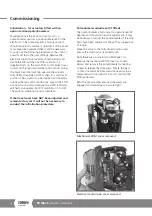
CPT Adjustment
Connect multimeter measuring mA to terminals
46 (+) and 45 (-). Move the actuator to the Close
position and adjust VR3 Zero potentiometer to
measure 4 mA output. Move the actuator to Open
and adjust VR4 Span potentiometer to measure
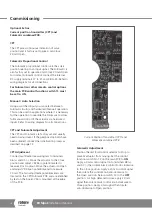
20 mA. The two adjustment potentiometers are
located on the CPT/Folomatic PCB and are identified
by text on the board. VR4 is mounted at the edge
of the PCB.
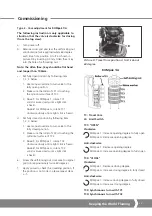
Current Position Transmitter (CPT) and
Folomatic combined PCB
Folomatic Adjustment
Position the red local control selector to Stop to
prevent actuator from moving. Set the control
function switch No.12 on the main PCB to
ON
.
Apply a 4 mA control signal onto terminals 48 (+)
and 47 (-) then rotate black control knob clockwise
to the Close position. Apply a 20 mA control signal
then rotate the control knob anti-clockwise to
the Open position. Return switch 12 to the
OFF
position. For high demand to close apply 20 mA
signal then rotate black control knob clockwise to
Close position. Apply 4 mA signal then rotate
anti-clockwise to Open position.

