8
SI manual – Section: Storage
3. Storage
If your actuator cannot be installed
immediately, store it in a dry place until
you are ready to connect incoming cables.
If the actuator has to be installed but
cannot be cabled it is recommended
that the plastic transit cable entry plugs
are replaced with metal plugs.
Apart from the terminal and indication
cover, it is not necessary to remove any
electrical compartment covers in order
to commission the SI actuator.
Fill the reservoir with the correct
hydraulic fluid to protect the interior
from corrosion.
Visually inspect the equipment
periodically to identify any potential
corrosion. Repair as required.
Rotork cannot accept responsibility for
deterioration caused on-site once the
covers are removed.
Every Rotork actuator has been fully
tested before leaving the factory to
give years of trouble free operation,
providing it is correctly commissioned,
installed and sealed.
Do not store in temperatures beyond
the normal operating range as stated
on the data label.
4. Mounting the Actuator
4.1 Lifting
NOTE:
Refer to section 11 Weights
and Measures for actuator weight.
Ensure the valve is secure before fitting
the actuator as the combination may
be top heavy and therefore unstable.
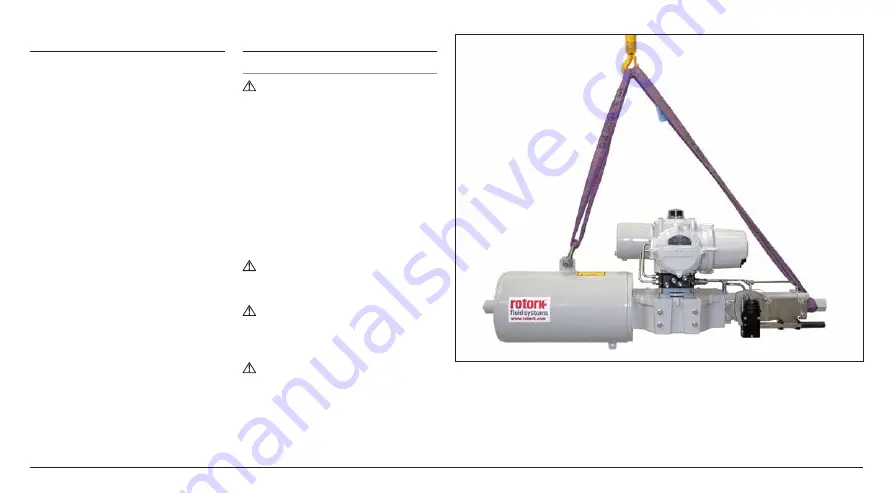
If it is necessary to lift the actuator
using mechanical lifting equipment then
certified slings should be attached as
indicated in figure 4.1.1.
At all times trained and experienced
personnel should ensure safe lifting
particularly when mounting actuators.
WARNING:
The SI actuator must
only be lifted from the spring can,
actuator body or hydraulic cylinder.
WARNING:
The actuator should be
fully supported until full valve shaft
engagement is achieved and the actuator
is secured onto the valve flange.
WARNING:
Do not lift the actuator
and the valve combination via the
actuator. Always lift the valve/actuator
assembly via the valve flange.
Each assembly must be assessed on an
individual basis for lifting.
Fig. 4.1.1. SI3 lifting: Slings attached to the lifting eye and hydraulic cylinder stop bolt cover.
Summary of Contents for Skilmatic SI 3
Page 39: ...39...


