For models RTM01, SCS01,
SCS01LE, SCS02.
• Remove base guide from saw.
• Loosen screw on
CRCT 2 clamp.
• Line up base guide -
clamp with the sleeve
spring on saw as
depicted in photo (A1).
The space in between
the thumb screw should
be able to slip over the
sleeve spring on saw.
• Push base guide down until flush with saw housing.
• Tighten knob on clamp to secure
to saw.
No. CRCT 2
Instructions
Cuts fast, clean circles from
1" to 20" in diameter.
Taille rapidement des cercles
précis de 25 mm à 50 cm
de diamètre.
Corta con rapidez círculos
perfectos con diámetros
de 1" a 20".
www.rotozip.com
Roto Zip Tool Corporation
1861 Ludden Drive
Cross Plains, WI 53528
If you have any questions or comments,
please call our Customer Service
department toll free at:
1-877-RotoZip (768-6947)
or 1-608-798-3737
Office hours: 8:00am - 4:30pm CST
Read all safety instructions before
working with any power tool.
Si vous avez des questions ou des
commentaires, prière de téléphoner notre
service à la Clientèle en composant sans frais:
1-877-Roto Zip (768-6947)
(ou 1-608-798-3737)
Heures d’affaires : 8h00 - 16h30 HNC
Lire toutes les directives de sécurité avant
de travailler avec un outil mécanique.
Comuníquese con el departamento de
Servicio al Cliente de Roto Zip al:
Llamada gratis
1-877-RotoZip (768-6947)
(o al 1-608-798-3737)
Horas hábiles: 8:00am - 4:30pm (hora del centro)
Lea este manual antes de usar su herramienta.
© 2001 Roto Zip Tool Corporation. All Rights
Reserved. Corian® is a registered trademark of
E.I. du Pont de Nemours and company./Tous
droits réservés. Corian® est une marque
déposée de E.I. du Pont de Nemours and com-
pany./
Todos los derechos reservados
.Corian(r) es
una marca registrada de E.I. du Pont de
Nemours and company.
PN 101020TL 2/01
www.rotozip.com
Easily cuts
through:
• Acoustic tile
• Acrylic
• Aluminum &
Vinyl Siding
• Cement Board
• Ceramic Wall Tile
• Drywall
• Fiberglass
• Foam Board
• Hardwood
• Lath
• Marble
• O.S.B.
• Plaster
• Plastic
• Plywood
• Solid Surface
Material
• Stucco
• Wood
• Wood Composites
• Slate
• Corian®
• Terra Cotta
• Plexiglas®
Coupe
facilement:
• Les carreaux
insonorisants
• L’acrylique
• Le bardage d’aluminium
et de vinyle
• Le panneau de
fibragglo-ciment
• Les carreaux muraux
en céramique
• La plaque de plâtre
• La fibre de verre
• Le panneau de
mousse
• Le bois franc
• Le lattis
• Le marbre
• Le PPO
• Le plâtre
• Le plastique
• Le contreplaqué
• Les matériaux de
recouvrement massifs
• Le stuc
• Le bois
• Les bois composites
• L’ardoise
• Le Corian®
• La terre cuite
• Le Plexiglas®
Corta con
facilidad a
través de:
• Loseta acústica
• Acrílico
• Paneles de aluminio
y vinilo
• Planchas de cemento
• Cerámica para muros
• Muros prefabricados
• Fibra de vidrio
• Planchas de material
alveolar
• Madera dura
• Hojalata
• Mármol
• O.S.B.
• Enlúcidos
• Plástico
• Madera contrachapada
• Material de superficie
sólida
• Estucco
• Madera
• Compuestos de madera
• Pizarra
• Corian®
• Terracota
• Plexiglas®
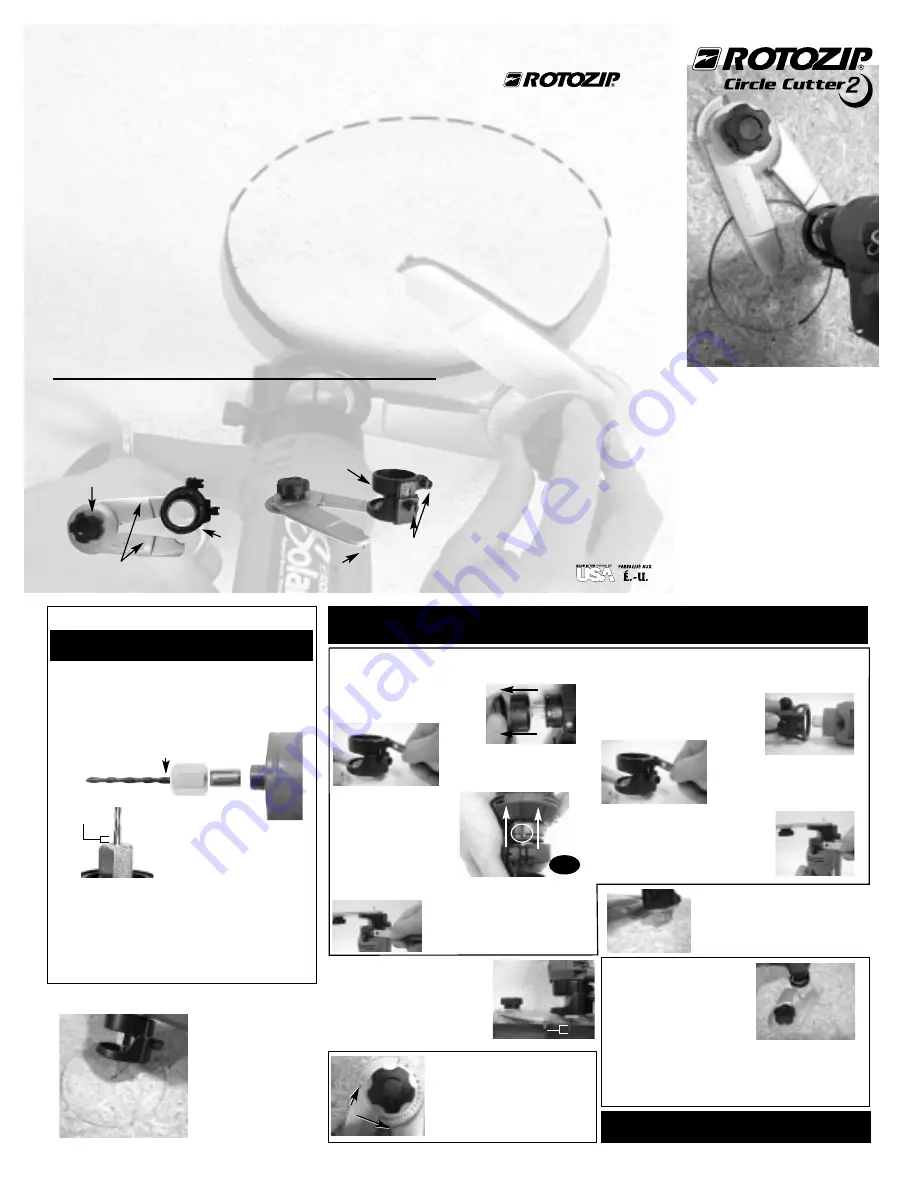
E. Pivot Point/Pivot/Pivote
Screws
Vis/Tornillos
Circle Cutter (CRCT2) Specifications
Fiche technique du coupe-cercle (CRCT2)
Step 2. Locate and make pilot holes.
• Mark the center of
your circle.
• Turn tool on.
• Plunge bit into the
material at a 45º angle
at the spot you want
your pilot hole. Slowly
bring tool to a 90º angle
to complete pilot hole.
• Remove from material
and turn tool off.
Warning! Prior to using the Roto Zip Spiral Saw, you are required to read and understand the Roto Zip Owner's
Manual for your particular model.
Step 3. Mount the Circle Cutter CRCT 2 to the Spiral Saw.
For models Rebel, RebelLE, Revolution and
Solaris.
• Remove base guide from saw.
• Loosen screw on CRCT 2
clamp.
• Push base guide down until flush
with saw housing. The pivot point
should be facing up.
• Position CRCT 2 to the desired angle.
• Tighten knob on clamp to secure
to saw.
A1
Especificaciones del Cortador de círculos (CRCT2)
Fits most Roto Zip Tool Corporation Spiral Saw
TM
Power
Tools (exceptions are Roto Zip models RM1 Type 1, and
the Ream Machine). Required for the Solaris model.
S’adapte à la plupart des scies mécaniques à spirale
MC
de
Roto Zip Tool Corporation (sauf les modèles Roto Zip
RM1 Type 1, Ream Machine). Obligatoire avec le
modèle Solaris.
Se adapta a la mayoría de herramientas Spiral Saw
TM
de
Roto Zip Tool Corporation (excepto los modelos RM1
Tipo 1, de la escriadora de Roto Zip). Necesario para el
modelo Solaris.
Step 4. Adjust base guide
to proper cutting depth.
• Loosen the base guide screw and
adjust the height of the base guide
so that the bit extends 1/8" more
than material being cut.
• Retighten screw.
notch
notch
1/8” more than
material being cut
Step 5. Adjust Circle
Cutter arms to hole size.
• Loosen knob to adjust arms.
• Set diameter of hole size by
lining up notch with desired
measurement on CRCT2 arm.
• Tighten knob.
Step 6. Line up pivot point
with pilot hole.
•
Line up pivot point with pilot hole
while keeping tool at a 45º angle to
the work surface.
Step 7. Make the cut.
•
Starting the cut.
Turn tool
on, insert bit into the material at
a 45º angle, plunge bit into the
work surface while at the same
time lining up and dropping the
pivot point into the pilot hole.
Bring the tool to a 90º angle. Hold the tool firmly with one
hand and hold the knob with the other.
•
Making the cut.
Begin the cut by applying moderate,
steady pressure in a clockwise direction and continue
cutting around to starting point.
CAUTION: Too much force will cause a heat build-up,
which can shorten bit life.
Mode d’emploi du
coupe-cercle 2
Cortador de
círculos 2
B. Circle Cutter Arms/Bras du coupe-cercle
Mangos del cortador de círculos
A. Knob/Bouton/Perilla
Side View/Vue latérale/Vista lateral
D. Clamp/Pince/Sujeción
C. Base Guide/Base
Guía de la base
Top View/Vue du haut/Vista superior
COLLET
NUT
COLLET
ZIP BIT
SHANK
Step 1. Insert a Zip® Bit into the saw.
Warning: The bit flutes are sharp and should be
handled with caution.
•
Loosen collet nut.
Push down on the shaft lock
button; at the same time use the wrench and turn
collet nut in a
counter-clockwise
direction until the
shaft lock button depresses. Continue to turn
collet nut in a
counter-clockwise
direction, loosening
the collet nut enough to insert a bit.
•
Insert bit.
Insert shank of bit into
the collet so that 1/8" of smooth
shank remains
visible above the collet.
•
Tighten collet nut.
Push down on the shaft lock
button; at the same time, use the wrench and turn
collet nut in a
clockwise
direction until the shaft lock
button depresses. Continue to turn collet nut in
clock-
wise
direction to tighten the collet nut and secure the
bit. (Never tighten collet nut without a bit inserted, as
this will damage collet and prevent future bit insertion.)
1/8” of smooth
shank showing


