background image

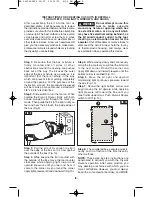
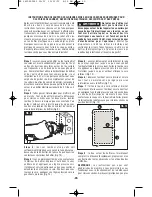
Step 1: Be certain that the box or fixture is

firmly mounted and all wires or other

obstructions around the opening are pushed

back out of the way. The bit uses the outer

edge of the box or fixture as a guide, so it is

important that there is nothing in the way

which can prevent it from guiding completely

around the opening. For the purposes of this

instruction manual, the procedure discussed

will be to make a cut-out around a standard 2

1/8" x 3 3/4" electrical box.
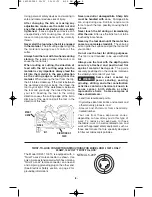
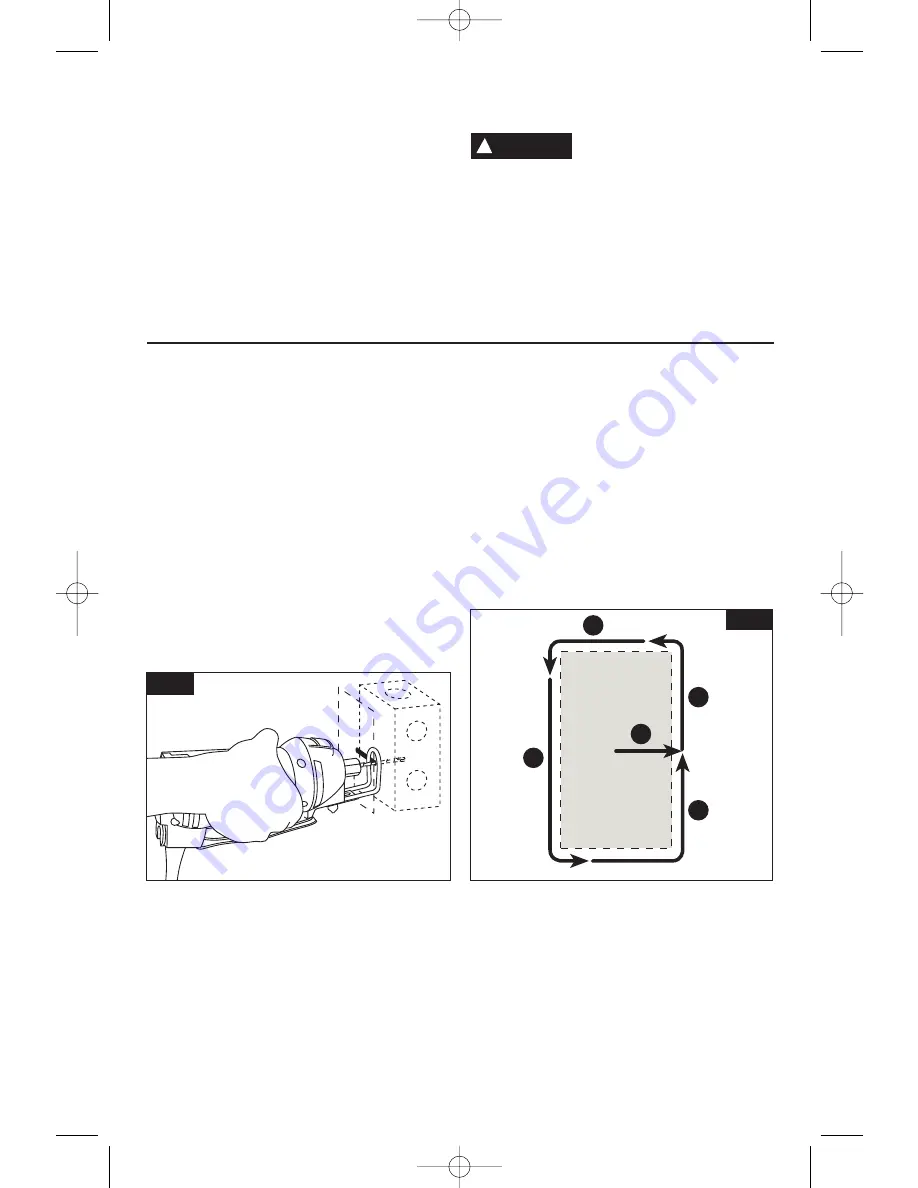
Step 2: Slide switch to turn the tool on. While

holding the Drywall Router firmly with both

hands, plunge the bit through the mark you

made. Then guide the bit to the right until you

feel and hear the bit touch the inside edge of

the box (Fig. 9).

Step 3: Pull the bit out far enough to slip it

over the edge of the box so it is now against

the outside of the box (Fig. 10).
Step 4: While keeping the bit in contact with

the outside of the box move the tool counter

clockwise while applying light inward and

upward pressure until you feel and hear it

come to the corner. As you round the corner

apply light pressure left and downward (Fig. 10).

Step 5: While moving slowly and continuously

along the top contour you will feel the bit come

to the next corner. Round the corner and

apply light down and inward pressure until the

bottom corner is reached (Fig. 10).
Step 6: Move the bit right and upward

maintaining light continuous pressure toward

the box (Fig. 10).
Step 7: Round the right bottom corner and

begin moving the bit upward while applying

light pressure left toward the box until you

meet initial upward cut. Push Drywall Router

switch to off (Fig. 10).

Step 8: The completed box, executed quickly,

neatly, and in a fraction of the time taken by

other methods. 
NOTE: These step-by-step instructions are

generalized to acquaint you with the Drywall

Router’s operation. After some practice, you

may develop a technique with which you are

more comfortable. However, you must always

begin the cut somewhat centrally, and MOVE

-9-

After assembling the bit into the tool as

described earlier, it will be necessary to review

the instructions provided below and make some

practice cut-outs with this tool before attempting

an actual job. The best method is to take some

scrap pieces and nail or screw them in place

over wall studs which have an electrical box or

other feature in place. A few such exercises will

give you the necessary practice to make clean,

professional cutouts around whatever is behind

the drywall you are installing.

Do not attempt to use this

tool to make cut-outs

around any fixture or opening which has

live electrical wires, or on any wall which

may have live electrical wiring behind it, as

the bit could conduct current to the tool,

creating an electrocution hazard for the

operator. Shut off breakers or remove fuses to

disconnect the circuit. Always hold the tool by

its thermoplastic housing, and always wear

eye protection when operating this device.

!

WARNING

INSTRUCTIONS FOR CREATING CUT-OUTS IN DRYWALL

FOR OUTLETS, CAN LIGHTS, WINDOWS, AND DOORS

3

4

5

6

7

FIG. 9

FIG. 10

RZ 2610955525 10-07  10/11/07  8:19 AM  Page 9

Summary of Contents for RotoZip DR1

Page 1: ...gnes de fonctionnement s curit Instrucciones de funcionamiento y seguridad 1 877 ROTOZIP 1 877 768 6947 www rotozip com Call Toll Free for Consumer Information Service Locations Pour obtenir des infor...

Page 2: ...nd footwear will further enhance your personal safety Personal safety Stay alert watch what you are doing and use common sense when operating a power tool Do not use a power tool while you are tired o...

Page 3: ...the risk of starting the power tool accidentally Store idle power tools out of the reach of children and do not allow persons unfamiliar with the power tool or these instructions to operate the power...

Page 4: ...ull the tool in the direction of this feed Never use dull or damaged bits Sharp bits must be handled with care Damaged bits can snap during use Dull bits require more force to push the tool possibly c...

Page 5: ...ng from 0 setting Arrow Action in the direction of arrow Alternating current Type or a characteristic of current Direct current Type or a characteristic of current Alternating or direct current Type o...

Page 6: ...ety measures reduce the risk of starting the tool accidentally WARNING NOTE For tool specifications refer to nameplate on your tool DEPTH GUIDE SHAFT LOCK INTAKE AIR VENTS BUMP SWITCH ON OF SUPPORT ST...

Page 7: ...e depth guide line up the slot in the depth guide with the threaded hole in the metal housing and re install the thumb screw by rotating it clockwise until tight Be careful not to cross thread the thu...

Page 8: ...e tool to twist WARNING Operating Instructions MAKE A FEW PRACTICE CUTS After installing the Bit into the tool and adjusting your depth guide you should make a few practice cuts with the tool before a...

Page 9: ...tom corner and begin moving the bit upward while applying light pressure left toward the box until you meet initial upward cut Push Drywall Router switch to off Fig 10 Step 8 The completed box execute...

Page 10: ...screw Using a screwdriver loosen the screw by rotating it counter clockwise Fig 1 Be careful not to lose the screw 3 Using your fingernail pry the brush door loose and remove it from the tool 4 In or...

Page 11: ...CORDS 120 VOLT ALTERNATING CURRENT TOOL Extension Cords Tool s Ampere Rating Cord Size in A W G Wire Sizes in mm2 3 6 6 8 8 10 10 12 12 16 18 16 16 14 0 75 0 75 1 5 2 5 18 16 14 12 0 75 1 0 2 5 4 0 18...

Page 12: ...Drywall Zip Bits 1 4 WD1 WD10 Window Door Zip Bit with Guidepoint available in 1 pack or 10 pack Do not use WD1 WD10 bits that measure 3 in length or have a tip like the one shown WARNING OK DO NOT US...

Page 13: ...outil pr vu pour le C A tomberont probablement en panne et risquent de cr er un danger pour l utilisateur S il est n cessaire d utiliser l outil dans un lieu humide il faut l alimenter par l interm di...

Page 14: ...ils lectroportatifs dont vous ne vous servez pas hors de port e des enfants et ne permettez pas des personnes qui ne connaissent pas l outil lectroportatif ou qui ignorent ces consignes de s en servir...

Page 15: ...per hors de la pi ce et de tirer l outil dans la direction de l avance N utilisez jamais d embouts mouss s ou ab m s Les embouts affil s doivent tre mani s soigneusement Les embouts ab m s peuvent se...

Page 16: ...vitesse augmente depuis le r glage 0 Fl che Action dans la direction de la fl che Courant alternatif Type ou caract ristique du courant Courant continu Type ou caract ristique du courant Courant alter...

Page 17: ...util REMARQUE Pour sp cifications de l outil reportez vous la plaque signal tique de votre outil AVERTISSEMENT FIG 1 D fonceuse pour cloisons s ches GUIDE DE PROFONDEUR BLOCAGE DE L ARBRE VENTS D ADMI...

Page 18: ...aux instructions de la rubrique consacr e l installation des embouts Fig 4 18 D branchez la fiche de la prise de courant avant d effectuer quelque assemblage ou r glage que ce soit ou de changer les...

Page 19: ...TIL EN MARCHE faites glisser l interrupteur vers le haut c d dans la position 1 POUR ARR TER L OUTIL faites glisser l interrupteur vers le bas c d dans la position 0 Tenez l outil des deux mains duran...

Page 20: ...7 faites le tour du coin inf rieur droit et commencez faire avancer l embout vers le haut tout en appliquant une l g re pression vers la gauche dans le sens du bo tier jusqu au moment o vous ferez co...

Page 21: ...mmages permanents au moteur si vous continuez utiliser l outil dans un tel tat Ne tentez pas de faire fonctionner l outil si les portes du compartiment des balais sont cass es manquantes ou desserr es...

Page 22: ...it nominale de l outil Longueur en pieds Longueur en m tres 3 6 6 8 8 10 10 12 12 16 18 16 16 14 0 75 0 75 1 5 2 5 18 16 14 12 0 75 1 0 2 5 4 0 18 16 14 12 0 75 1 0 2 5 4 0 16 16 14 12 1 0 2 5 4 0 14...

Page 23: ...s Window Door Zip WD1 WD10 avec Guidepoint disponibles en paquets d un embout ou de 10 embouts N utilisez pas d embouts WD1 WD10 mesurant 3 pouces de long ou ayant une pointe telle que celle qui est i...

Page 24: ...intemperie reduce el riesgo de que se produzcan sacudidas el ctricas No use herramientas mec nicas con capacidad nominal solamente para CA con una fuente de energ a de CC Aunque pueda parecer que la h...

Page 25: ...la herramienta mec nica Guarde las herramientas que no est usando fuera del alcance de los ni os y no deje que personas que no est n familiarizadas con la herramienta mec nica o con estas instruccione...

Page 26: ...rrecto se hace que el borde de corte de la broca trepe se salga de la pieza de trabajo y tire de la herramienta en el sentido de este avance Nunca use brocas desafiladas o da adas Las brocas afiladas...

Page 27: ...aci n de 0 Flecha Acci n en la direcci n de la flecha Corriente alterna Tipo o una caracter stica de corriente Corriente continua Tipo o una caracter stica de corriente Corriente alterna o continua Ti...

Page 28: ...s de la herramienta consulte la placa del fabricante colocada en la herramienta ADVERTENCIA FIG 1 Rebajadora para panel de yeso GU A DE PROFUNDIDAD CIERRE DEL EJE REJILLAS DE ENTRADA AIRE INTERRUPTOR...

Page 29: ...y se deben manejar con precauci n El portaherramienta de 1 8 0 125 se usa con brocas de 1 8 0 125 de di metro el portaherramienta de 1 4 0 250 se usa con brocas de 1 4 0 250 de di metro y el portaherr...

Page 30: ...el material a un ngulo de 45 Fig 7 Paso 4 Lleve la herramienta lentamente hasta un ngulo de 90 para comenzar el corte La gu a de profundidad debe estar al ras con la superficie del material Fig 8 Pas...

Page 31: ...Paso 7 Rodee la esquina inferior derecha y comience a mover la broca hacia arriba al mismo tiempo que aplica una presi n ligera hacia la izquierda hacia la caja hasta que se encuentre con el corte in...

Page 32: ...da ar permanentemente el motor No intente utilizar la herramienta si las puertas de las escobillas est n rotas faltan o est n flojas Si las puertas de las escobillas o los tornillos de las puertas de...

Page 33: ...extensi n Capacidad nominal en amperes de la herramienta Tama o del cord n en A W G Tama os del cable en mm2 3 6 6 8 8 10 10 12 12 16 18 16 16 14 0 75 0 75 1 5 2 5 18 16 14 12 0 75 1 0 2 5 4 0 18 16 1...

Page 34: ...Zip para ventanas y puertas WD1 WD10 con punta de gu a Guidepoint disponible en paquete de 1 en paquete de 10 No utilice brocas WD1 WD10 que midan 3 76 mm de longitud o tengan una punta como la que s...

Page 35: ...35 Notes Remarques Notas RZ 2610955525 10 07 10 11 07 8 19 AM Page 35...

Page 36: ...CAS LE VENDEUR NE SAURAIT TRE TENU POUR RESPONSABLE DES INCIDENTS OU DOMMAGES INDIRECTS INCLUANT MAIS NE SE LIMITANT PAS AUX PERTES DE PROFITS CONS CUTIFS LA VENTE OU L USAGE DE CE PRODUIT CERTAINS T...

Reviews: